Brother International CB3-B917 Service Manual - Page 32
Cover, B917A, B916A
 |
View all Brother International CB3-B917 manuals
Add to My Manuals
Save this manual to your list of manuals |
Page 32 highlights
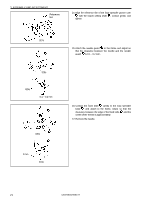
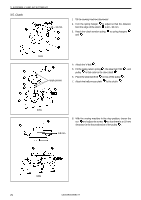
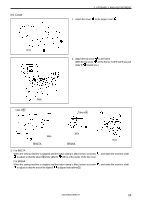
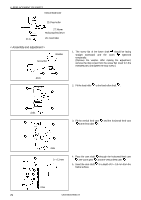
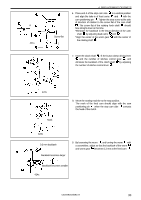
3-6. Cover 347s 3. ASSEMBLY AND ADJUSTMENT 1. Attach the cover to the looper cover . 2. Attach the top cover to the frame. (With the top cover on the frame, it will fit well if you pull slider B toward you.) Take-in B 348s Take-in A 349s 350s 351s B917A B916A 3. For B917A When the sewing machine is stopped and the button clamp is lifted, loosen set screw to adjust so that the take-in B of the slider B will be at the center of the top cover. For B916A When the sewing machine is stopped and the button clamp is lifted, loosen set screw to adjust so that the end of the slider B is aligned with take-in A. , and rotate the eccentric shaft , and rotate the eccentric shaft CB3-B916A/B917A 26
-
 1
1 -
2
-
3
-
4
-
5
-
6
-
7
-
8
-
9
-
10
-
11
-
12
-
13
-
14
-
15
-
16
-
17
-
18
-
19
-
20
-
21
-
22
-
23
-
24
-
25
-
26
-
 27
27 -
 28
28 -
 29
29 -
 30
30 -
 31
31 -
 32
32 -
 33
33 -
 34
34 -
 35
35 -
 36
36 -
 37
37 -
38
-
39
-
40
-
41
-
42
-
43
-
44
-
45
-
46
-
47
-
48
-
49
-
50
-
51
-
52
-
53
-
54
-
55
-
56
 |
 |

3. ASSEMBLY AND ADJUSTMENT
CB3-B916A/B917A
26
3-6. Cover
3. For B917A
When the sewing machine is stopped and the button clamp is lifted, loosen set screw
, and rotate the eccentric shaft
to adjust so that the take-in B of the slider B
will be at the center of the top cover.
For B916A
When the sewing machine is stopped and the button clamp is lifted, loosen set screw
, and rotate the eccentric shaft
to adjust so that the end of the slider B
is aligned with take-in A.
1.
Attach the cover
to the looper cover
.
347s
348s
2. Attach the top cover
to the frame.
(With the top cover
on the frame, it will fit well if you pull
slider B
toward you.)
B917A
B916A
351s
Take-in B
349s
350s
Take-in A