Brother International CB3-B917 Service Manual - Page 55
CB3-B916A/B917A, Button clamp lift, stroke is too small., Thread is not cut.
 |
View all Brother International CB3-B917 manuals
Add to My Manuals
Save this manual to your list of manuals |
Page 55 highlights
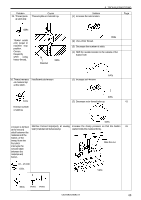
6. TROUBLESHOOTING Problem 17. Clutch does not engage. (Machine stops before the stop position.) • Button clamp lift stroke is too small. • Thread is not cut. 18. Machine makes abnormally loud sound when stopping. 19. Button clamp does not rise. Cause Motor is not turning fast enough for the needle bar to advance to the stop position (standard motor speed is 1500 rpm). Brake is too tight. Motor is turning too fast and does not decelerate properly. (This occurs when the N75 pulley is used with a 60 Hz power supply.) Brake is weak. The button clamp driving fork to operating lever pawl end gap is too large. Driving lever pawl is worn and teeth do not mesh properly. Driving lever pawl does not mesh at top dead center of the button clamp driving fork stroke. Solution Use a standard pulley. 50Hz-----N75 pulley 60Hz-----N65 pulley Brake is too loose. Use a standard pulley. 50Hz-----N75 pulley 60Hz-----N65 pulley Increase the brake tension. Adjust the gap to 0.5 to 1 mm. Replace the driving lever pawl. Screw the set screw in so there is 0.6 mm gap at the driving lever pawl. (The end of slider B should be aligned with take-in C on the top cover at this time.) Take-in C Page 39 39 36 37 504s Slider B 20. Button does The button opener does not open (1) Set a button in the button clamp and adjust the not drop at the sufficiently for the current button size. stop position. diameter. (2) Set a button in the button clamp and remove (B917A) any play with the size adjustment plate. Improper button opener claw B (1) Adjust the timing of button opener claw B. 40 adjustment. (2) Adjust the gap between button opener claw B 40 and the button opener rod to 0 - 1 mm. 21. Button pops Button clamp is not adjusted to the Replace the button clamp. 39 out of the current button size. Use button clamp set A (S03701-001) for small button clamp buttons (10 - 20 mm dia.). (factory equipment) at the sewing Use button clamp set B (S03633-001) for large start. buttons (10 - 30 mm dia.). 22. Needle breaks Feed adjustment lever improperly Set the vertical feed adjustment lever to the positioned. buttons in use. Refer to item "21." above. Needle location is improperly adjusted (1) Adjust the needle location to the button hole for the button hole. gaps with the vertical feed adjustment lever and horizontal feed adjustment nut. (2) Adjust the button clamp installation position. (3) Adjust the feed plate installation position. 23 Use feed plate A (S03476-101) (factory equipment) a = 4.8, b = 4.8, h = 1 for small buttons. Use feed plate B (S03630-101) a = 4.8, b = 4.8, h = 0 for concave buttons. Use feed plate C (115085-001) a = 7, b = 7, h = 0 for large buttons. h a b 645s (4) Adjust the forward and reverse feed. 38 (5) Adjust feed cam play to approx. 0.3 mm . 37 (Adjust with the worm and worm gear backlash.) 49 CB3-B916A/B917A
-
 1
1 -
2
-
3
-
4
-
5
-
6
-
7
-
8
-
9
-
10
-
11
-
12
-
13
-
14
-
15
-
16
-
17
-
18
-
19
-
20
-
21
-
22
-
23
-
24
-
25
-
26
-
27
-
28
-
29
-
30
-
31
-
32
-
33
-
34
-
35
-
36
-
37
-
38
-
39
-
40
-
41
-
42
-
43
-
44
-
45
-
46
-
47
-
48
-
49
-
 50
50 -
 51
51 -
 52
52 -
 53
53 -
 54
54 -
 55
55 -
 56
56
 |
 |