Brother International DCP 7020 Users Manual - English - Page 25
Getting started, Initial Setup, Setting the Paper Type - paper tray
 |
UPC - 012502612834
View all Brother International DCP 7020 manuals
Add to My Manuals
Save this manual to your list of manuals |
Page 25 highlights
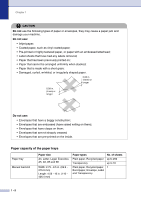
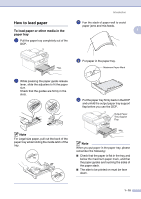
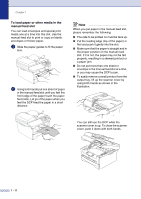
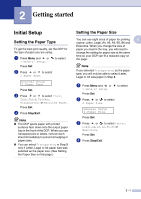
2 Getting started Initial Setup Setting the Paper Type To get the best print quality, set the DCP for the type of paper you are using. 1 Press Menu and or 1.General Setup. to select Press Set. 2 Press or to select 1.Paper Type. General Setup 1.Paper Type Press Set. 3 Press or to select Plain, Thin, Thick, Thicker, Transparency or Recycled Paper. Press Set. 4 Press Stop/Exit. Note ■ The DCP ejects paper with printed surfaces face down onto the output paper tray in the front of the DCP. When you use transparencies or labels, remove each sheet immediately to prevent smudging or paper jams. ■ You can select Transparency in Step 3 only if Letter, Legal or A4 paper size was selected as the paper size. (See Setting the Paper Size on this page.) Setting the Paper Size You can use eight sizes of paper for printing 2 copies: Letter, Legal, A4, A5, A6, B5, B6 and Executive. When you change the size of paper you load in the tray, you will need to change the setting for paper size at the same time so your DCP can fit a reduced copy on the page. Note If you selected Transparency as the paper type, you will only be able to select Letter, Legal or A4 size paper in Step 3. 1 Press Menu and or 1.General Setup. to select Press Set. 2 Press or to select 2.Paper Size. General Setup 2.Paper Size Press Set. 3 Press or to select Letter, Legal, A4, A5, A6, B5, B6 or Executive. Press Set. 4 Press Stop/Exit. 2 - 1
-
 1
1 -
2
-
3
-
4
-
5
-
6
-
7
-
8
-
9
-
10
-
11
-
12
-
13
-
14
-
15
-
16
-
17
-
18
-
19
-
 20
20 -
 21
21 -
 22
22 -
 23
23 -
 24
24 -
 25
25 -
 26
26 -
 27
27 -
 28
28 -
 29
29 -
 30
30 -
31
-
32
-
33
-
34
-
35
-
36
-
37
-
38
-
39
-
40
-
41
-
42
-
43
-
44
-
45
-
46
-
47
-
48
-
49
-
50
-
51
-
52
-
53
-
54
-
55
-
56
-
57
-
58
-
59
-
60
-
61
-
62
-
63
-
64
-
65
-
66
-
67
-
68
-
69
-
70
-
71
-
72
-
73
-
74
-
75
-
76
-
77
-
78
-
79
 |
 |