Brother International Innov-is 4500D Operation Manual - Page 155
Embroidery
 |
View all Brother International Innov-is 4500D manuals
Add to My Manuals
Save this manual to your list of manuals |
Page 155 highlights
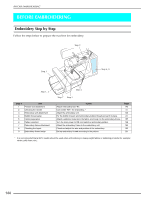
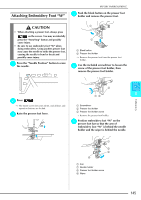
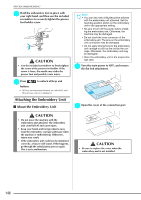
5 Chapter Embroidery BEFORE EMBROIDERING 144 Embroidery Step by Step 144 Attaching Embroidery Foot "W 145 Attaching the Embroidery Unit 146 I About the Embroidery Unit 146 I Removing the Embroidery Unit 147 SELECTING PATTERNS 149 I Copyright Information 149 I Pattern Selection Screens 150 Selecting Embroidery Patterns/Heirloom Patterns/Border Patterns/Cross stitch Patterns/Floral alphabet Patterns .. 151 Selecting Alphabet Character Patterns 152 Selecting Frame Patterns 153 Selecting Patterns from Embroidery Cards 154 I About Embroidery Cards (Sold Separately 154 Selecting Patterns from USB media/Computer 154 VIEWING THE SEWING SCREEN 155 I Key Functions 156 PREPARING THE FABRIC 157 Attaching Iron-on Stabilizers (backing) to the Fabric...... 157 Hooping the Fabric in the Embroidery Frame 158 I Types of Embroidery Frames 158 I Inserting the Fabric 159 I Using the Embroidery Sheet 160 Embroidering Small Fabrics or Fabric Edges 160 I Embroidering Small Fabrics 160 I Embroidering Edges or Corners 160 I Embroidering Ribbons or Tape 161 ATTACHING THE EMBROIDERY FRAME .....162 I Removing the Embroidery Frame 162 CONFIRMING THE PATTERN POSITION ....163 Checking the Pattern Position 163 Previewing the Completed Pattern 164 SEWING AN EMBROIDERY PATTERN .........165 Sewing Attractive Finishes 165 I Embroidery Needle Plate Cover 165 Sewing Embroidery Patterns 166 I When Threading Manually 167 Sewing Embroidery Patterns Which Use Appliqu 168 ADJUSTMENTS DURING THE EMBROIDERY PROCESS 170 If the Bobbin Runs Out of Thread 170 If the Thread Breaks During Sewing 171 Restarting from the Beginning 172 Resuming Embroidery After Turning Off the Power........ 172 MAKING EMBROIDERY ADJUSTMENTS ..... 174 Adjusting Thread Tension 174 I Correct Thread Tension 174 I Upper Thread is Too Tight 174 I Upper Thread is Too Loose 174 Using the Automatic Thread Cutting Function (END COLOR TRIM 175 Using the Thread Trimming Function (JUMP STITCH TRIM 175 I Selecting the length of JUMP STITCH not to trim 176 Adjusting the Embroidery Speed 176 Changing the Thread Color Display 177 Changing the Embroidery Frame Display 178 REVISING THE PATTERN 179 Changing the Pattern Position 179 Aligning the Pattern and the Needle 180 Changing the Size 181 Rotating the Pattern 182 Creating a Horizontal Mirror Image 183 Changing the Density (Alphabet Character and Frame Patterns Only 183 Changing the Colors of Alphabet Character Patterns ......184 USING THE MEMORY FUNCTION 185 Embroidery Data Precautions 185 I Types of Embroidery Data that can be Used 185 I Types of USB Devices/Media that can be Used 185 I Computers and Operating Systems with the Following Specifications can be Used 186 I Precautions on Using the Computer to Create and Save Data..........186 I Tajima (.dst) Embroidery Data 186 I Trademarks 186 Saving Embroidery Patterns in the Machine's Memory....187 I If the Memory is Full 187 Saving Embroidery Patterns to USB Media (Commercially Available 189 Saving Embroidery Patterns in the Computer 190 Retrieving Patterns from the Machine's Memory 191 Recalling from USB Media 191 Recalling from the Computer 192 EMBROIDERY APPLICATIONS 194 Using a Frame Pattern to Make an Appliqué (1 194 Using a Frame Pattern to Make an Appliqué (2 195
-
 1
1 -
2
-
3
-
4
-
5
-
6
-
7
-
8
-
9
-
10
-
11
-
12
-
13
-
14
-
15
-
16
-
17
-
18
-
19
-
20
-
21
-
22
-
23
-
24
-
25
-
26
-
27
-
28
-
29
-
30
-
31
-
32
-
33
-
34
-
35
-
36
-
37
-
38
-
39
-
40
-
41
-
42
-
43
-
44
-
45
-
46
-
47
-
48
-
49
-
50
-
51
-
52
-
53
-
54
-
55
-
56
-
57
-
58
-
59
-
60
-
61
-
62
-
63
-
64
-
65
-
66
-
67
-
68
-
69
-
70
-
71
-
72
-
73
-
74
-
75
-
76
-
77
-
78
-
79
-
80
-
81
-
82
-
83
-
84
-
85
-
86
-
87
-
88
-
89
-
90
-
91
-
92
-
93
-
94
-
95
-
96
-
97
-
98
-
99
-
100
-
101
-
102
-
103
-
104
-
105
-
106
-
107
-
108
-
109
-
110
-
111
-
112
-
113
-
114
-
115
-
116
-
117
-
118
-
119
-
120
-
121
-
122
-
123
-
124
-
125
-
126
-
127
-
128
-
129
-
130
-
131
-
132
-
133
-
134
-
135
-
136
-
137
-
138
-
139
-
140
-
141
-
142
-
143
-
144
-
145
-
146
-
147
-
148
-
149
-
 150
150 -
 151
151 -
 152
152 -
 153
153 -
 154
154 -
 155
155 -
 156
156 -
 157
157 -
 158
158 -
 159
159 -
 160
160 -
161
-
162
-
163
-
164
-
165
-
166
-
167
-
168
-
169
-
170
-
171
-
172
-
173
-
174
-
175
-
176
-
177
-
178
-
179
-
180
-
181
-
182
-
183
-
184
-
185
-
186
-
187
-
188
-
189
-
190
-
191
-
192
-
193
-
194
-
195
-
196
-
197
-
198
-
199
-
200
-
201
-
202
-
203
-
204
-
205
-
206
-
207
-
208
-
209
-
210
-
211
-
212
-
213
-
214
-
215
-
216
-
217
-
218
-
219
-
220
-
221
-
222
-
223
-
224
-
225
-
226
-
227
-
228
-
229
-
230
-
231
-
232
-
233
-
234
-
235
-
236
-
237
-
238
-
239
-
240
-
241
-
242
-
243
-
244
-
245
-
246
-
247
-
248
-
249
-
250
-
251
-
252
-
253
-
254
-
255
-
256
-
257
-
258
-
259
-
260
-
261
-
262
-
263
-
264
-
265
-
266
-
267
-
268
-
269
-
270
-
271
-
272
-
273
-
274
-
275
-
276
 |
 |
