Brother International MFC 795CW Software Users Manual - English - Page 42
TWAIN: TW-Brother MFC-XXXX LAN, Scan or Get Photo
 |
UPC - 012502623311
View all Brother International MFC 795CW manuals
Add to My Manuals
Save this manual to your list of manuals |
Page 42 highlights
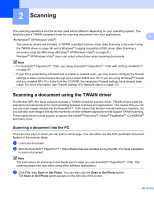
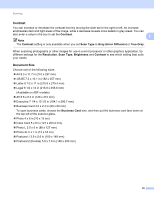
Scanning d Click the Select button. e Choose TWAIN: TW-Brother MFC-XXXX or TWAIN: TW-Brother MFC-XXXX LAN from the Available Scanners list. (Where XXXX is your model name.) 2 f Check the Display scanner dialog box on the Scan or Get Photo panel. g Click Scan. The Scanner Setup dialog box appears: h Adjust the following settings, if needed, in the Scanner Setup dialog box: „ Scan (Image Type) (1) „ Resolution (2) „ Scan Type (3) „ Reduce Noise (4) „ Brightness (5) „ Contrast (6) „ Document Size (7) 7 i Click Start. When scanning is finished, click Cancel to return to the PaperPort™ 11SE window. Note After you select a document size, you can adjust the scanning area further by clicking the left mouse button and dragging it. This is required when you want to crop an image when scanning. 35
-
 1
1 -
2
-
3
-
4
-
5
-
6
-
7
-
8
-
9
-
10
-
11
-
12
-
13
-
14
-
15
-
16
-
17
-
18
-
19
-
20
-
21
-
22
-
23
-
24
-
25
-
26
-
27
-
28
-
29
-
30
-
31
-
32
-
33
-
34
-
35
-
36
-
 37
37 -
 38
38 -
 39
39 -
 40
40 -
 41
41 -
 42
42 -
 43
43 -
 44
44 -
 45
45 -
 46
46 -
 47
47 -
48
-
49
-
50
-
51
-
52
-
53
-
54
-
55
-
56
-
57
-
58
-
59
-
60
-
61
-
62
-
63
-
64
-
65
-
66
-
67
-
68
-
69
-
70
-
71
-
72
-
73
-
74
-
75
-
76
-
77
-
78
-
79
-
80
-
81
-
82
-
83
-
84
-
85
-
86
-
87
-
88
-
89
-
90
-
91
-
92
-
93
-
94
-
95
-
96
-
97
-
98
-
99
-
100
-
101
-
102
-
103
-
104
-
105
-
106
-
107
-
108
-
109
-
110
-
111
-
112
-
113
-
114
-
115
-
116
-
117
-
118
-
119
-
120
-
121
-
122
-
123
-
124
-
125
-
126
-
127
-
128
-
129
-
130
-
131
-
132
-
133
-
134
-
135
-
136
-
137
-
138
-
139
-
140
-
141
-
142
-
143
-
144
-
145
-
146
-
147
-
148
-
149
-
150
-
151
-
152
-
153
-
154
-
155
-
156
-
157
-
158
-
159
-
160
-
161
-
162
-
163
-
164
-
165
-
166
-
167
-
168
-
169
-
170
-
171
-
172
-
173
-
174
-
175
-
176
-
177
-
178
-
179
-
180
-
181
-
182
-
183
-
184
-
185
-
186
-
187
-
188
-
189
-
190
-
191
-
192
-
193
-
194
-
195
-
196
-
197
-
198
 |
 |
