Canon PIXMA iP4500 iP4500 series Quick Start Guide - Page 18
Loading Paper in the Cassette
 |
View all Canon PIXMA iP4500 manuals
Add to My Manuals
Save this manual to your list of manuals |
Page 18 highlights
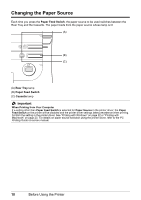
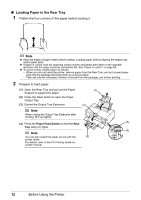
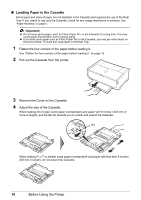
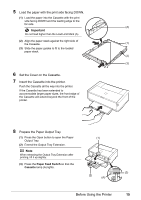
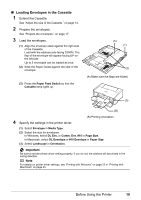
„ Loading Paper in the Cassette Some types and sizes of paper are not loadable in the Cassette and requires the use of the Rear Tray. If you intend to use only the Cassette, check for any usage restrictions in advance. See "Paper Handling" on page 5. Important z Do not leave photo paper, such as Photo Paper Pro, in the Cassette for a long time. This may cause paper discoloration due to natural aging. z If you load photo paper such as Photo Paper Pro in the Cassette, you may get roller traces on the print surface. To avoid this, load paper in the Rear Tray. 1 Flatten the four corners of the paper before loading it. See "Flatten the four corners of the paper before loading it." on page 12. 2 Pull out the Cassette from the printer. 3 Remove the Cover on the Cassette. 4 Adjust the size of the Cassette. When loading A5 or larger sized paper (nonstandard-size paper with 8 inches / 203 mm or more in length), pull the tab (A) towards you to unlock and extend the Cassette. (A) When loading 5" x 7" or smaller sized paper (nonstandard-size paper with less than 8 inches / 203 mm in length), do not extend the Cassette. 14 Before Using the Printer
-
 1
1 -
2
-
3
-
4
-
5
-
6
-
7
-
8
-
9
-
10
-
11
-
12
-
 13
13 -
 14
14 -
 15
15 -
 16
16 -
 17
17 -
 18
18 -
 19
19 -
 20
20 -
 21
21 -
 22
22 -
 23
23 -
24
-
25
-
26
-
27
-
28
-
29
-
30
-
31
-
32
-
33
-
34
-
35
-
36
-
37
-
38
-
39
-
40
-
41
-
42
-
43
-
44
-
45
-
46
-
47
-
48
-
49
-
50
-
51
-
52
-
53
-
54
-
55
-
56
-
57
-
58
-
59
-
60
-
61
-
62
-
63
-
64
-
65
-
66
-
67
-
68
-
69
-
70
-
71
-
72
-
73
-
74
-
75
-
76
-
77
-
78
-
79
-
80
-
81
-
82
-
83
-
84
-
85
-
86
-
87
-
88
-
89
-
90
-
91
-
92
-
93
-
94
-
95
-
96
-
97
-
98
-
99
-
100
-
101
-
102
 |
 |
