Canon PIXMA iP4500 iP4500 series Quick Start Guide - Page 39
Printing the Nozzle Check Pattern - resume button
 |
View all Canon PIXMA iP4500 manuals
Add to My Manuals
Save this manual to your list of manuals |
Page 39 highlights
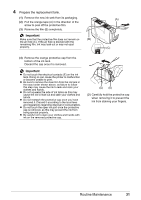
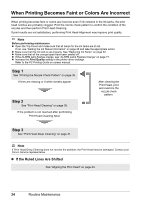
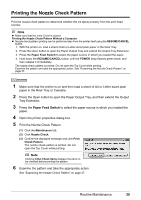
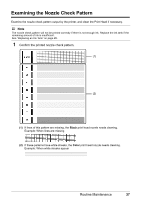
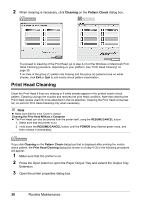
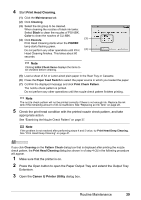
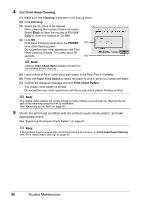
Printing the Nozzle Check Pattern Print the nozzle check pattern to determine whether the ink ejects properly from the print head nozzles. Note z Make sure that the Inner Cover is closed. Printing the Nozzle Check Pattern Without a Computer z Nozzle check pattern printing can be performed also from the printer itself using the RESUME/CANCEL button. 1. With the printer on, load a sheet of A4 or Letter-sized plain paper in the Rear Tray. 2. Press the Open button to open the Paper Output Tray and extend the Output Tray Extension. 3. Press the Paper Feed Switch to select the paper source in which you loaded the paper. 4. Hold down the RESUME/CANCEL button until the POWER lamp flashes green twice, and then release it immediately. The nozzle check pattern is printed. Do not open the Top Cover while printing. Examine the pattern and take the appropriate action. See "Examining the Nozzle Check Pattern" on page 37. 1 Make sure that the printer is on and then load a sheet of A4 or Letter-sized plain paper in the Rear Tray or Cassette. 2 Press the Open button to open the Paper Output Tray, and then extend the Output Tray Extension. 3 Press the Paper Feed Switch to select the paper source in which you loaded the paper. 4 Open the printer properties dialog box. 5 Print the Nozzle Check Pattern. (1) Click the Maintenance tab. (2) Click Nozzle Check. (3) Confirm the displayed message and click Print Check Pattern. The nozzle check pattern is printed. Do not open the Top Cover while printing. Note Clicking Initial Check Items displays the items to be checked before printing the pattern. 6 Examine the pattern and take the appropriate action. See "Examining the Nozzle Check Pattern" on page 37. Routine Maintenance 35
-
 1
1 -
2
-
3
-
4
-
5
-
6
-
7
-
8
-
9
-
10
-
11
-
12
-
13
-
14
-
15
-
16
-
17
-
18
-
19
-
20
-
21
-
22
-
23
-
24
-
25
-
26
-
27
-
28
-
29
-
30
-
31
-
32
-
33
-
 34
34 -
 35
35 -
 36
36 -
 37
37 -
 38
38 -
 39
39 -
 40
40 -
 41
41 -
 42
42 -
 43
43 -
 44
44 -
45
-
46
-
47
-
48
-
49
-
50
-
51
-
52
-
53
-
54
-
55
-
56
-
57
-
58
-
59
-
60
-
61
-
62
-
63
-
64
-
65
-
66
-
67
-
68
-
69
-
70
-
71
-
72
-
73
-
74
-
75
-
76
-
77
-
78
-
79
-
80
-
81
-
82
-
83
-
84
-
85
-
86
-
87
-
88
-
89
-
90
-
91
-
92
-
93
-
94
-
95
-
96
-
97
-
98
-
99
-
100
-
101
-
102
 |
 |