Canon PIXMA iP4500 iP4500 series Quick Start Guide - Page 51
Manual Print Head Alignment, Paper Feed Switch, Important
 |
View all Canon PIXMA iP4500 manuals
Add to My Manuals
Save this manual to your list of manuals |
Page 51 highlights
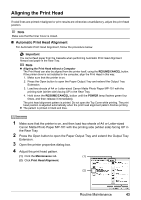
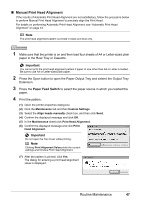
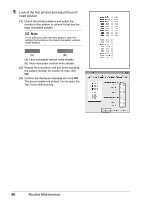
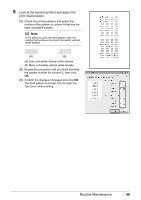
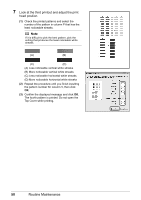
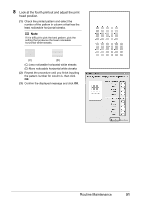
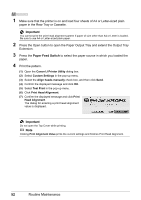
„ Manual Print Head Alignment If the results of Automatic Print Head Alignment are not satisfactory, follow the procedure below to perform Manual Print Head Alignment to precisely align the Print Head. For details on performing Automatic Print Head Alignment, see "Automatic Print Head Alignment" on page 43. Note The print head alignment pattern is printed in black and blue only. 1 Make sure that the printer is on and then load four sheets of A4 or Letter-sized plain paper in the Rear Tray or Cassette. Important You cannot print the print head alignment pattern if paper of size other than A4 or Letter is loaded. Be sure to use A4 or Letter-sized plain paper. 2 Press the Open button to open the Paper Output Tray and extend the Output Tray Extension. 3 Press the Paper Feed Switch to select the paper source in which you loaded the paper. 4 Print the pattern. (1) Open the printer properties dialog box. (2) Click the Maintenance tab and then Custom Settings. (3) Select the Align heads manually check box, and then click Send. (4) Confirm the displayed message and click OK. (5) In the Maintenance sheet click Print Head Alignment. (6) Confirm the displayed message and click Print Head Alignment. Important Do not open the Top Cover while printing. Note Clicking Print Alignment Value prints the current settings and finishes Print Head Alignment. (7) After the pattern is printed, click Yes. The dialog for entering a print head alignment value is displayed. Routine Maintenance 47
-
 1
1 -
2
-
3
-
4
-
5
-
6
-
7
-
8
-
9
-
10
-
11
-
12
-
13
-
14
-
15
-
16
-
17
-
18
-
19
-
20
-
21
-
22
-
23
-
24
-
25
-
26
-
27
-
28
-
29
-
30
-
31
-
32
-
33
-
34
-
35
-
36
-
37
-
38
-
39
-
40
-
41
-
42
-
43
-
44
-
45
-
 46
46 -
 47
47 -
 48
48 -
 49
49 -
 50
50 -
 51
51 -
 52
52 -
 53
53 -
 54
54 -
 55
55 -
 56
56 -
57
-
58
-
59
-
60
-
61
-
62
-
63
-
64
-
65
-
66
-
67
-
68
-
69
-
70
-
71
-
72
-
73
-
74
-
75
-
76
-
77
-
78
-
79
-
80
-
81
-
82
-
83
-
84
-
85
-
86
-
87
-
88
-
89
-
90
-
91
-
92
-
93
-
94
-
95
-
96
-
97
-
98
-
99
-
100
-
101
-
102
 |
 |