Canon iP100 Quick Start Guide - Page 32
Print Head Cleaning, Cleaning, Pattern Check, Maintenance, Execute, Power, RESUME/CANCEL
 |
UPC - 013803067316
View all Canon iP100 manuals
Add to My Manuals
Save this manual to your list of manuals |
Page 32 highlights
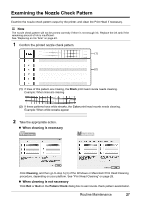
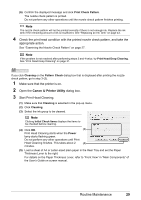
Print Head Cleaning Clean the Print Head if lines are missing or if white streaks appear in the printed nozzle check pattern. Cleaning unclogs the nozzles and restores the print head condition. Note that cleaning the Print Head causes used ink to be absorbed in the ink absorber. Cleaning the Print Head consumes ink, so perform Print Head Cleaning only when necessary. Note Cleaning the Print Head Without a Computer The Print Head cleaning can also be performed without a computer, using the RESUME/CANCEL button. 1. Make sure that the printer is on. 2. Hold down the RESUME/CANCEL button until the Power lamp flashes green once, and then release it immediately. If you click Cleaning on the Pattern Check dialog box that is displayed after printing the nozzle check pattern, go to step 3-(3). 1 Make sure that the printer is on. 2 Open the printer properties dialog box. 3 Start Print Head Cleaning. (1) Click the Maintenance tab. (2) Click Cleaning. (3) Select the ink group to be cleaned. Note Clicking Initial Check Items displays the items to be checked before cleaning. (3) (4) Click Execute. Print Head Cleaning starts when the Power (4) lamp starts flashing green. Do not perform any other operations until Print Head Cleaning finishes. This takes about 2 minutes. (5) Load a sheet of A4 or Letter-sized plain paper in the Rear Tray and set the Paper Thickness Lever to the right. For details on the Paper Thickness Lever, refer to "Front View" in "Main Components" of the User's Guide on-screen manual. 28 Routine Maintenance
-
 1
1 -
2
-
3
-
4
-
5
-
6
-
7
-
8
-
9
-
10
-
11
-
12
-
13
-
14
-
15
-
16
-
17
-
18
-
19
-
20
-
21
-
22
-
23
-
24
-
25
-
26
-
 27
27 -
 28
28 -
 29
29 -
 30
30 -
 31
31 -
 32
32 -
 33
33 -
 34
34 -
 35
35 -
 36
36 -
 37
37 -
38
-
39
-
40
-
41
-
42
-
43
-
44
-
45
-
46
-
47
-
48
-
49
-
50
-
51
-
52
-
53
-
54
-
55
-
56
-
57
-
58
-
59
-
60
-
61
-
62
-
63
-
64
-
65
-
66
-
67
-
68
-
69
-
70
-
71
-
72
-
73
-
74
-
75
-
76
-
77
-
78
-
79
-
80
-
81
-
82
-
83
-
84
-
85
-
86
-
87
-
88
-
89
-
90
-
91
-
92
 |
 |
