Canon iP100 Quick Start Guide - Page 44
Align Print Head
 |
UPC - 013803067316
View all Canon iP100 manuals
Add to My Manuals
Save this manual to your list of manuals |
Page 44 highlights
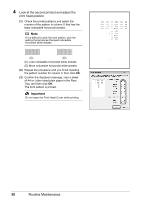
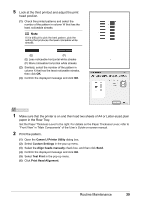
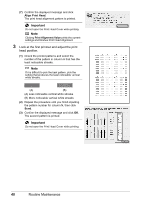
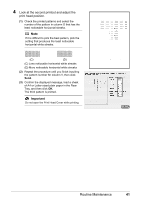
(7) Confirm the displayed message and click Align Print Head. The print head alignment pattern is printed. Important Do not open the Print Head Cover while printing. Note Clicking Print Alignment Value prints the current settings and finishes Print Head Alignment. 3 Look at the first printout and adjust the print head position. (1) Check the printed patterns and select the number of the pattern in column A that has the least noticeable streaks. Note If it is difficult to pick the best pattern, pick the setting that produces the least noticeable vertical white streaks. (A) (B) (A) Less noticeable vertical white streaks (B) More noticeable vertical white streaks (2) Repeat the procedure until you finish inputting the pattern number for column N, then click Send. (3) Confirm the displayed message and click OK. The second pattern is printed. Important Do not open the Print Head Cover while printing. 40 Routine Maintenance
-
 1
1 -
2
-
3
-
4
-
5
-
6
-
7
-
8
-
9
-
10
-
11
-
12
-
13
-
14
-
15
-
16
-
17
-
18
-
19
-
20
-
21
-
22
-
23
-
24
-
25
-
26
-
27
-
28
-
29
-
30
-
31
-
32
-
33
-
34
-
35
-
36
-
37
-
38
-
 39
39 -
 40
40 -
 41
41 -
 42
42 -
 43
43 -
 44
44 -
 45
45 -
 46
46 -
 47
47 -
 48
48 -
 49
49 -
50
-
51
-
52
-
53
-
54
-
55
-
56
-
57
-
58
-
59
-
60
-
61
-
62
-
63
-
64
-
65
-
66
-
67
-
68
-
69
-
70
-
71
-
72
-
73
-
74
-
75
-
76
-
77
-
78
-
79
-
80
-
81
-
82
-
83
-
84
-
85
-
86
-
87
-
88
-
89
-
90
-
91
-
92
 |
 |
