Canon iP100 Quick Start Guide - Page 51
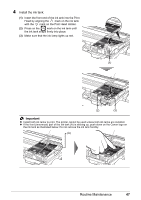
Install the ink tank., Press on - printer parts
 |
UPC - 013803067316
View all Canon iP100 manuals
Add to My Manuals
Save this manual to your list of manuals |
Page 51 highlights
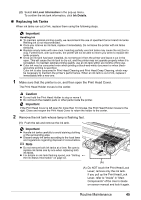
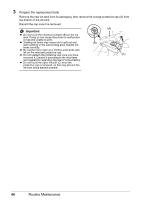
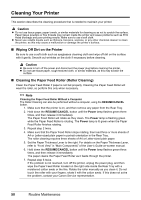
4 Install the ink tank. (1) Insert the front end of the ink tank into the Print Head by aligning the mark on the ink tank with the mark on the Print Head Holder. (2) Press on the mark on the ink tank until the ink tank snaps firmly into place. (3) Make sure that the ink lamp lights up red. (1) (2) (3) Important z Install both ink tanks to print. The printer cannot be used unless both ink tanks are installed. z If the front (innermost) part of the ink tank (A) is sticking up, push down on the Canon logo on the ink tank as illustrated below. Do not remove the ink tank forcibly. (A) Routine Maintenance 47
-
 1
1 -
2
-
3
-
4
-
5
-
6
-
7
-
8
-
9
-
10
-
11
-
12
-
13
-
14
-
15
-
16
-
17
-
18
-
19
-
20
-
21
-
22
-
23
-
24
-
25
-
26
-
27
-
28
-
29
-
30
-
31
-
32
-
33
-
34
-
35
-
36
-
37
-
38
-
39
-
40
-
41
-
42
-
43
-
44
-
45
-
 46
46 -
 47
47 -
 48
48 -
 49
49 -
 50
50 -
 51
51 -
 52
52 -
 53
53 -
 54
54 -
 55
55 -
 56
56 -
57
-
58
-
59
-
60
-
61
-
62
-
63
-
64
-
65
-
66
-
67
-
68
-
69
-
70
-
71
-
72
-
73
-
74
-
75
-
76
-
77
-
78
-
79
-
80
-
81
-
82
-
83
-
84
-
85
-
86
-
87
-
88
-
89
-
90
-
91
-
92
 |
 |

47
Routine Maintenance
4
Install the ink tank.
(1)
Insert the front end of the ink tank into the Print
Head by aligning the
mark on the ink tank
with the
mark on the Print Head Holder.
(2)
Press on the
mark on the ink tank until
the ink tank snaps firmly into place.
(3)
Make sure that the ink lamp lights up red.
Important
Install both ink tanks to print. The printer cannot be used unless both ink tanks are installed.
If the front (innermost) part of the ink tank (A) is sticking up, push down on the Canon logo on
the ink tank as illustrated below. Do not remove the ink tank forcibly.
(3)
(2)
(1)
(A)