Canon iP100 Quick Start Guide - Page 46
Look at the third printout and adjust the print, head position., Similarly
 |
UPC - 013803067316
View all Canon iP100 manuals
Add to My Manuals
Save this manual to your list of manuals |
Page 46 highlights
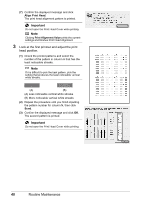
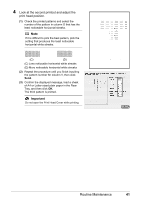
5 Look at the third printout and adjust the print head position. (1) Check the printed patterns and select the number of the pattern in column W that has the least noticeable streaks. Note If it is difficult to pick the best pattern, pick the setting that produces the least noticeable white streaks. (E) (F) (E) Less noticeable horizontal white streaks (F) More noticeable horizontal white streaks (2) Similarly, select the number of the pattern in column X that has the least noticeable streaks, then click Send. 42 Routine Maintenance
-
 1
1 -
2
-
3
-
4
-
5
-
6
-
7
-
8
-
9
-
10
-
11
-
12
-
13
-
14
-
15
-
16
-
17
-
18
-
19
-
20
-
21
-
22
-
23
-
24
-
25
-
26
-
27
-
28
-
29
-
30
-
31
-
32
-
33
-
34
-
35
-
36
-
37
-
38
-
39
-
40
-
 41
41 -
 42
42 -
 43
43 -
 44
44 -
 45
45 -
 46
46 -
 47
47 -
 48
48 -
 49
49 -
 50
50 -
 51
51 -
52
-
53
-
54
-
55
-
56
-
57
-
58
-
59
-
60
-
61
-
62
-
63
-
64
-
65
-
66
-
67
-
68
-
69
-
70
-
71
-
72
-
73
-
74
-
75
-
76
-
77
-
78
-
79
-
80
-
81
-
82
-
83
-
84
-
85
-
86
-
87
-
88
-
89
-
90
-
91
-
92
 |
 |

42
Routine Maintenance
5
Look at the third printout and adjust the print
head position.
(1)
Check the printed patterns and select the
number of the pattern in column W that has the
least noticeable streaks.
(E) Less noticeable horizontal white streaks
(F) More noticeable horizontal white streaks
(2)
Similarly, select the number of the pattern in
column X that has the least noticeable streaks,
then click
Send
.
Note
If it is difficult to pick the best pattern, pick the
setting that produces the least noticeable white
streaks.
(E)
(F)