Canon imagePROGRAF iPF650 iPF650 655 750 755 Basic Guide Step1 - Page 11
Menu operations
 |
View all Canon imagePROGRAF iPF650 manuals
Add to My Manuals
Save this manual to your list of manuals |
Page 11 highlights
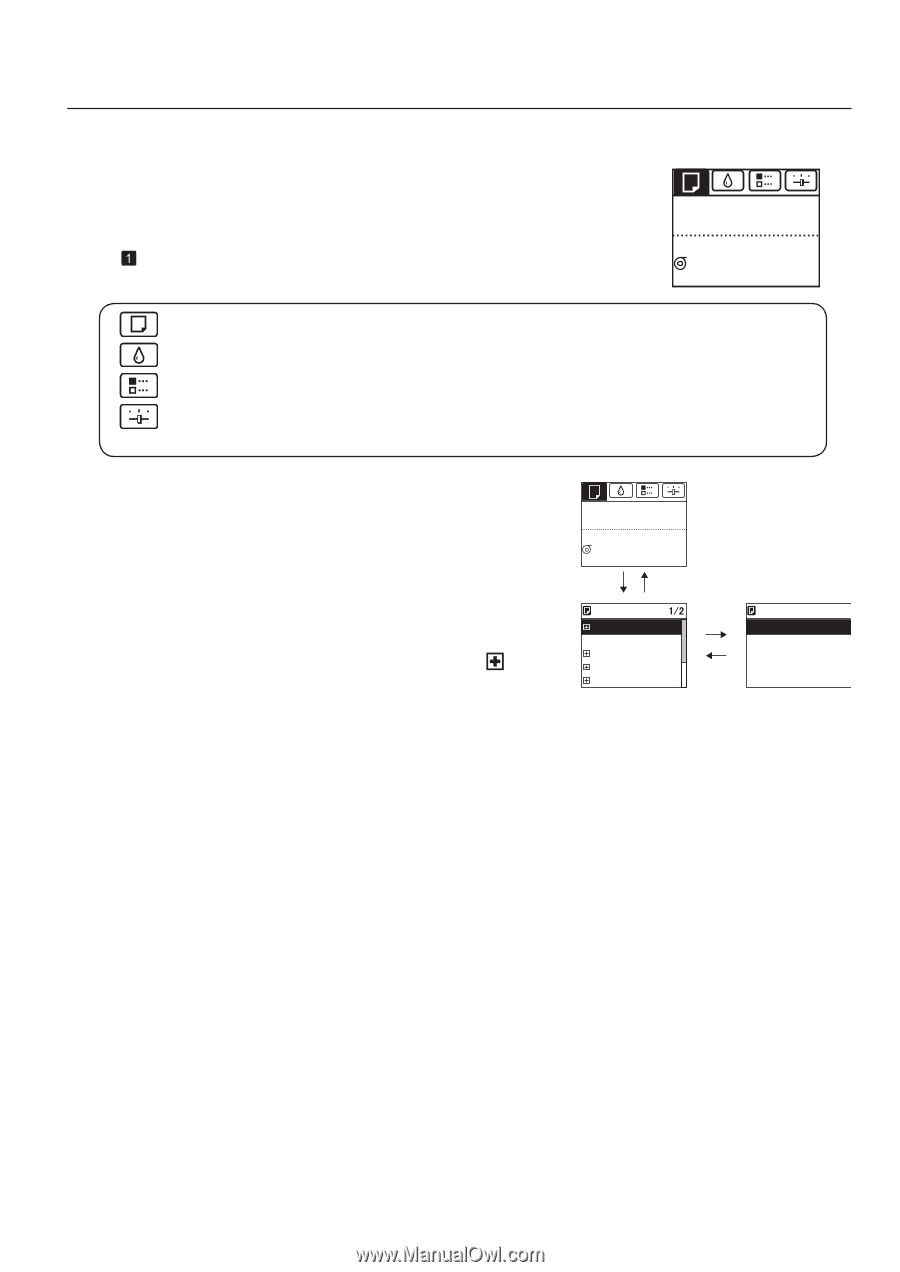
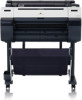
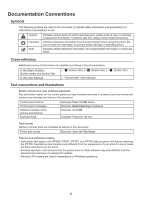
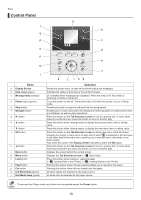
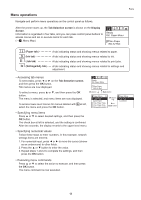
Menu operations Navigate and perform menu operations on the control panel as follows. After the printer starts up, the Tab Selection screen is shown on the Display Screen. Information is organized in four tabs, and you can press control panel buttons to access menus and set or execute items for each tab. (→ , Menu Map) Ready OK: Paper Menu Plain Paper ISO A2 Roll Parts (Paper tab A tab indicating status and showing menus related to paper. (Ink tab A tab indicating status and showing menus related to ink. (Job tab A tab indicating status and showing menus related to print jobs. (Settings/Adj. tab A tab indicating status and showing menus related to settings and adjustment. • Accessing tab menus To select tabs, press ◄ or ► on the Tab Selection screen, and then press the OK button. Tab menus are now displayed. Ready OK: Paper Menu Plain Paper ISO A2 Roll To select a menu, press ▲ or ▼, and then press the OK button. The menu is selected, and menu items are now displayed. To access lower-level menus for menus labeled with at left, select the menu and press the OK button. OK button Back button Paper Menu 㪈㪆㪉 Load Paper OK button Eject Paper Chg. Paper Type Chg. Paper Size Back button ManageRemainRoll Paper Menu Roll Paper Cut Sheet • Specifying menu items Press ▲ or ▼ to select desired settings, and then press the OK button. The check box at left is selected, and the setting is confirmed. After two seconds, the display reverts to the upper level menu. • Specifying numerical values Follow these steps to enter numbers. In this example, network settings items are entered. 1. For numerical input, press ◄ or ► to move the cursor (shown as an underscore) to other fields. 2. Press the ▲ or ▼ button to enter the value. 3. Repeat steps 1 and 2 to complete the settings, and then press the OK button. • Executing menu commands Press ▲ or ▼ to select the action to execute, and then press the OK button. The menu command is now executed. 11
-
 1
1 -
2
-
3
-
4
-
5
-
 6
6 -
 7
7 -
 8
8 -
 9
9 -
 10
10 -
 11
11 -
 12
12 -
 13
13 -
 14
14 -
 15
15 -
 16
16 -
17
-
18
-
19
-
20
-
21
-
22
-
23
-
24
-
25
-
26
-
27
-
28
-
29
-
30
-
31
-
32
-
33
-
34
-
35
-
36
-
37
-
38
-
39
-
40
 |
 |