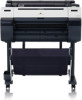
Canon imagePROGRAF iPF650 iPF650 655 750 755 Basic Guide Step1 - Page 12
Attaching the Roll Holder to Rolls - manual
 |
View all Canon imagePROGRAF iPF650 manuals
Add to My Manuals
Save this manual to your list of manuals |
Page 12 highlights
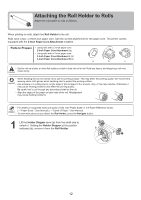
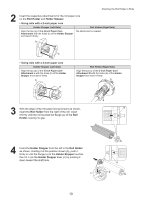
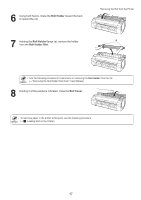
Attaching the Roll Holder to Rolls Attach the roll holder to rolls as follows. When printing on rolls, attach the Roll Holder to the roll. Rolls have a two- or three-inch paper core. Use the correct attachment for the paper core. The printer comes equipped with the 2-Inch Paper Core Attachment installed. Parts to Prepare • Using rolls with a 2-inch paper core 2-Inch Paper Core Attachment (a) • Using rolls with a 3-inch paper core 3-Inch Paper Core Attachment L (b) 3-Inch Paper Core Attachment R (c) a b c • Set the roll on a table or other flat surface so that it does not roll or fall. Rolls are heavy, and dropping a roll may cause injury. • When handling the roll, be careful not to soil the printing surface. This may affect the printing quality. We recommend wearing clean cloth gloves when handling rolls to protect the printing surface. • Use scissors or a cutting tool to cut the edge of the roll paper if it is uneven, dirty, or has tape residue. Otherwise, it may cause feeding problems and affect the printing quality. Be careful not to cut through any barcodes printed on the roll. • Align the edges of the paper on both ends of the roll. Misalignment may cause feeding problems. • For details on supported sizes and types of rolls, see "Paper Sizes" or the Paper Reference Guide. (→"Paper Sizes," User Manual), (→"Types of Paper," User Manual) • To view instructions as you attach the Roll Holder, press the Navigate button. 1 Lift the Holder Stopper lever (a) from the shaft side to unlock it. Holding the Holder Stopper at the position indicated (b), remove it from the Roll Holder. a b 12
-
 1
1 -
2
-
3
-
4
-
5
-
6
-
 7
7 -
 8
8 -
 9
9 -
 10
10 -
 11
11 -
 12
12 -
 13
13 -
 14
14 -
 15
15 -
 16
16 -
 17
17 -
18
-
19
-
20
-
21
-
22
-
23
-
24
-
25
-
26
-
27
-
28
-
29
-
30
-
31
-
32
-
33
-
34
-
35
-
36
-
37
-
38
-
39
-
40
 |
 |
