Cub Cadet XT2 GX50 Operation Manual - Page 11
Installing The Fastattach™ Brush Guard, Lower Deck Discharge Chute
 |
View all Cub Cadet XT2 GX50 manuals
Add to My Manuals
Save this manual to your list of manuals |
Page 11 highlights
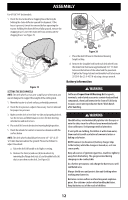
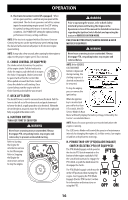
ASSEMBLY The hardware for attaching the front bumper is shipped installed into the bumper. 1. Remove the four hex screws (a) from the bumper (b). 2. Position the bumper brackets to the inside of the tractor's frame and secure it in place with the four hex flange screws (a). See Figure 15. (b) (a) (a) Figure 15 INSTALLING THE FASTATTACH™ BRUSH GUARD (IF EQUIPPED) 1. Align the brush guard assembly with the FastAttach™ brackets and push assembly together. See Figure 16. 1 2 Figure 17 LOWER DECK DISCHARGE CHUTE DEFLECTOR WARNING Never operate the mower deck without the chute deflector installed and in the down position. For 46" deck models: 1. Remove the keys attached with a zip tie to the chute bracket. 2. Remove the flange lock nut and hex screw from the deck. 3. Place the chute deflector on the deck, be sure to insert the tabs on the chute deflector into the holes on the deck. See Figure 18. 4. Slide the chute deflector toward the rear of the tractor until the bolt hole in the chute deflector aligns with the hole in the deck. See Figure 18. 5 4 Figure 16 2. Install the pins on the right and left side of brush guard and then secure with two cotter pins found in the hardware pack. See Figure 17. NOTE: Pulling up lightly on the brush guard may make installation of the pins easier. 3 5 4 Figure 18 5. Secure the chute deflector in place with the flange lock nut and hex screw removed in Step 2. Tighten to 102-124 in-lbs (11.5-14 N-m). See Figure 18. Skip ahead to Setting the Deck Wheels. 11
-
 1
1 -
2
-
3
-
4
-
5
-
 6
6 -
 7
7 -
 8
8 -
 9
9 -
 10
10 -
 11
11 -
 12
12 -
 13
13 -
 14
14 -
 15
15 -
 16
16 -
17
-
18
-
19
-
20
-
21
-
22
-
23
-
24
-
25
-
26
-
27
-
28
-
29
-
30
-
31
-
32
-
33
-
34
-
35
-
36
-
37
-
38
-
39
-
40
-
41
-
42
-
43
-
44
-
45
-
46
-
47
-
48
-
49
-
50
-
51
-
52
-
53
-
54
-
55
-
56
-
57
-
58
-
59
-
60
-
61
-
62
-
63
-
64
-
65
-
66
-
67
-
68
-
69
-
70
-
71
-
72
-
73
-
74
-
75
-
76
-
77
-
78
-
79
-
80
-
81
-
82
-
83
-
84
-
85
-
86
-
87
-
88
-
89
-
90
-
91
-
92
-
93
-
94
-
95
-
96
-
97
-
98
-
99
-
100
-
101
-
102
-
103
-
104
-
105
-
106
-
107
-
108
-
109
-
110
-
111
-
112
 |
 |
