Cub Cadet XT2 GX50 Operation Manual - Page 14
Caution
 |
View all Cub Cadet XT2 GX50 manuals
Add to My Manuals
Save this manual to your list of manuals |
Page 14 highlights
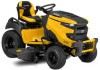
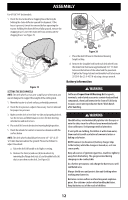
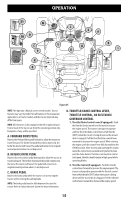
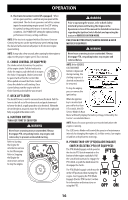
ASSEMBLY 2. Remove the hex cap screw and nut securing the black negative battery lead to the negative battery post (marked NEG). Move the cable away from the negative battery post. 3. Remove the hex cap screw and nut securing the red positive battery lead to the positive battery post (marked POS). 4. Carefully lift the battery out of the tractor. 5. Install the battery by repeating the above steps in the reverse order. Charging the Battery Test and, if necessary, recharge the battery after the tractor has been stored for a period of time. MODELS WITH LEAD-ACID BATTERY • A voltmeter or load tester reading of 12.4 volts (DC) or lower across the battery terminals indicates that the battery needs to be charged. • A lead-acid battery charger should be used. Recommended charge rate is 4A/14.7V. • If your battery charger is automatic, charge the battery until the charger indicates that charging is complete. If the charger is not automatic, charge for no fewer than eight (8) hours. MODELS WITH AGM BATTERY • An AGM battery charger should be used. Recommended charge rate is 1.1A/14.8V. • If your battery charger is automatic, charge the battery until the charger indicates that charging is complete. If the charger is not automatic, charge for no fewer than eight (8) hours. Adjusting the Seat To adjust the position of the seat, lift the seat adjustment lever up. Slide the seat forward or rearward to the desired position; then release the adjustment lever. Make sure seat is locked into position before operating the tractor. See Figure 23. Figure 23 Oil NOTE: Your tractor is shipped with oil in the engine. However, you MUST check the oil level before operating. See the Engine Operator's Manual for instructions on checking, adding and changing oil. CAUTION Always check the engine oil level before each use as instructed in the Engine Operator's Manual. Add oil as necessary. Failure to do so may result in serious damage to your engine. 14
-
 1
1 -
2
-
3
-
4
-
5
-
6
-
7
-
8
-
 9
9 -
 10
10 -
 11
11 -
 12
12 -
 13
13 -
 14
14 -
 15
15 -
 16
16 -
 17
17 -
 18
18 -
 19
19 -
20
-
21
-
22
-
23
-
24
-
25
-
26
-
27
-
28
-
29
-
30
-
31
-
32
-
33
-
34
-
35
-
36
-
37
-
38
-
39
-
40
-
41
-
42
-
43
-
44
-
45
-
46
-
47
-
48
-
49
-
50
-
51
-
52
-
53
-
54
-
55
-
56
-
57
-
58
-
59
-
60
-
61
-
62
-
63
-
64
-
65
-
66
-
67
-
68
-
69
-
70
-
71
-
72
-
73
-
74
-
75
-
76
-
77
-
78
-
79
-
80
-
81
-
82
-
83
-
84
-
85
-
86
-
87
-
88
-
89
-
90
-
91
-
92
-
93
-
94
-
95
-
96
-
97
-
98
-
99
-
100
-
101
-
102
-
103
-
104
-
105
-
106
-
107
-
108
-
109
-
110
-
111
-
112
 |
 |
