Cub Cadet XT2 GX50 Operation Manual - Page 32
Installing the Blade
 |
View all Cub Cadet XT2 GX50 manuals
Add to My Manuals
Save this manual to your list of manuals |
Page 32 highlights
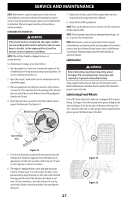
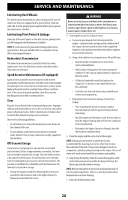
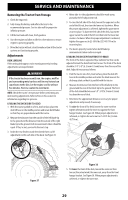
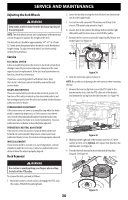
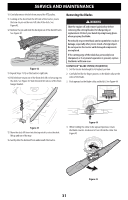
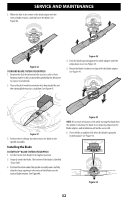
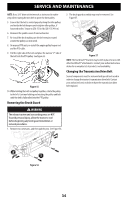
SERVICE AND MAINTENANCE 5. When the hole in the center of the blade aligns with the tractor blade retainer, carefully lower the blade. See Figure 46. Figure 46 STANDARD BLADE SYSTEM (IF EQUIPPED) 1. Remove the deck from beneath the tractor, (refer to Deck Removal earlier in this section) then gently flip the deck over to expose its underside. 2. Place a block of wood between the deck housing baffle and the cutting blade to act as a stabilizer. See Figure 47. Figure 48 4. Push the blade upward against the blade adapter until the collar above rises. See Figure 44. 5. Rotate the blade clockwise to align with the blade adapter. See Figure 49. Figure 47 3. Remove the hex flange nut that secures the blade to the spindle assembly. Installing the Blade FASTATTACH™ BLADE SYSTEM (IF EQUIPPED) 1. Set the tractor deck height to its highest position. 2. Properly orient the blade. The bottom of the blade is labelled "Grass Side". 3. Position the blade under the spindle assembly and carefully align the large opening in the center of the blade over the tractor blade retainer. See Figure 48. Figure 49 NOTE: If too much resistance is felt while turning the blade then the spindle is rotating, the blade is not properly aligned on the blade adapter, and installation will not be successful. 6. There will be an audible click when the blade is properly locked in place. See Figure 50. Figure 50 32
-
 1
1 -
2
-
3
-
4
-
5
-
6
-
7
-
8
-
9
-
10
-
11
-
12
-
13
-
14
-
15
-
16
-
17
-
18
-
19
-
20
-
21
-
22
-
23
-
24
-
25
-
26
-
 27
27 -
 28
28 -
 29
29 -
 30
30 -
 31
31 -
 32
32 -
 33
33 -
 34
34 -
 35
35 -
 36
36 -
 37
37 -
38
-
39
-
40
-
41
-
42
-
43
-
44
-
45
-
46
-
47
-
48
-
49
-
50
-
51
-
52
-
53
-
54
-
55
-
56
-
57
-
58
-
59
-
60
-
61
-
62
-
63
-
64
-
65
-
66
-
67
-
68
-
69
-
70
-
71
-
72
-
73
-
74
-
75
-
76
-
77
-
78
-
79
-
80
-
81
-
82
-
83
-
84
-
85
-
86
-
87
-
88
-
89
-
90
-
91
-
92
-
93
-
94
-
95
-
96
-
97
-
98
-
99
-
100
-
101
-
102
-
103
-
104
-
105
-
106
-
107
-
108
-
109
-
110
-
111
-
112
 |
 |
