D-Link DES-1210-52 Product Manual
D-Link DES-1210-52 Manual
 |
UPC - 790069327827
View all D-Link DES-1210-52 manuals
Add to My Manuals
Save this manual to your list of manuals |
D-Link DES-1210-52 manual content summary:
- D-Link DES-1210-52 | Product Manual - Page 1
- D-Link DES-1210-52 | Product Manual - Page 2
- D-Link DES-1210-52 | Product Manual - Page 3
D-Link Web Smart Switch User Manual Table of Contents Table of Contents ...i About This Guide...1 Terms/Usage...1 Copyright and Trademarks ...1 Product Introduction ...2 DES-1210-08P ...3 Front Panel ...3 Rear Panel...3 DES-1210-28 ...3 Front Panel ...3 Rear Panel...4 DES-1210-28P ...4 Front - D-Link DES-1210-52 | Product Manual - Page 4
40 Configuration > Link Aggregation > Port Trunking 41 Configuration > Link Aggregation > LACP Port Settings 42 Configuration > IGMP Snooping ...43 Configuration > Multicast Filtering Mode (For DES-1210-08P only 44 Configuration > Multicast Filtering Mode (For DES-1210-28/28P/52 45 Configuration - D-Link DES-1210-52 | Product Manual - Page 5
Log...59 ACL > ACL Configuration Wizard...60 ACL > ACL Profile List...61 ACL > ACL Finder ...64 PoE > PoE Port Settings (Only for DES-1210-08P/28P 64 PoE > PoE System Settings (Only for DES-1210-08P/28P 65 Time-Based PoE > Time Range Settings (Only for DES-1210-08P/28P 66 LLDP > LLDP Global - D-Link DES-1210-52 | Product Manual - Page 6
Table of Contents D-Link Web Smart Switch User Manual L2 Features ...75 VLAN ...75 QoS (Quality of Service)...76 Security...76 Green...76 Management...76 Appendix C - Rack mount Instructions ...77 iv - D-Link DES-1210-52 | Product Manual - Page 7
About This Guide D-Link Web Smart Switch User Manual About This Guide This guide provides instructions to install the D-Link Fast Ethernet Web Smart Switch DES-121008P/28/28P/52, how to use the SmartConsole Utility, and to configure Web-based Management step-by-step. Note: The model you have - D-Link DES-1210-52 | Product Manual - Page 8
security, traffic segmentation, QoS and versatile management. Flexible Port Configurations. D-Link Web Smart Switches offer four port configurations, 24/48 Ethernet ports or 8/24 Ethernet ports with PoE support. All ports of the switch support auto MDI/MDIX feature which bring inexpensive and easy - D-Link DES-1210-52 | Product Manual - Page 9
1 Product Introduction DES-1210-08P 8-Port 10/100Mpbs PoE Web Smart Switch Front Panel D-Link Web Smart Switch User Manual Figure 1 - DES-1210-08P Front Panel Power LED : The Power LED lights up when the Switch is connected to a power source. Power Max LED: The Power Max lights up when the system - D-Link DES-1210-52 | Product Manual - Page 10
default configuration and all changes will be lost. Rear Panel Figure 4 - DES-1210-28 Rear Panel Power: The power port is where to connect the AC power cord. DES-1210-28P 24-Port 10/100Mpbs PoE with 4-Port 10/100/1000Mbps Copper and 2 Combo SFP Web Smart Switch Front Panel Figure 5 - DES-1210-28P - D-Link DES-1210-52 | Product Manual - Page 11
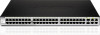
the default configuration and all changes will be lost. Rear Panel Figure 6 - DES-1210-28P Rear Panel Power: The power port is where to connect the AC power cord. DES-1210-52 48-Port 10/100Mpbs Web Smart Switch with 4-Port 10/100/1000Mbps and 2 Combo SFPs Front Panel Figure 7 - DES-1210-52 Front - D-Link DES-1210-52 | Product Manual - Page 12
1 Product Introduction D-Link Web Smart Switch User Manual Rear Panel cannot be used. CAUTION: The MiniGBIC ports should use UL listed Optical Transceiver product, Rated Laser Class I. 3.3Vdc. Figure 8 - DES-1210-52 Rear Panel Power: Connect the supplied AC power cable to this port. 6 - D-Link DES-1210-52 | Product Manual - Page 13
is missing or damaged, please contact your local D-Link reseller for replacement. One D-Link Web-Smart Switch One AC power cord Four rubber feet Screws and two mounting brackets One Multi-lingual Getting Started Guide One CD with User Manual, SmartConsole Utility program, and D-View Module If any - D-Link DES-1210-52 | Product Manual - Page 14
2 Hardware Installation D-Link Web Smart Switch User Manual Then, use the screws provided with the equipment rack to mount the switch in the rack. Figure 11 - Mount the Switch in the rack or chassis Please be aware of following safety Instructions when installing: A) Elevated Operating Ambient - - D-Link DES-1210-52 | Product Manual - Page 15
Installation D-Link Web Smart Switch User Manual Figure 12 - Plugging the DES-1210-08P into an outlet CAUTION: Do not turn on the power switch of DES-1210-08P before power cables are connected. Power surge may cause damage to the Switch. CAUTION: The installation instructions clearly state - D-Link DES-1210-52 | Product Manual - Page 16
3 Getting Started D-Link Web Smart Switch User Manual 3 Getting Started This chapter introduces the management interface of D-Link Web-Smart Switch. Management Options The D-Link Web Smart Switch can be managed through any port on the device by using the Web-based Management or through any PC - D-Link DES-1210-52 | Product Manual - Page 17
and Russian. By default, the password is admin and the language is English. Figure 16 - Logon Dialog Box Smart Wizard After a successful login, the Smart Wizard will guide you through essential settings of the D-Link Web Smart Switch. Please refer to Smart Wizard Configuration section for details - D-Link DES-1210-52 | Product Manual - Page 18
3 Getting Started D-Link Web Smart Switch User Manual Option 1: Follow these steps to install the the on-screen instructions to install the utility. 5. Upon completion, go to Start > Programs > D-Link SmartConsole Utility and open the SmartConsole Utility. 6. Connect the Smart Switch to the same - D-Link DES-1210-52 | Product Manual - Page 19
D-Link Web Smart Switch User Manual 4 SmartConsole Utility The D-Link SmartConsole Utility allows the administrator to quickly discover all D-Link smart switches which are in the same domain of the PC, collect traps and log messages, and quick access to basic configurations of the switch. The - D-Link DES-1210-52 | Product Manual - Page 20
Link Web Smart Switch User Manual Web-Smart Switch will not be discovered. Log Click this icon to launch the Log window. Click View Log to show the events of the SmartConsole Utility and the device. Date/Time indicates when the message was received, IP message was received, IP denotes where it comes - D-Link DES-1210-52 | Product Manual - Page 21
Link Web Smart Switch User Manual Figure 21 - SmartConsole File Monitor Save: Records the setting of the Device List as default for the next time the SmartConsole Utility is used. Monitor Save As: Records the setting of the Device List in an appointed filename and file path. Monitor Load: Manually - D-Link DES-1210-52 | Product Manual - Page 22
D-Link Web Smart Switch User Manual Device Configuration The Device Configuration in the SmartConsole Utility has five icons: Device Settings Device Password Manager Multi Firmware Upgrade DHCP Refresh Web Access and the , , device buttons for the Device List. Device Settings Select a switch - D-Link DES-1210-52 | Product Manual - Page 23
Utility D-Link Web Smart Switch User Manual Device Password Manager Select a switch from the Device List. Click on this icon to launch the Device Password Manager window. Here you can enter a new password and confirm it. Figure 24 - SmartConsole Device Password Manager Multi Firmware Upgrade - D-Link DES-1210-52 | Product Manual - Page 24
D-Link Web Smart Switch User Manual Figure 26 - DHCP Refresh Web Access Select a switch from the Device List. Click this icon to launch your internet browser (eg. The Internet Explorer). Here you can configure the Switch through the Web-based Management utility. You may also get into the Web - D-Link DES-1210-52 | Product Manual - Page 25
Link Web Smart Switch User Manual IP Address: Displays the current IP Switch will be discovered in the SmartConsole Device List Firmware version: Displays the current Firmware version of this device. LLDP: Displays the LLDP (Link Layer Discovery Protocol) status of the device. (Only for PoE - D-Link DES-1210-52 | Product Manual - Page 26
5 Configuration D-Link Web Smart Switch User Manual 5 Configuration The features and functions of the D-Link Web Smart Switch can be configured for optimum use through the Web-based Management Utility. Smart Wizard Configuration After a successful login, the Smart Wizard will guide you through - D-Link DES-1210-52 | Product Manual - Page 27
D-Link Web Smart Switch User Manual SNMP Settings The SNMP Settings feature allows you to quickly enable or disable the SNMP function and configure the SNMP community name. For the complete SNMP feature, please navigate to Setup Menu > System > SNMP Settings in the Web Interface. By default - D-Link DES-1210-52 | Product Manual - Page 28
D-Link Web Smart Switch User Manual System Settings You can manually change the system IP Address, Subnet Mask, and Gateway address by selecting Static and clicking Apply. You can further configure and read more about the above settings in the "Setup Menu > System > System Settings". The default - D-Link DES-1210-52 | Product Manual - Page 29
5 Configuration D-Link Web Smart Switch User Manual Web-based Management After clicking the Exit button in Smart Wizard you will see the screen below: Tool Bar Function Tree Main Configuration Screen Figure 34 - Web-based Management Above is the Web-based Management screen. The three main areas - D-Link DES-1210-52 | Product Manual - Page 30
5 Configuration D-Link Web Smart Switch User Manual Tool Bar > Save Menu The Save Menu provides Save Configuration and Save Log functions. Figure 35 - Save Menu Save Configuration Select to save the entire configuration changes you have made to the device to switch's non-volatile RAM. Figure 36 - D-Link DES-1210-52 | Product Manual - Page 31
5 Configuration D-Link Web Smart Switch User Manual Figure 40 - Tool Menu > Reset System Reboot Device Provide a safe way to reboot the system. Click Reboot to restart the switch. Figure 41 - Tool Menu > Reboot Device Configuration Backup & Restore Allow the current configuration settings to be - D-Link DES-1210-52 | Product Manual - Page 32
5 Configuration D-Link Web Smart Switch User Manual Figure 43 - Tool Menu > Firmware Backup and Upload HTTP: Backup or upgrade the firmware to or from your local drive of PC. Click Backup to save the firmware to your disk. Click Browse to browse your inventories for a saved firmware file. Click - D-Link DES-1210-52 | Product Manual - Page 33
5 Configuration D-Link Web Smart Switch User Manual Figure 45 - User Guide Micro Site 27 - D-Link DES-1210-52 | Product Manual - Page 34
overview of the switch, includes essential information such as firmware & hardware information, and IP address. It also offers an overall status of common software features: RSTP: Click Setting to link to Configuration > Spanning Tree > STP Global Settings. Default is disabled. Port Mirroring: Click - D-Link DES-1210-52 | Product Manual - Page 35
5 Configuration D-Link Web Smart Switch User Manual System > System Settings The System Setting allows the user to configure the IP address and the basic system information of the Switch. IP Information: There are two ways for the switch to obtain an IP address: Static and DHCP (Dynamic Host - D-Link DES-1210-52 | Product Manual - Page 36
pair Port Link Up/Link Down: Copper port connection information. RSTP Port State Change: Events of a RSTP port state changes. Firmware Upgrade State: Information of firmware upgrade - success or failure. PoE Power On/Off: Status of power per port (Only for DES-1210-08P and 28P) PoE Power Error - D-Link DES-1210-52 | Product Manual - Page 37
5 Configuration D-Link Web Smart Switch User Manual Figure 51 - System > Port Setting Speed: Gigabit Fiber connections can operate in 1000M Full Force Mode, Auto Mode or Disabled. Copper connections can operate in Forced Mode settings (1000M - D-Link DES-1210-52 | Product Manual - Page 38
5 Configuration D-Link Web Smart Switch User Manual Figure 52 - System > SNMP Settings > SNMP Global State . Enter a password for SNMPv3 encryption in the right column. Priv-Protocol/Password: Specify either no authorization or DES 56-bit encryption and then enter a password for SNMPv3 encryption - D-Link DES-1210-52 | Product Manual - Page 39
5 Configuration D-Link Web Smart Switch User Manual AuthPriv - Both authorization and encryption are required for packets sent between the Switch and SNMP manger. Notify View Name: Specify a SNMP group name for users that can receive SNMP trap messages generated by the Switch's SNMP agent. Figure - D-Link DES-1210-52 | Product Manual - Page 40
5 Configuration D-Link Web Smart Switch User Manual Figure 56 - System > SNMP Settings > SNMP Community Table Click Apply to create a new SNMP community, Delete to remove an existing community. System > SNMP Settings > SNMP Host Table This page is to configure the SNMP trap recipients. Host IP - D-Link DES-1210-52 | Product Manual - Page 41
5 Configuration D-Link Web Smart Switch User Manual Figure 59 - System > SNMP Settings > SNMP Trap Setting System > Password Access Control Setting a password is a critical tool for managers to secure the Web-Smart Switch. After entering the old password and the new password two times, click Apply - D-Link DES-1210-52 | Product Manual - Page 42
5 Configuration D-Link Web Smart Switch User Manual You may change the name accordingly to the desired groups, such as R&D, Marketing, email, etc. Figure 62 - Configuration > 802.1Q VLAN > Default Setting Figure 63 - Configuration > 802.1Q VLAN > Add VID Figure 64 - Configuration > 802.1Q VLAN > - D-Link DES-1210-52 | Product Manual - Page 43
D-Link Web Smart Switch User Manual Configuration > 802.1Q VLAN (Asymmetric VLAN) This function is located in the 802.1Q Configuration page. It allows devices in different VLANs to communicate with the servers, firewalls or other shared resources in the shared VLAN. This configuration is - D-Link DES-1210-52 | Product Manual - Page 44
5 Configuration D-Link Web Smart Switch User Manual shared ports and the set of ports to be separated from the other VLANs (for example, port 6 and 7 respectively). Therefore we have three VLANs that share some common ports, but their original membership ports are still separated from each other ( - D-Link DES-1210-52 | Product Manual - Page 45
5 Configuration D-Link Web Smart Switch User Manual Figure 70 - Configuration > 802.1Q Management VLAN Configuration > Voice VLAN > Voice VLAN Settings Voice VLAN is a feature that allows you to automatically place the voice traffic from IP phone to an assigned VLAN to enhance the VoIP service. - D-Link DES-1210-52 | Product Manual - Page 46
5 Configuration D-Link Web Smart Switch User Manual VoIP traffic. Configuration > Voice VLAN > Voice VLAN OUI Setting This window allows the user to configure the user-defined voice traffic's OUI. An Organizationally Unique Identifier (OUI) is the first three bytes of the MAC address. This - D-Link DES-1210-52 | Product Manual - Page 47
Configuration D-Link Web Smart Switch User Manual Figure 73 - Configuration > Link Aggregation > Port Trunking Auto Surveillance VLAN State: Select to enable or disable Auto Surveillance VLAN. The default is Enabled. VLAN ID: By default, the VLAN ID 1 was created as Surveillance VLAN and all ports - D-Link DES-1210-52 | Product Manual - Page 48
D-Link Web Smart Switch User Manual LACP - LACP (Link Aggregation Control Protocol) is enabled on the device. LACP allows for the automatic detection of links in a Port Trunking Group. Disable - Remove all the member in this trunk group. Figure 74 - Configuration > Link Aggregation > Port - D-Link DES-1210-52 | Product Manual - Page 49
5 Configuration D-Link Web Smart Switch User Manual Passive - LACP ports that are designated as passive cannot initially send LACP control frames. In order to allow the linked port group to negotiate adjustments and make changes dynamically, one end of the connection must have "active" LACP ports. - D-Link DES-1210-52 | Product Manual - Page 50
5 Configuration D-Link Web Smart Switch User Manual members. It also allows adjustments for controlling the frequency of IGMP traffic on a subnet. Default is 10 seconds. Querier State: D-Link Smart Switch is able to send out the IGMP Queries to check the status of multicast clients. Default is - D-Link DES-1210-52 | Product Manual - Page 51
5 Configuration D-Link Web Smart Switch User Manual Figure 79 - Configuration > Multicast Filtering Mode Configuration > Multicast Filtering Mode (For DES-1210-28/28P/52) The Multicast Filtering Mode function allows users to select the filtering mode for IGMP group per VLAN basis. Forward All - D-Link DES-1210-52 | Product Manual - Page 52
5 Configuration D-Link Web Smart Switch User Manual Detection port will be unlocked when the Loopback Detection Recover Time times out. The Loopback Detection function can be implemented on a range of ports at a time. You may enable or disable this function using the pull-down menu. Figure 82 - - D-Link DES-1210-52 | Product Manual - Page 53
5 Configuration D-Link Web Smart Switch User Manual Clock IP address of secondary SNTP server from which the system time is retrieved. SNTP Poll Interval in Seconds (30-99999): Defines the interval (in seconds) at which the SNTP server is polled for Unicast information. The Poll Interval default - D-Link DES-1210-52 | Product Manual - Page 54
5 Configuration D-Link Web Smart Switch User Manual Configuration > Spanning Tree > STP Global Settings The Switch implements two versions of the Spanning Tree Protocol, the Rapid Spanning Tree Protocol (RSTP) as defined by the IEEE 802.1w specification and a version compatible with the IEEE 802. - D-Link DES-1210-52 | Product Manual - Page 55
5 Configuration D-Link Web Smart Switch User Manual Configuration > Spanning Tree > STP Port Settings STP can be set up on a port per port basis. In addition to setting Spanning Tree parameters for use on the switch level, the Switch allows for the configuration of groups of ports, each port-group - D-Link DES-1210-52 | Product Manual - Page 56
5 Configuration D-Link Web Smart Switch User Manual Edge: Selecting the True parameter designates the port as an edge port. Edge ports cannot create loops, however an edge port can lose edge port status if a topology change creates a potential for a loop. An edge port normally should not receive - D-Link DES-1210-52 | Product Manual - Page 57
for the selected port. For DES-1210-08P, the value is between 63 and 100000. For DES-1210-28/28P/52, the value is between 64 and 1024000. Click Apply to set the bandwidth control for the selected ports. NOTE: For DES-1210-28/28P/52, the TX rate for Gigabit ports can only be configured in multiples - D-Link DES-1210-52 | Product Manual - Page 58
5 Configuration D-Link Web Smart Switch User Manual Figure 89 - QoS > 802.1p Default Priority By selecting the DSCP priority, the web pages will changes as seen below: Figure 90 - QoS > DSCP Priority Settings Select QoS Mode: D-Link Smart Switch allows the user to prioritize the traffic based on - D-Link DES-1210-52 | Product Manual - Page 59
5 Configuration D-Link Web Smart Switch User Manual Security > Trusted Host Use Trusted Host function to manage the switch from a remote station. You can enter up to ten designated management stations networks by defining the IP address/Subnet Mask as seen in the figure below. Figure 91 Security - D-Link DES-1210-52 | Product Manual - Page 60
5 Configuration D-Link Web Smart Switch User Manual ARP to the network claiming to be the gateway checking the gratuitous ARP packets and filtering those with illegal IP or MAC addresses. Enter the Router/Gateway IP Address, MAC Address, Ports and then click Add to create a checking/filtering rule. - D-Link DES-1210-52 | Product Manual - Page 61
5 Configuration D-Link Web Smart Switch User Manual Security > 802.1X > 802.1X Settings Network switches provide easy and open access to resources by simply attaching a client PC. Unfortunately this automatic configuration also allows unauthorized personnel to easily intrude and possibly gain - D-Link DES-1210-52 | Product Manual - Page 62
5 Configuration D-Link Web Smart Switch User Manual QuietPeriod (0 - 65535 sec): Sets the number of seconds that the switch remains in the quiet state following a failed authentication exchange with the client. Default is 80 seconds SuppTimeout (1 - 65535 sec): This value determines timeout - D-Link DES-1210-52 | Product Manual - Page 63
5 Configuration D-Link Web Smart Switch User Manual The Static MAC Address Setting table displays the static MAC addresses connected, as well as the VID. Click Add Mac to add a new MAC address, you also need to select the assigned Port number, enter both the Mac Address and VID and Click Apply. - D-Link DES-1210-52 | Product Manual - Page 64
5 Configuration D-Link Web Smart Switch User Manual Figure 97 - Monitoring > Statistics Refresh All: Renews the details in error. To view the statistics of individual ports, click one of the linked port numbers for details. Figure 98 - Monitoring > Port Statistics Previous Page: Go back to the - D-Link DES-1210-52 | Product Manual - Page 65
Configuration D-Link Web Smart Switch User Manual Monitoring > Cable Diagnostics The Cable Diagnostics is designed primarily for administrators and customer service is effective on Gigabit ports only. NOTE: If the port state of DES-1210-08P just changed from link up to link down, please wait 5 - D-Link DES-1210-52 | Product Manual - Page 66
5 Configuration D-Link Web Smart Switch User Manual Figure 100 - Monitoring > System Log ID: Displays an the Switch will forward packets based on the information contained in each packet's header. These criteria can be specified on a basis of MAC address, or IP address. The ACL Configuration - D-Link DES-1210-52 | Product Manual - Page 67
Configuration D-Link Web Smart Switch User Manual Service Type: Specify the type of service. The possible values are: Any - Indicates ACL action will be on packets from any service type. Ether type - Specifies an Ethernet criteria is met. Port: Enter a range of ports to be configured. Press Apply - D-Link DES-1210-52 | Product Manual - Page 68
5 Configuration D-Link Web Smart Switch User Manual Edit / New Rules: To edit or create an access rule in this profile. To add a new rule, please see Access Rule List in the next section. Delete: To delete an access profile. To manually add a profile, click Add ACL Profile: Figure 103 - Add - D-Link DES-1210-52 | Product Manual - Page 69
5 Configuration D-Link Web Smart Switch User Manual Figure 104 - Access Rule List Profile ID: the Ethernet Type value. Destination IP Address: Specify the Destination IP address. Source IP Address: Specify the Source IP address. DSCP: Specify the DSCP value. IP Protocol: The L4 protocol above IP. - D-Link DES-1210-52 | Product Manual - Page 70
corresponding Delete button. Figure 107 - ACL > ACL Finder PoE > PoE Port Settings (Only for DES-1210-08P/28P) DES-1210-08P/28P supports Power over Ethernet (PoE) as defined by the IEEE specification. All ports of DES-1210-08P and port 5-24 of DES-1210-28P comply with IEEE 802.3af providing up to - D-Link DES-1210-52 | Product Manual - Page 71
5 Configuration D-Link Web Smart Switch User Manual As seen in the following figure, the PoE port table displays the PoE status including, Port Enable, Time Range, Priority, Power Limit, Power(W), Voltage(V), Current(mA), Classification and Port Status. You can select From Port / To Port to - D-Link DES-1210-52 | Product Manual - Page 72
5 Configuration D-Link Web Smart Switch User Manual Figure 109 - PoE > PoE System Settings System Power Threshold: To configure the maximum power for PoE function. The maximum PoE threshold of each device is: Model Maximum Power DES-1210-08P 72Watts DES-1210-28P 193Watts System Setting - D-Link DES-1210-52 | Product Manual - Page 73
specific interval before it re-initializes. LLDP TX Delay: Configure the minimum time delay interval for any LLDP port which transmits successive LLDP advertisements due to changes in the LLDP MIB content. The default value is 2 seconds. LLDP > LLDP Remote Port Information (Only for DES-1210-08P/28P - D-Link DES-1210-52 | Product Manual - Page 74
5 Configuration D-Link Web Smart Switch User Manual LLDP > LLDP-MED Settings (Only for DES-1210-28P) LLDP-MED (Link Layer Discovery Protocol-Media Endpoint Discovery) is an enhancement of LLDP. It improves the LLDP operation between endpoint devices such as IP phones and APs. LLDP-MED supports - D-Link DES-1210-52 | Product Manual - Page 75
reset config save show ipif show switch upload { firmware_toTFTP tftp://ip-address/filename | cfg_toTFTP tftp://ip-address/filename } DES-1210-28P> Figure 116 - The ? command Download The download command is used to download and install new firmware or a Switch configuration file from a TFTP server - D-Link DES-1210-52 | Product Manual - Page 76
D-Link Web Smart Switch User Manual firmware_fromTFTP cfg_fromTFTP tftp://ip-address/ filename Download and install new firmware on the Switch from a TFTP server. Download a switch configuration file from a TFTP server. The IP address of the TFTP server. The filename of the firmware or switch - D-Link DES-1210-52 | Product Manual - Page 77
Line Interface D-Link Web Smart Switch User Manual Logout This command closes the current connection. Syntax logout Example DES-1210-28P> logout Figure 118 - The logout command Ping This command checks if another IP address is reachable on the network. You can ping the IP address connected - D-Link DES-1210-52 | Product Manual - Page 78
Command Line Interface D-Link Web Smart Switch User Manual Figure 120 - The reboot command Reset All configurations will be reset to the default settings. Syntax reset config Example DES-1210-28P> reset config % Device will reboot after reset configuration successfully. DES-1210-28P> Figure 121 - D-Link DES-1210-52 | Product Manual - Page 79
Link Web Smart Switch User Manual Parameter Parameter Description The new password of the administrator. Save Example DES-1210-28P> config account admin password admin DES-1210-28P> Figure 124 - The config account admin password command The command saves the configuration 00:00:48:bf:f3 - D-Link DES-1210-52 | Product Manual - Page 80
- Ethernet Technology D-Link Web Smart Switch User Manual Appendix A - Ethernet Technology This chapter will describe the features of the D-Link Web Smart Switch and provide some background information about Ethernet/Fast Ethernet/Gigabit Ethernet switching technology. Gigabit Ethernet Technology - D-Link DES-1210-52 | Product Manual - Page 81
Link Web Smart Switch User Manual Appendix B - Technical Specifications Hardware Specifications Key Components / Performance Switching Capacity: - DES-1210-08P : 1.6Gbps - DES-1210-28: 12.8Gbps - DES-1210-52: 17.6Gbps - DES-1210-28P: 12.8Gbps Max. Forwarding Rate - DES-1210-08P: 1.19Mpps - DES-1210 - D-Link DES-1210-52 | Product Manual - Page 82
SSL Green Time-based PoE (DES-1210-08P/28P only) Management Web-based GUI or SmartConsole Utility D-Link proprietary CLI SNMP support DHCP client DHCP Auto Configuration LLDP(DES-1210-08/28P only) LLDP-MED (DES-1210-28P only) Trap setting for destination IP, system events, fiber port events, twisted - D-Link DES-1210-52 | Product Manual - Page 83
Appendix C - Rack mount Instructions D-Link Web Smart Switch User Manual Appendix C - Rack mount Instructions Safety Instructions - Rack Mount Instructions - The following or similar rack-mount instructions are included with the installation instructions: A) Elevated Operating Ambient - If - D-Link DES-1210-52 | Product Manual - Page 84
- D-Link DES-1210-52 | Product Manual - Page 85
-
 1
1 -
 2
2 -
 3
3 -
 4
4 -
 5
5 -
 6
6 -
 7
7 -
8
-
9
-
10
-
11
-
12
-
13
-
14
-
15
-
16
-
17
-
18
-
19
-
20
-
21
-
22
-
23
-
24
-
25
-
26
-
27
-
28
-
29
-
30
-
31
-
32
-
33
-
34
-
35
-
36
-
37
-
38
-
39
-
40
-
41
-
42
-
43
-
44
-
45
-
46
-
47
-
48
-
49
-
50
-
51
-
52
-
53
-
54
-
55
-
56
-
57
-
58
-
59
-
60
-
61
-
62
-
63
-
64
-
65
-
66
-
67
-
68
-
69
-
70
-
71
-
72
-
73
-
74
-
75
-
76
-
77
-
78
-
79
-
80
-
81
-
82
-
83
-
84
-
85
 |
 |
