Dell 1135N Service Manual - Page 44
ssem ly, e ssem ly
 |
View all Dell 1135N manuals
Add to My Manuals
Save this manual to your list of manuals |
Page 44 highlights
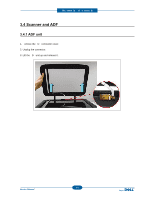
Dis ssem ly d e ssem ly 3. Dis ssem ly d e ssem ly 3.1 Prec utio s whe re l ci rts 3.1.1 Prec utio s whe ssem li d dis ssem li Use only approved Dell spare parts. Ensure that part number, product name, any voltage, current or temperature rating are correct. Failure to do so could result in damage to the machine, circuit overload, fire or electric shock. Do not make any unauthorized changes or additions to the printer, these could cause the printer to malfunction and create electric shock or fire hazards. Take care when dismantling the unit to note where each screw goes. There are 19 different screws. Use of the wrong screw could lead to system failure, short circuit or electric shock. Do not disassemble the LSU unit. Once it is disassembled dust is admitted to the mirror chamber and will seriously degrade print quality. There are no serviceable parts inside. egularly check the condition of the power cord, plug and socket. Bad contacts could lead to overheating and firfe. Damaged cables could lead to electric shock or unit malfunction. 3.1.2 Pre utio s whe h dli PBA Static electricity can damage a PB , always used approved anti-static precautions when handling or storing a PB . Prec utio s whe movi d stori PBA 1. Please keep PB in a conductive case, anti-static bag, or wrapped in aluminum foil. 2. Do not store a PB where it is exposed to direct sunlight. Prec utio s whe re l ci PBA 1. Disconnect power connectors first, before disconnecting other cables 2. Do not touch any soldered connections, connector terminals or other electronic parts when handling insulated parts. Prec utio s whe chec i PBA 1. Before touching a PB , please touch other grounded areas of the chassis to discharge any static electrical charge on the body. 2. Take care not to touch the PB with your bare hands or metal objects as you could create a short circuit or get an electric shock. Take extra care when handling PBAs with moving parts fitted such as sensors, motors or lamps as they may get hot. 3. Take care when fitting, or removing, screws. Look out for hidden screws. Always ensure that the correct screw is used and always ensure that when toothed washers are removed they are refitted in their original positions. 3.1.3 ele si Pl stic tches Many of the parts are held in place with plastic latches. elease carefully to prevent damage. To remove such parts, press the hook end of the latch away from the part to which it is latched. 3-1 Service Manual
-
 1
1 -
2
-
3
-
4
-
5
-
6
-
7
-
8
-
9
-
10
-
11
-
12
-
13
-
14
-
15
-
16
-
17
-
18
-
19
-
20
-
21
-
22
-
23
-
24
-
25
-
26
-
27
-
28
-
29
-
30
-
31
-
32
-
33
-
34
-
35
-
36
-
37
-
38
-
 39
39 -
 40
40 -
 41
41 -
 42
42 -
 43
43 -
 44
44 -
 45
45 -
 46
46 -
 47
47 -
 48
48 -
 49
49 -
50
-
51
-
52
-
53
-
54
-
55
-
56
-
57
-
58
-
59
-
60
-
61
-
62
-
63
-
64
-
65
-
66
-
67
-
68
-
69
-
70
-
71
-
72
-
73
-
74
-
75
-
76
-
77
-
78
-
79
-
80
-
81
-
82
-
83
-
84
-
85
-
86
-
87
-
88
-
89
-
90
-
91
-
92
-
93
-
94
-
95
-
96
-
97
-
98
-
99
-
100
-
101
-
102
-
103
-
104
-
105
-
106
-
107
-
108
-
109
-
110
-
111
-
112
-
113
-
114
-
115
-
116
-
117
-
118
-
119
-
120
-
121
-
122
-
123
-
124
-
125
-
126
-
127
-
128
-
129
-
130
-
131
-
132
-
133
-
134
-
135
-
136
-
137
-
138
-
139
-
140
-
141
-
142
-
143
-
144
-
145
-
146
-
147
-
148
-
149
-
150
-
151
-
152
-
153
-
154
-
155
-
156
-
157
-
158
-
159
-
160
-
161
-
162
-
163
-
164
-
165
-
166
-
167
-
168
-
169
 |
 |
