Dell 1235cn User's Guide - Page 104
Scanning, Smarthru Office, Quick Start Guide
 |
View all Dell 1235cn manuals
Add to My Manuals
Save this manual to your list of manuals |
Page 104 highlights
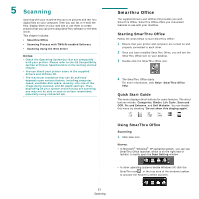
5 Scanning Scanning with your machine lets you turn pictures and text into digital files on your computer. Then you can fax or e-mail the files, display them on your web site or use them to create projects that you can print using SmarThru software or the WIA driver. This chapter includes: • Smarthru Office • Scanning Process with TWAIN-enabled Software • Scanning Using the WIA Driver NOTES: • Check the Operating System(s) that are compatible with your printer. Please refer to the OS Compatibility section of Printer Specifications in the Getting started chapter. • You can check your printer name in the supplied Drivers and Utilities CD. • The maximum resolution that can be achieved depends upon various factors, including computer speed, available disk space, memory, the size of the image being scanned, and bit depth settings. Thus, depending on your system and what you are scanning, you may not be able to scan at certain resolutions, especially using enhanced dpi. Smarthru Office The supplied Drivers and Utilities CD provides you with SmarThru Office. SmarThru Office offers you convenient features to use with your machine. Starting SmarThru Office Follow the steps below to start SmarThru Office: 1 Ensure that your printer and computer are turned on and properly connected to each other. 2 Once you have installed SmarThru Office, you will see the SmarThru Office icon on your desktop. 3 Double-click the SmarThru Office icon. 4 The SmarThru Office starts. For more information, click Help> SmarThru Office help. Quick Start Guide This menu displays direct buttons for some features. The direct buttons include: Categories, Binder, Life Cycle, Scan and OCR, Fix and Enhance, and Dell Website. You can disable this menu by checking "Do not show this diaglog again". Using SmarThru Office Scanning 1 Click scan icon. NOTES: • In Microsoft® Windows® XP operating system, you can use SmarThru Office launcher, which is on the right end of taskbar, to easily open the Scan Setting window. • In other operating systems beside Windows XP, click the SmarThru icon in the tray area of the windows taskbar to activate the SmarThru Office launcher. 22 Scanning
-
 1
1 -
2
-
3
-
4
-
5
-
6
-
7
-
8
-
9
-
10
-
11
-
12
-
13
-
14
-
15
-
16
-
17
-
18
-
19
-
20
-
21
-
22
-
23
-
24
-
25
-
26
-
27
-
28
-
29
-
30
-
31
-
32
-
33
-
34
-
35
-
36
-
37
-
38
-
39
-
40
-
41
-
42
-
43
-
44
-
45
-
46
-
47
-
48
-
49
-
50
-
51
-
52
-
53
-
54
-
55
-
56
-
57
-
58
-
59
-
60
-
61
-
62
-
63
-
64
-
65
-
66
-
67
-
68
-
69
-
70
-
71
-
72
-
73
-
74
-
75
-
76
-
77
-
78
-
79
-
80
-
81
-
82
-
83
-
84
-
85
-
86
-
87
-
88
-
89
-
90
-
91
-
92
-
93
-
94
-
95
-
96
-
97
-
98
-
 99
99 -
 100
100 -
 101
101 -
 102
102 -
 103
103 -
 104
104 -
 105
105 -
 106
106 -
 107
107 -
 108
108 -
 109
109 -
110
-
111
-
112
-
113
-
114
-
115
-
116
 |
 |