Dell 1235cn User's Guide - Page 59
Roller misfeed, Clearing paper jams, In the tray 1, In the fuser unit area - fuser unit removal
 |
View all Dell 1235cn manuals
Add to My Manuals
Save this manual to your list of manuals |
Page 59 highlights
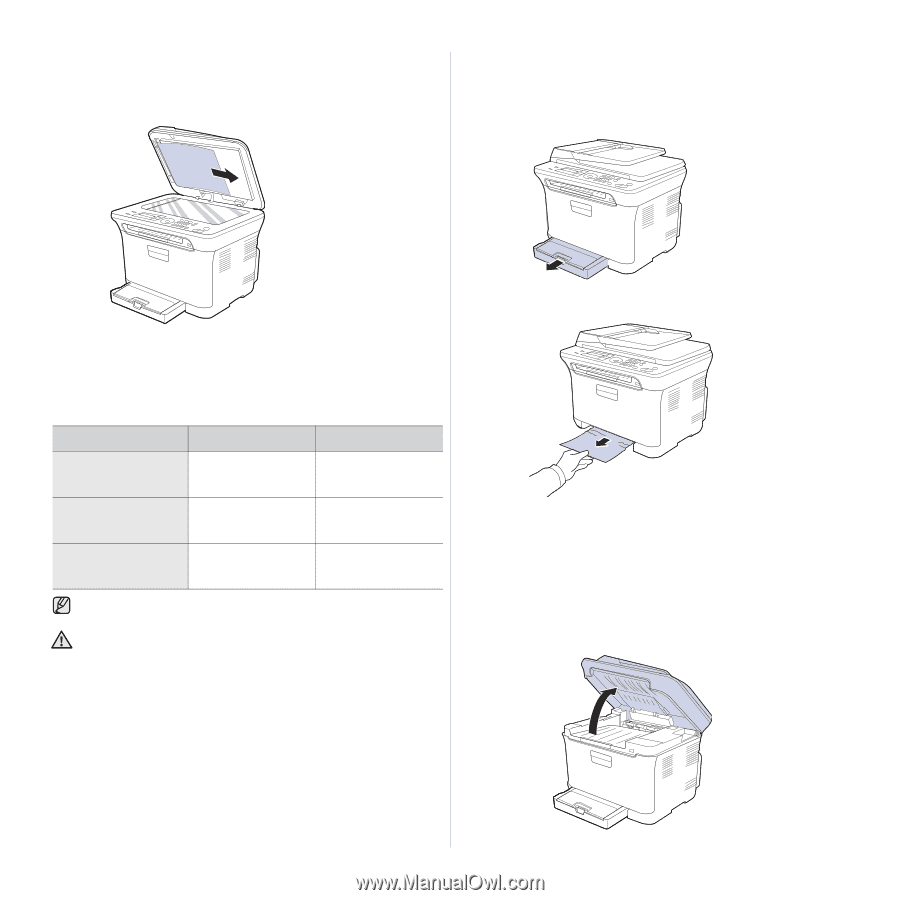
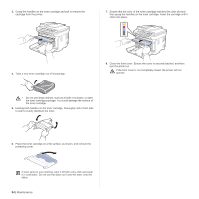
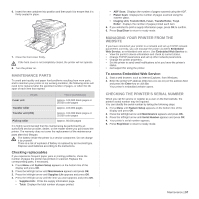
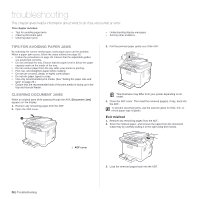
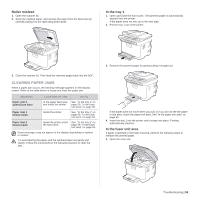
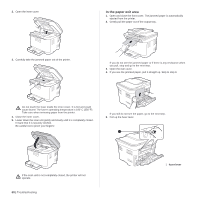
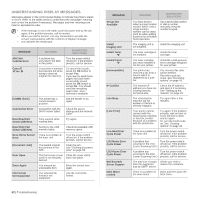
Roller misfeed 1. Open the scanner lid. 2. Seize the misfeed paper, and remove the paper from the feed area by carefully pulling it to the right using both hands. In the tray 1 1. Open and close the front cover. The jammed paper is automatically ejected from the printer. If the paper does not exit, go to the next step. 2. Pull the tray 1 out of the printer. 3. Close the scanner lid. Then load the removed pages back into the ADF. CLEARING PAPER JAMS When a paper jam occurs, the warning message appears on the display screen. Refer to the table below to locate and clear the paper jam. MESSAGE LOCATION OF JAM GO TO Paper Jam 0 Open/Close Door In the paper feed area and inside the printer See "In the tray 1" on page 59, "In the fuser unit area" on page 59. Paper Jam 1 Check Inside Inside the printer See "In the tray 1" on page 59, "In the fuser unit area" on page 59. Paper Jam 2 Check Inside Inside the printer and in See "In the tray 1" on the fuser area page 59, "In the fuser unit area" on page 59. Some messages may not appear in the display depending on options or models. To avoid tearing the paper, pull the jammed paper out gently and slowly. Follow the instructions in the following sections to clear the jam. 3. Remove the jammed paper by gently pulling it straight out. If the paper does not move when you pull, or if you do not see the paper in this area, check the paper exit area. See "In the paper exit area" on page 60. 4. Insert the tray 1 into the printer until it snaps into place. Printing automatically resumes. In the fuser unit area If paper is jammed in the fuser unit area, perform the following steps to release the jammed paper. 1. Open the scan unit. Troubleshooting | 59
-
 1
1 -
2
-
3
-
4
-
5
-
6
-
7
-
8
-
9
-
10
-
11
-
12
-
13
-
14
-
15
-
16
-
17
-
18
-
19
-
20
-
21
-
22
-
23
-
24
-
25
-
26
-
27
-
28
-
29
-
30
-
31
-
32
-
33
-
34
-
35
-
36
-
37
-
38
-
39
-
40
-
41
-
42
-
43
-
44
-
45
-
46
-
47
-
48
-
49
-
50
-
51
-
52
-
53
-
 54
54 -
 55
55 -
 56
56 -
 57
57 -
 58
58 -
 59
59 -
 60
60 -
 61
61 -
 62
62 -
 63
63 -
 64
64 -
65
-
66
-
67
-
68
-
69
-
70
-
71
-
72
-
73
-
74
-
75
-
76
-
77
-
78
-
79
-
80
-
81
-
82
-
83
-
84
-
85
-
86
-
87
-
88
-
89
-
90
-
91
-
92
-
93
-
94
-
95
-
96
-
97
-
98
-
99
-
100
-
101
-
102
-
103
-
104
-
105
-
106
-
107
-
108
-
109
-
110
-
111
-
112
-
113
-
114
-
115
-
116
 |
 |