Dell 1235cn User's Guide - Page 29
Printing on special print materials, Feeding the print material manually - software
 |
View all Dell 1235cn manuals
Add to My Manuals
Save this manual to your list of manuals |
Page 29 highlights
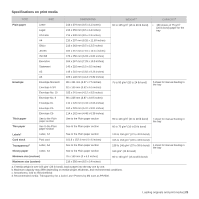
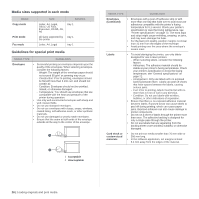
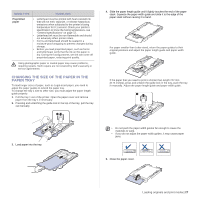
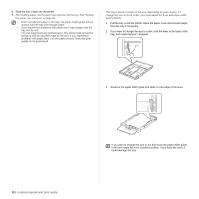
PRINTING ON SPECIAL PRINT MATERIALS The printer can hold special sizes and types of print material, such as postcards, note cards, and envelopes. Especially, it is useful for single page printing on letterhead or colored paper. Feeding the print material manually • Load only one size of print media at a time in the tray. • To prevent paper jams, do not add paper when there is still paper in the tray. This also applies to other types of print media. • Print media should be loaded face up with the side you want to print, and the top edge going into the tray first. Place print materials in the center of the tray. • Always load only the specified print media to avoid paper jams and print quality problems. See "Selecting print media" on page 24. • Flatten any curl on postcards, envelopes, and labels before loading them into the tray. 1. Load the paper. See "Changing the size of the paper in the paper tray" on page 27. Depending on the media type you are using, keep the following loading guidelines: • Envelopes: Flap side down and with the stamp area on the top left side. • Labels: Print side up and top short edge entering the printer first. • Preprinted paper: Design side up with the top edge toward the printer. • Card stock: Print side up and the short edge entering the printer first. • Previously printed paper: Previously printed side down with an uncurled edge toward the printer. 2. When you print in an application, start the print menu. 3. Before you print, open printer properties. 4. Press the Paper tab in printer properties, and select an appropriate paper type. If you want to use a label, set the paper type to Label. 5. Select Manual Feeder in paper source, then press OK. 6. Start printing in the application. 7. Press the Color Start or Black Start button on the printer to start feeding, then the printer starts printing. • If you are printing multiple pages, load the next sheet after first page prints out, and press the Color Start or Black Start button. Repeat this step for every page to be printed. • The settings you change remain in effect only while you are using the current application. SETTING THE PAPER SIZE AND TYPE After loading paper in the paper tray, you need to set the paper size and type using the control panel buttons. These settings will apply to Copy and Fax modes. For computer-printing, you need to select the paper size and type in the application you use on your computer. 1. Press Menu until System Setup appears on the bottom line of the display and press OK. 2. Press the left/right arrow until Paper Setup appears and press OK. 3. Press OK when Paper Size appears. 4. Press the left/right arrow until the paper size you are using appears and press OK. 5. Press the left/right arrow until Paper Type appears and press OK. 6. Press the left/right arrow until the paper type you are using appears and press OK. 7. Press Stop/Clear to return to ready mode. If you want to use special sized paper such as billing paper, select Custom in the Paper tab in the printer properties. See Software section. Loading originals and print media | 29
-
 1
1 -
2
-
3
-
4
-
5
-
6
-
7
-
8
-
9
-
10
-
11
-
12
-
13
-
14
-
15
-
16
-
17
-
18
-
19
-
20
-
21
-
22
-
23
-
 24
24 -
 25
25 -
 26
26 -
 27
27 -
 28
28 -
 29
29 -
 30
30 -
 31
31 -
 32
32 -
 33
33 -
 34
34 -
35
-
36
-
37
-
38
-
39
-
40
-
41
-
42
-
43
-
44
-
45
-
46
-
47
-
48
-
49
-
50
-
51
-
52
-
53
-
54
-
55
-
56
-
57
-
58
-
59
-
60
-
61
-
62
-
63
-
64
-
65
-
66
-
67
-
68
-
69
-
70
-
71
-
72
-
73
-
74
-
75
-
76
-
77
-
78
-
79
-
80
-
81
-
82
-
83
-
84
-
85
-
86
-
87
-
88
-
89
-
90
-
91
-
92
-
93
-
94
-
95
-
96
-
97
-
98
-
99
-
100
-
101
-
102
-
103
-
104
-
105
-
106
-
107
-
108
-
109
-
110
-
111
-
112
-
113
-
114
-
115
-
116
 |
 |