Dell 1235cn User's Guide - Page 105
Send to, Email, Send By E-mail - scanner not working
 |
View all Dell 1235cn manuals
Add to My Manuals
Save this manual to your list of manuals |
Page 105 highlights
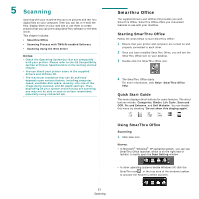
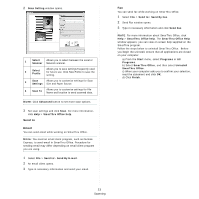
2 Scan Setting window opens. 1 Select Allows you to select between the Local or Scanner Network scanner. 2 Select Profile Allows you to save settings frequently used for future use. Click New Profile to save the setting. 3 Scan Allows you to customize settings for Scan Settings Size and Paper Source. 4 Scan To Allows you to customize settings for File Name and location to send scanned data. NOTE: Click Advanced button to set more scan options. 3 Set scan settings and click Scan. For more information, click Help > SmarThru Office help. Send to Email You can send email while working on SmarThru Office. NOTE: You need an email client program, such as Outlook Express, to send email in SmarThru Office. Procedure for sending email may differ depending on email client program you are using. 1 Select File > Send to> Send By E-mail. 2 An email client opens. 3 Type in necessary information and send your email. Fax You can send fax while working on SmarThru Office. 1 Select File > Send to> Send By Fax. 2 Send Fax window opens. 3 Type in necessary information and click Send Fax. NOTE: For more information about SmarThru Office, click Help > SmarThru Office help. The SmarThru Office Help window appears; you can view on screen help supplied on the SmarThru program. Follow the steps below to uninstall SmarThru Office. Before you begin the uninstall, ensure that all applications are closed on your computer. a) From the Start menu, select Programs or All Programs. b) Select SmarThru Office, and then select Uninstall SmarThru Office. c) When your computer asks you to confirm your selection, read the statement and click OK. d) Click Finish. 23 Scanning
-
 1
1 -
2
-
3
-
4
-
5
-
6
-
7
-
8
-
9
-
10
-
11
-
12
-
13
-
14
-
15
-
16
-
17
-
18
-
19
-
20
-
21
-
22
-
23
-
24
-
25
-
26
-
27
-
28
-
29
-
30
-
31
-
32
-
33
-
34
-
35
-
36
-
37
-
38
-
39
-
40
-
41
-
42
-
43
-
44
-
45
-
46
-
47
-
48
-
49
-
50
-
51
-
52
-
53
-
54
-
55
-
56
-
57
-
58
-
59
-
60
-
61
-
62
-
63
-
64
-
65
-
66
-
67
-
68
-
69
-
70
-
71
-
72
-
73
-
74
-
75
-
76
-
77
-
78
-
79
-
80
-
81
-
82
-
83
-
84
-
85
-
86
-
87
-
88
-
89
-
90
-
91
-
92
-
93
-
94
-
95
-
96
-
97
-
98
-
99
-
 100
100 -
 101
101 -
 102
102 -
 103
103 -
 104
104 -
 105
105 -
 106
106 -
 107
107 -
 108
108 -
 109
109 -
 110
110 -
111
-
112
-
113
-
114
-
115
-
116
 |
 |
