Dell 1235cn User's Guide - Page 61
Troubleshooting, Be careful not to pinch your fingers
 |
View all Dell 1235cn manuals
Add to My Manuals
Save this manual to your list of manuals |
Page 61 highlights
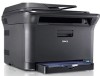
6. Open the scan unit. 9. Pull down the fuser lever. 7. Carefully take the jammed paper out of the printer. 10. Close the rear cover. Printing automatically resumes. 8. Lower down the scan unit gently and slowly until it is completely closed. Ensure that it is securely latched. Be careful not to pinch your fingers! Troubleshooting | 61
-
 1
1 -
2
-
3
-
4
-
5
-
6
-
7
-
8
-
9
-
10
-
11
-
12
-
13
-
14
-
15
-
16
-
17
-
18
-
19
-
20
-
21
-
22
-
23
-
24
-
25
-
26
-
27
-
28
-
29
-
30
-
31
-
32
-
33
-
34
-
35
-
36
-
37
-
38
-
39
-
40
-
41
-
42
-
43
-
44
-
45
-
46
-
47
-
48
-
49
-
50
-
51
-
52
-
53
-
54
-
55
-
 56
56 -
 57
57 -
 58
58 -
 59
59 -
 60
60 -
 61
61 -
 62
62 -
 63
63 -
 64
64 -
 65
65 -
 66
66 -
67
-
68
-
69
-
70
-
71
-
72
-
73
-
74
-
75
-
76
-
77
-
78
-
79
-
80
-
81
-
82
-
83
-
84
-
85
-
86
-
87
-
88
-
89
-
90
-
91
-
92
-
93
-
94
-
95
-
96
-
97
-
98
-
99
-
100
-
101
-
102
-
103
-
104
-
105
-
106
-
107
-
108
-
109
-
110
-
111
-
112
-
113
-
114
-
115
-
116
 |
 |
Troubleshooting
| 61
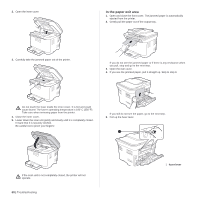
6.
Open the scan unit.
7.
Carefully take the jammed paper out of the printer.
8.
Lower down the scan unit gently and slowly until it is completely closed.
Ensure that it is securely latched.
Be careful not to pinch your fingers!
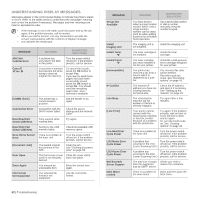
9.
Pull down the fuser lever.
10.
Close the rear cover. Printing automatically resumes.