Dell 1815dn Multifunction Mono Laser Printer User's Guide - Page 2
About Your Multi-Function Printer - labels
 |
View all Dell 1815dn Multifunction Mono Laser Printer manuals
Add to My Manuals
Save this manual to your list of manuals |
Page 2 highlights
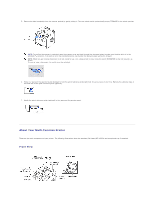
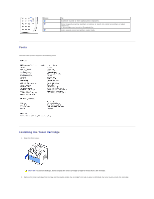
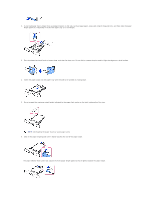
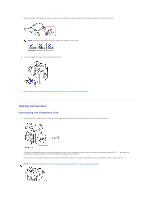
5. Remove the label completely from the scanner module by gently pulling it. The scan unlock switch automatically moves FORWARD to the unlock position. NOTE: To confirm the scanner is unlocked, open the scanner cover and look through the document glass to make sure the blue latch is in the unlocked ( ) position. If the latch is not in the unlocked position, reach under the operator panel and pull it forward. NOTE: When you are moving the printer or do not intend to use it for a long period of time, move the switch BACKWARD to the lock position, as shown. To scan or copy a document, the switch must be unlocked. 6. There is a space on the operator panel designed to hold the quick reference guide (optional) for easy access at any time. Remove the adhesive tape at the back side of the quick reference guide (optional). 7. Attach the quick reference guide (optional) to the space on the operator panel. About Your Multi-Function Printer These are the main components of your printer. The following illustrations show the standard Dell Laser MFP 1815dn and an optional tray 2 attached: Front View
-
 1
1 -
 2
2 -
 3
3 -
 4
4 -
 5
5 -
 6
6 -
 7
7 -
 8
8 -
9
-
10
-
11
-
12
-
13
-
14
-
15
-
16
-
17
-
18
-
19
-
20
-
21
-
22
-
23
-
24
-
25
-
26
-
27
-
28
-
29
-
30
-
31
-
32
-
33
-
34
-
35
-
36
-
37
-
38
-
39
-
40
-
41
-
42
-
43
-
44
-
45
-
46
-
47
-
48
-
49
-
50
-
51
-
52
-
53
-
54
-
55
-
56
-
57
-
58
-
59
-
60
-
61
-
62
-
63
-
64
-
65
-
66
-
67
-
68
-
69
-
70
-
71
-
72
-
73
-
74
-
75
-
76
-
77
-
78
-
79
-
80
-
81
-
82
-
83
-
84
-
85
-
86
-
87
-
88
-
89
-
90
-
91
-
92
-
93
-
94
-
95
-
96
-
97
-
98
-
99
-
100
-
101
-
102
-
103
-
104
-
105
-
106
-
107
-
108
-
109
-
110
-
111
-
112
-
113
-
114
-
115
-
116
-
117
-
118
-
119
-
120
-
121
-
122
-
123
-
124
-
125
-
126
-
127
-
128
-
129
-
130
-
131
-
132
-
133
-
134
-
135
-
136
-
137
-
138
-
139
-
140
-
141
-
142
-
143
-
144
-
145
-
146
-
147
-
148
 |
 |
