Dell 1815dn Multifunction Mono Laser Printer User's Guide - Page 9
Powering On the Multi-Function Printer, Dell Laser MFP 1815dn Menu Functions - duplex
 |
View all Dell 1815dn Multifunction Mono Laser Printer manuals
Add to My Manuals
Save this manual to your list of manuals |
Page 9 highlights
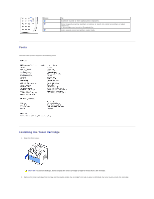
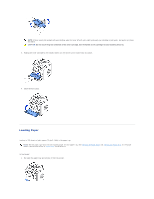
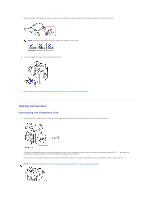
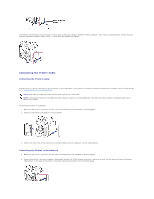
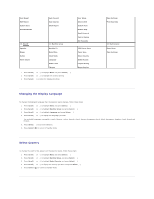
NOTE: After connecting the printer, you need to configure the network parameters on the operator panel. See "Printing a Network Configuration Page". Powering On the Multi-Function Printer CAUTION: The fusing area at the rear part of the inside of your printer becomes hot once the printer is powered on. CAUTION: Be careful of hot areas when accessing this area. CAUTION: Do not disassemble the printer when it is powered on. If you do, you may receive an electric shock. To power on the printer: 1. Plug one end of the power cord into the power receptacle at the back of the printer and the other end into a properly grounded outlet. 2. Press the power switch to power on the printer. Warming Up appears on the display indicating that the printer is now on. To view your display text in another language, see "Changing the Display Language". Dell Laser MFP 1815dn Menu Functions 1. Paper Setup Paper Size Paper Type 2. Copy Defaults # of copies Zoom Contrast Quality Select Tray Duplex 4. Scan Defaults Image Size Version Resolution Netscan Tm-out 7. Reports Phone Book 5. Advanced Fax Send Forward Recv Forward Toll Save Junk Fax Setup Secure Receive MSG Confirm 3. Fax Defaults Contrast Resolution Rings to Answr Receive Mode Redial Delay Redial Attmpts MSG Confirm Prefix Dial Stmp Rcvd Name ECM Mode Modem Speed Rcv Disable 8. Email Setup SMTP Server Auto Report Auto Reduction Discard Size Receive Code DRPD Mode Duplex 6. Directory PhoneBook Email 9. Network CFG Configuration
-
 1
1 -
2
-
3
-
 4
4 -
 5
5 -
 6
6 -
 7
7 -
 8
8 -
 9
9 -
 10
10 -
 11
11 -
 12
12 -
 13
13 -
 14
14 -
15
-
16
-
17
-
18
-
19
-
20
-
21
-
22
-
23
-
24
-
25
-
26
-
27
-
28
-
29
-
30
-
31
-
32
-
33
-
34
-
35
-
36
-
37
-
38
-
39
-
40
-
41
-
42
-
43
-
44
-
45
-
46
-
47
-
48
-
49
-
50
-
51
-
52
-
53
-
54
-
55
-
56
-
57
-
58
-
59
-
60
-
61
-
62
-
63
-
64
-
65
-
66
-
67
-
68
-
69
-
70
-
71
-
72
-
73
-
74
-
75
-
76
-
77
-
78
-
79
-
80
-
81
-
82
-
83
-
84
-
85
-
86
-
87
-
88
-
89
-
90
-
91
-
92
-
93
-
94
-
95
-
96
-
97
-
98
-
99
-
100
-
101
-
102
-
103
-
104
-
105
-
106
-
107
-
108
-
109
-
110
-
111
-
112
-
113
-
114
-
115
-
116
-
117
-
118
-
119
-
120
-
121
-
122
-
123
-
124
-
125
-
126
-
127
-
128
-
129
-
130
-
131
-
132
-
133
-
134
-
135
-
136
-
137
-
138
-
139
-
140
-
141
-
142
-
143
-
144
-
145
-
146
-
147
-
148
 |
 |
