Dell 1815dn Multifunction Mono Laser Printer User's Guide - Page 60
Clearing the Memory, Backing up Data
 |
View all Dell 1815dn Multifunction Mono Laser Printer manuals
Add to My Manuals
Save this manual to your list of manuals |
Page 60 highlights
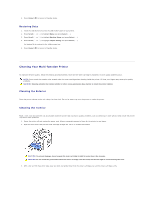
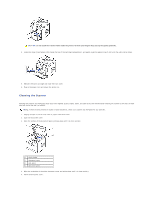
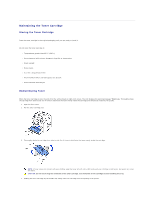
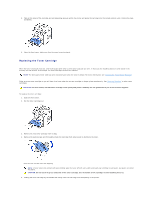
Maintenance Clearing the Memory Backing up Data Cleaning Your Multi-function Printer Maintaining the Toner Cartridge Replacement parts Ordering Supplies Clearing the Memory You can selectively clear information stored in your printer's memory. 1. Press Scroll ( or ) to highlight Menu and press Select ( ). 2. Press Scroll ( or ) to highlight Maintenance and press Select ( ). 3. Press Scroll ( or ) to highlight Clear Settings and press Select ( ). 4. Press Scroll ( or ) until you see the item you want to clear. l All Settings: Clears all of the data stored in the memory and resets all of your settings to the factory default. l Paper Setup: Restores all of the Paper Setting options to the factory default. l Copy Setup: Restores all of the Copy Setup options to the factory default. l Fax Setup: Restores all of the Fax Setup options to the factory default. l Fax Features: Cancels all of the scheduled fax jobs in the printer's memory. l Advanced Fax: Restores all of the Advanced Fax setting options to the factory default. l Sent Report: Clears all records of your sent faxes. l RCV Report: Clears all records of your received faxes. l Address Book: Clears the Email entries stored in the memory. l Phone Book: Clears the speed dial or group dial numbers stored in the memory. 5. Press Select ( ). The selected memory is cleared and the display asks you to continue clearing the next item. 6. Repeat steps 4 and 5 to clear another item. OR Press Cancel ( ) to return to Standby mode. Backing up Data Date in the printer's memory can be accidentally erased due to power failure or storage failure. Backup helps you protect your Address Book/Phone Book entries and the system settings by storing them as backup files on a USB memory key. Backing up Data 1. Insert the USB memory key into the USB memory port on your printer. 2. Press Scroll ( or ) to highlight Menu and press Select ( ). 3. Press Scroll ( or ) to highlight Machine Setup and press Select ( ). 4. Press Scroll ( or ) to highlight Export Setting and press Select ( ). The data is backed up to the USB memory key.
-
 1
1 -
2
-
3
-
4
-
5
-
6
-
7
-
8
-
9
-
10
-
11
-
12
-
13
-
14
-
15
-
16
-
17
-
18
-
19
-
20
-
21
-
22
-
23
-
24
-
25
-
26
-
27
-
28
-
29
-
30
-
31
-
32
-
33
-
34
-
35
-
36
-
37
-
38
-
39
-
40
-
41
-
42
-
43
-
44
-
45
-
46
-
47
-
48
-
49
-
50
-
51
-
52
-
53
-
54
-
 55
55 -
 56
56 -
 57
57 -
 58
58 -
 59
59 -
 60
60 -
 61
61 -
 62
62 -
 63
63 -
 64
64 -
 65
65 -
66
-
67
-
68
-
69
-
70
-
71
-
72
-
73
-
74
-
75
-
76
-
77
-
78
-
79
-
80
-
81
-
82
-
83
-
84
-
85
-
86
-
87
-
88
-
89
-
90
-
91
-
92
-
93
-
94
-
95
-
96
-
97
-
98
-
99
-
100
-
101
-
102
-
103
-
104
-
105
-
106
-
107
-
108
-
109
-
110
-
111
-
112
-
113
-
114
-
115
-
116
-
117
-
118
-
119
-
120
-
121
-
122
-
123
-
124
-
125
-
126
-
127
-
128
-
129
-
130
-
131
-
132
-
133
-
134
-
135
-
136
-
137
-
138
-
139
-
140
-
141
-
142
-
143
-
144
-
145
-
146
-
147
-
148
 |
 |
