Dell 928 User Guide - Page 64
Error Messages and LEDs, Alignment error
 |
View all Dell 928 manuals
Add to My Manuals
Save this manual to your list of manuals |
Page 64 highlights
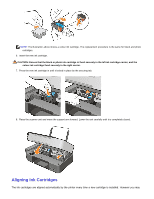
USE ONLY THE TYPE Of PAPER REcOMMENdEd fOR THE PRiNTER. For more information, see chapter "Loading Paper". USE LESS PAPER WHEN PRiNTiNG MANY PAGES. For more information, see chapter "Loading Paper". ENSURE THAT THE LOAdEd PAPER iS NOT fOLdEd, TORN OR dAMAGEd. ENSURE THAT THE PAPER iS ALiGNEd WiTH THE RiGHT SidE Of THE PAPER SUPPORT, ANd THAT THE PAPER GUidE RESTS AGAiNST THE LEfT EdGE Of THE PAPER. ENSURE THAT THERE iS NO PAPER JAM. If you are using the printer in connection with a computer: · Follow the instructions displayed on the screen to remove the paper jam. If you are using the printer standalone, and: · Paper is jammed in the paper support: 1 Switch off the printer. 2 Take hold of the paper and pull it carefully out of the printer. 3 Switch on the printer and print the document again. · Paper is jammed in a hidden place: 1 Switch off the printer. 2 Lift the scanner unit and position the scanner support in a way that it maintains the scanner in the open position. 3 Pull the paper out of the printer carefully, including any remaining bits. 4 Close the scanner unit, switch the printer on and print the document again. Error Messages and LEDs The following error messages are displayed on the computer screen or on the operator panel display. Error Message Description Solution Alignment error Check that the tape has been removed from the cartridges. The tape has not been removed from the ink cartridge nozzles before they were installed in the printer. Remove the tape from the ink cartridges. For more information, see "Replacing Ink Cartridges".
-
 1
1 -
2
-
3
-
4
-
5
-
6
-
7
-
8
-
9
-
10
-
11
-
12
-
13
-
14
-
15
-
16
-
17
-
18
-
19
-
20
-
21
-
22
-
23
-
24
-
25
-
26
-
27
-
28
-
29
-
30
-
31
-
32
-
33
-
34
-
35
-
36
-
37
-
38
-
39
-
40
-
41
-
42
-
43
-
44
-
45
-
46
-
47
-
48
-
49
-
50
-
51
-
52
-
53
-
54
-
55
-
56
-
57
-
58
-
 59
59 -
 60
60 -
 61
61 -
 62
62 -
 63
63 -
 64
64 -
 65
65 -
 66
66 -
 67
67 -
 68
68 -
 69
69 -
70
-
71
 |
 |
