Dell 966 User Guide
Dell 966 Manual
 |
View all Dell 966 manuals
Add to My Manuals
Save this manual to your list of manuals |
Dell 966 manual content summary:
- Dell 966 | User Guide - Page 1
Tag available. Finding Information Faxing About Your Printer Understanding the Software Understanding the Operator Installing the Dell 966 Internal Panel Menus Wireless/Ethernet Adapter Loading Paper and Originals Maintenance Printing Troubleshooting Printing From a Memory Card or USB Key - Dell 966 | User Guide - Page 2
July 2007 SRV FT715 Rev. A01 - Dell 966 | User Guide - Page 3
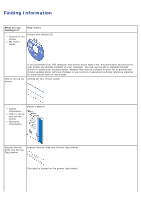
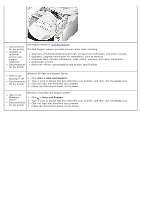
What are you looking for? Find it here Drivers for my printer My User's Guide Drivers and Utilities CD How to set up my printer If you purchased your Dell computer and printer at the same time, documentation and drivers for your printer are already installed on your computer. You can use the CD - Dell 966 | User Guide - Page 4
then click the arrow icon. 3. Click the topic that describes your problem. 4. Follow the instructions shown on the screen. How to use Windows Vista Help and Support Center Windows 1. Click ® Help and Support. Vista™ Documentation for my printer 2. Type a word or phrase that best describes your - Dell 966 | User Guide - Page 5
. In addition, the Dell Fax Solutions Software is bundled in the Drivers and Utilities CD and should have been installed when you installed your printer driver. You can also use this faxing software to send and receive faxes. Equipment printer phone cord (provided) Benefits Make copies and send - Dell 966 | User Guide - Page 6
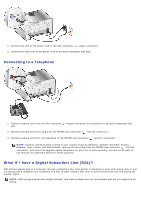
Your printer is designed to work with analog data. If you are faxing over a telephone line connected to a DSL modem, install a DSL filter to avoid interference with the analog fax modem signal. NOTE: ISDN (integrated services digital network) and cable modems are not fax modems and are not supported - Dell 966 | User Guide - Page 7
on the DSL filter. NOTE: Do not install any splitters between the DSL filter and the printer. Contact your DSL service provider if you need more help. Connecting to an Answering Machine 1. Connect a phone cord from the FAX connector ( -upper connector) on the printer to an active telephone wall jack - Dell 966 | User Guide - Page 8
cord from the computer modem to the PHONE jack connector ( -bottom connector). 4. Connect a phone cord the keypad to enter a number. You can enter a maximum of 64 digits in a fax number. Sending a fax to an entry in additional 0 0 for a one-digit extension. For example, to dial extension 12, enter 120 - Dell 966 | User Guide - Page 9
that you are using to fax, you must also have a DSL filter installed. Contact your Internet Service Provider for information. 2. Load your original document. 3. Click Start® Programs or All Programs® Dell Printers® Dell Photo AIO Printer 966. For Windows Vista: a. Click ® Programs. b. Click Dell - Dell 966 | User Guide - Page 10
c. Click Dell Photo AIO Printer 966. 4. Select Dell All-In-One Center. The Dell All-In-One Center opens. 5. In the Dell All-In-One Center, you can either: In the Scan or Fax section, send a single- or multiple-page fax. First, customize your fax job by answering the questions - Dell 966 | User Guide - Page 11
a connection are retried based on the number of retries specified in the Dialing and Sending menu. Manually Dialing a Fax While Listening to a Telephone Line (On Hook Dial) 1. Make sure your printer is on and connected to an active telephone line. 2. Load an original document. 3. From the main - Dell 966 | User Guide - Page 12
You can also enter or change information on the Cover Page using the Printer Setup Utility. For more information, see Using the Computer. Using the Computer Click the Sending Faxes tab. 3. From the Cover Page area, click User Information. 4. Enter information about the sender. NOTE: You may have - Dell 966 | User Guide - Page 13
support color faxes. 1. Make sure your printer is on and connected to an active telephone line. 2. Load the paper. For more information, see Loading Paper. 3. Load the original document. Faxing color documents uses a lot of the printer that prints at a lower resolution, the printer can automatically - Dell 966 | User Guide - Page 14
Back button . to select the number of rings you want to allow before the printer When the number of set rings is detected, the printer automatically receives the fax. Receiving a Fax Manually 1. Make sure your printer is on and connected to an active telephone line. 2. Make sure Auto Answer is - Dell 966 | User Guide - Page 15
tone, press DELL# (3355#) on the printer operator panel. NOTE: DELL# is the Windows Vista: a. Click ® Programs. b. Click Dell PC Fax. c. Click Dell PC Fax. 2. From Receiving Faxes, choose how you want to receive the fax. Select Automatically if you want the software to receive faxes, or Manually - Dell 966 | User Guide - Page 16
Printer Setup Utility if you want to configure the printer's fax settings from your computer. 1. Click Start® Programs or All Programs® Dell Printers® Dell Photo AIO Printer 966. For Windows Vista: a. Click ® Programs. b. Click Dell Printers. c. Click Dell Photo AIO Printer 966. 2. Select Printer - Dell 966 | User Guide - Page 17
service activated. Set the ring volume. Choose whether to use error Specify a manual answer print a footer (date, time, and page number) on each page. If an optional second paper tray is installed, choose from which tray the printer picks paper. Choose Auto if you want the printer to pick the paper - Dell 966 | User Guide - Page 18
assumes you are entering a speed dial entry. If the number you entered does not correspond to any entry in the Phone Book, the printer assumes you are entering an extension number. Blocking Faxes Create a Blocked Fax List 1. From the main menu, press the up or down Arrow button . to - Dell 966 | User Guide - Page 19
the left or right Arrow button to choose On. 5. Press the Select button . If the printer detects a fax from one of the numbers on the Blocked Fax List, the transmission is disconnected. Blocking Faxes Without Caller ID 4. From the History and Reports menu, you can view or print your fax activity. - Dell 966 | User Guide - Page 20
Click Start® Programs or All Programs® Dell PC Fax® Dell PC Fax. For Windows Vista: a. Click ® Programs. b. Click Dell PC Fax. c. Click Dell PC Fax. 2. From Sending Faxes, click Create Report. 3. Select a date range for your report. 4. Click the print button in the upper-left corner of the dialog to - Dell 966 | User Guide - Page 21
3 Operator panel 4 Paper tray 5 Optional paper tray 6 Paper exit tray Description: Part that feeds original documents into the printer. Unit you lift to gain access to the ink cartridges. Panel on the printer you use to control copying, scanning, faxing, and printing. For more information - Dell 966 | User Guide - Page 22
Identify your printer when you use support.dell.com or contact technical support. Enter the Express Service Code to direct your call when contacting technical support. NOTE: The Express Service Code is not available in all countries. 12 Supplies Reorder Label To order ink cartridges or paper, visit - Dell 966 | User Guide - Page 23
you can purchase separately to print on both sides of the paper. unit 18 Optional Dell 966 A networking device that you can purchase separately to set up your printer on a wireless Internal network. Wireless/Ethernet Adapter 19 Power cord connector Connects printer power supply to the power - Dell 966 | User Guide - Page 24
button 8 Back button 9 Keypad printer needs power to perform regular maintenance on cartridges. NOTE: To conserve power, press and hold the Power button to put your printer on a 1 Watt-Off State. Your printer consumes minimal power at this state. Cancel a scan, print, or copy job in progress - Dell 966 | User Guide - Page 25
Using the Dell All-In-One Center Using the Dell Fax Solutions Software Using Printing Preferences Using Memory Card Manager Dell Ink Management System Removing and Reinstalling Software The printer software includes: Dell All-In-One Center- Allows you to perform various scan, copy - Dell 966 | User Guide - Page 26
them to folders, print them, perform creative copying). NOTE: You cannot scan over a network using the Dell All-In-One Center. To access the Dell All-In-One Center: 1. Click Start® Programs or All Programs® Dell Printers® Dell Photo AIO Printer 966. For Windows Vista: a. Click ® Programs. b. Click - Dell 966 | User Guide - Page 27
Software: 1. Click Start® Programs or All Programs® Dell PC Fax. 2. Select Dell PC Fax. For Windows Vista : a. Click ® Programs. b. Click Dell PC Fax. c. Click Dell PC Fax. The Dell Fax Solutions Software the printer attempts to send the fax when a transmission fails. Specify the driver - Dell 966 | User Guide - Page 28
Settings® Control Panel® Printers and Other Hardware® Printers and Faxes. In Windows 2000, click Start® Settings® Printers. In Windows Vista: a. Click ® Control Panel. b. Click Hardware and Sound. c. Click Printers. 2. Right-click the printer icon, and then select Printing Preferences. NOTE: Changes - Dell 966 | User Guide - Page 29
a photo cartridge installed. Media Type - Allows you to set the paper type manually, or have the printer detect the paper type automatically. Paper Size - Select the size of your paper. Print in black and white - Print your color images in black and white to save the ink in your color cartridge - Dell 966 | User Guide - Page 30
or All Programs® Dell Printers® Dell Photo AIO Printer 966. For Windows Vista: a. Click ® Programs. b. Click Dell Printers. c. Click Dell Photo AIO Printer 966. 3. Select Memory Card Manager. Dell Ink Management System Each time you print a job, a printing progress screen appears, which shows - Dell 966 | User Guide - Page 31
® Dell Printers® Dell Photo AIO Printer 966. For Windows Vista: a. Click ® Programs. b. Click Dell Printers. c. Click Dell Photo AIO Printer 966. 2. Click Uninstall Dell Photo AIO Printer 966. 3. Follow the instructions on the screen. 4. Restart your computer. 5. Insert the Drivers and Utilities - Dell 966 | User Guide - Page 32
Color* Black & White Copies 1-99 Reduce/Enlarge 50% 100%* 200% Custom% Fit to Page 2 x 2 Poster 3 x 3 Poster 4 x 4 Poster Quality Draft Normal Photo Auto* Lighter/Darker Press the left or right Arrow button to adjust the brightness. Paper Handling Press the Select button to enter the Paper - Dell 966 | User Guide - Page 33
Mode Most digital cameras use a memory card to store photos. Your printer supports the following digital media: CompactFlash Type I and II Memory Stick Memory Stick PRO Memory Stick Duo (with adapter) Microdrive Secure Digital Mini SD (with adapter) MultiMedia Card xD-Picture Card To view or change - Dell 966 | User Guide - Page 34
screen. Press the Select button to enter the Print All Photos screen where you can specify the number of photos printed on a page. NOTE: Only photos stored in the JPG format can be printed directly from the memory card. If you want to print photos stored on the memory card in a different file - Dell 966 | User Guide - Page 35
page) One Photo Centered 1 per page 2 per page 3 per page 4 per page 6 per page 8 per page 16 per page Quality Auto* Draft Normal Photo Paper Press the Select button to enter the Paper Handling menu, and then select the size and type of the Handling blank paper loaded in the input tray. If you - Dell 966 | User Guide - Page 36
, and then press the Select button. Print Files Mode Menu Menu item Settings Quality Auto* Draft Normal Photo Paper Press the Select button to enter the Paper Handling menu, and then select the size and type of the Handling blank paper loaded in the input tray. If you have an optional input - Dell 966 | User Guide - Page 37
number on the Fax main menu, then you can also use this window to enter another number and send a broadcast fax. Phone Book Press see Phone Book Add Group Menu. Press the Select button to print the phone book stored on your printer. Name Search Menu You can access the Name Search menu by - Dell 966 | User Guide - Page 38
by selecting Group Search from the Phone Book menu. Menu item Search Criteria Window Speed dial Action Use the keypad to enter a letter. The fax number of groups listed depends on the number of groups specified in your printer. Phone Book Edit Group Menu You can access the Phone Book: Edit - Dell 966 | User Guide - Page 39
Phone book menu. Menu item Name Fax number window Name Search Phone Number Search Redial History Speed user intervention. When Auto Answer is turned off, incoming faxes must be answered manually. Cover Page Action Yes No* Color Black & White* Color Quality Standard* Fine Superfine Ultrafine - Dell 966 | User Guide - Page 40
to enter the Ringing and Answering menu. For more information, see Ringing and Answering Menu. Fax Printing Press the Select button Menu. to enter the Fax Printing menu. For more information, see Fax Printing Dialing and Sending Press the Select button to enter the Dialing and Sending menu. For - Dell 966 | User Guide - Page 41
a history of received faxes. to display information about pending faxes on the screen. Manual Print* Every 40 Jobs Print Fax Activity History Confirmation Press the Select button Off On Error* For All to print a history of your fax activity. * Factory default settings Fax History More Options - Dell 966 | User Guide - Page 42
Footer On* Off 2-Sided Print 1 Sided Print* 2 Sided Print Paper Press the Select button to enter the Paper Handling menu, and then select the size and type of the Handling blank paper loaded in the input tray. If you have an optional input tray, you can also specify the paper source. For more - Dell 966 | User Guide - Page 43
the Select button Create-Press the Select button to change defaults. to create a prefix if one is necessary to obtain an outside line. Off Low* High Before Dial*-the fax is scanned send settings. Off-an unsupported fax error is given if there is a mismatch between send settings and those on the receiving - Dell 966 | User Guide - Page 44
a caller ID that matches one specified on the block list or print the contents of the blocked fax list. * Factory default settings Blocked Fax Name Search Menu You can access the Blocked Fax Name Search menu by selecting Blocked Fax Name Search from the Fax Blocking menu. Menu item Search Window - Dell 966 | User Guide - Page 45
Mode To view or change the Scan Mode menu settings: 1. Ensure your printer and computer are connected via a USB cable. 2. From the main menu, Menu Menu item Settings Scan To Preview Email File software installed on your computer Color Color* Black & White Quality Automatic* 150 dpi 300 dpi - Dell 966 | User Guide - Page 46
print a list of the options that were set using the operator panel. Network Setup Press the Select button Network Setup Menu. to enter the Network Setup menu. For more information, see Paper Handling Menu You can select the size and type of the blank paper loaded in the input tray from the Paper - Dell 966 | User Guide - Page 47
menu, Photo Print Settings menu, Photo Default Settings menu, Print File Default Settings menu, Fax Printing menu, or Bluetooth Default Settings menu. Paper Handling menu for printer with one input tray Menu Settings item Size Hagaki L 2L A6 10x15 cm A5 13x18 cm B5 A4 3x5 4x6 5x7 8.5x11 8.5x14 - Dell 966 | User Guide - Page 48
Off* Auto For more information, see Understanding Tray Linking. Tray1* Tray2 Photo Source Tray1* Tray2 Print Files Source Tray1* Tray2 Fax Source Tray1* Tray2 Auto NOTE: Select Auto if you want the printer to pick from the tray containing the paper that matches the size of the incoming fax - Dell 966 | User Guide - Page 49
Settings Color* Black & White Quality Auto* Draft Normal Photo Content Type Text & Graphics* Photo Text Only Line Drawing 2-sided copies 1-Sided Original, 1-Sided Copy* 1-Sided Original, 2-Sided Copy 2-Sided Original, 1-Sided Copy 2-Sided Original, 2-Sided Copy Paper Handling Press the - Dell 966 | User Guide - Page 50
page) One Photo Centered 1 per page 2 per page 3 per page 4 per page 6 per page 8 per page 16 per page Quality Auto* Draft Normal Photo Paper Handling Press the Select button Handling Menu. * Factory default setting to enter the Paper Handling menu. For more information, see Paper Print File - Dell 966 | User Guide - Page 51
Change Default Settings from the Scan Mode menu. Menu item Color Settings Color* Black & White Quality Automatic* 150 dpi 300 dpi 600 dpi Original by selecting Change PictBridge Default Settings from the Setup menu. Menu item Photo Size Settings Hagaki L 2L 60x80 mm A6 10x15 cm A5 B5 A4 - Dell 966 | User Guide - Page 52
every time the printer is powered on. Active Network Auto Ethernet 10/100 Wireless 802.11b/g * Factory default setting Wireless Menu You can view or change the settings in the Wireless Setup Menu by selecting Wireless Menu from the Network Setup menu. Menu item Print Wireless Setup Page Network - Dell 966 | User Guide - Page 53
Press the Select button to display the current ink level for each cartridge on the screen. Clean Cartridges Press the Select button to clean the ink cartridges. Align Cartridges Press the Select button to align the ink cartridges. Change Print Cartridges Press the Select button to view steps - Dell 966 | User Guide - Page 54
setting to reset all settings to factory default settings. PictBridge Mode Your printer automatically switches to PictBridge mode when you connect a PictBridge-enabled camera. You can print pictures using the controls of the camera. For more information, see Printing Photos From a PictBridge - Dell 966 | User Guide - Page 55
you want other Bluetooth-enabled devices to detect the USB Bluetooth adapter attached to your printer. Security Low* High Pass Key Specify a pass key. Any external Bluetooth-enabled device needs to enter this passkey before it sends a print job. NOTE: You only need to specify a pass key if the - Dell 966 | User Guide - Page 56
The Dell™ 966 Internal Wireless/Ethernet Adapter The Dell Photo All-In-One Printer 966 An existing wireless network The Drivers and Utilities CD that came with your printer A computer running one of the following operating systems: Windows Vista™ Windows® XP Windows 2000 Wireless Network Settings - Dell 966 | User Guide - Page 57
Hex characters, valid keys are either 10 or 26 characters long. If you are using ASCII, valid keys are either 5 or 13 characters long. Installing and Setting Up the Adapter Installing the Adapter 1. Turn off your printer, and then unplug the power cable from the wall. CAUTION: Failure to unplug the - Dell 966 | User Guide - Page 58
and Utilities CD. The CD launches automatically. NOTE: If you do not have your Drivers and Utilities CD, you can download the appropriate software from support.dell.com . 5. Select Using a wireless network, and then click Next. 6. Select I Agree with the terms of this license agreement, and then - Dell 966 | User Guide - Page 59
. The CD launches automatically. NOTE: If you do not have your Drivers and Utilities CD, you can download the appropriate software from support.dell.com . 3. Select Advanced Setup, and then click Next. 4. Select how the printer will be attached to a network, and then click Next. 5. Click I Agree - Dell 966 | User Guide - Page 60
detect wireless network settings or allow you to manually enter the network configuration settings. Before configuring the adapter, make sure your printer has been set up correctly: The adapter has been installed correctly in the printer. The ink cartridges are installed correctly. Paper has - Dell 966 | User Guide - Page 61
in Infrastructure Mode. For Ad-Hoc Mode, select Access other computers directly without using a wireless router (AdHoc Mode), and then click Next. For additional setup instructions, see Manually Configuring the Adapter in Ad-Hoc Mode. 3. Select the appropriate security method, and then click Next - Dell 966 | User Guide - Page 62
Next to apply the settings. 4. Verify that the adapter can communicate over the network. For more information, see Verifying Network Communication. If you only want to connect to access points that support WPA2 security 1. From the Wireless Security Settings screen, select Wi-Fi Protected Access - Dell 966 | User Guide - Page 63
configured and is available on the network, remove the USB cable, and click Next to continue with printer software installation. If the adapter was not able to join the wireless network, try one of the following suggestions: Click View Settings to verify the settings are correct. Select I want to - Dell 966 | User Guide - Page 64
Loading Original Documents Loading Paper Into Trays Loading Paper 1. Fan the paper. 2. Remove the paper tray. Push the lever in, and then extend the tray until it is long enough to accommodate the length of the paper. 3. Load paper in the paper tray, and adjust the paper guides. NOTE: You can only - Dell 966 | User Guide - Page 65
The paper guides rest against the edges of the paper. You load the paper with the print side facing down and the top going into the printer first. You select Automatic, Draft, Normal, or Photo print quality. Do not select Draft if you have a Photo cartridge installed. 10 envelopes in the paper tray - Dell 966 | User Guide - Page 66
25 sheets of labels 150 sheets of letterhead paper 150 sheets of custom size paper The print side of the paper faces down. The paper guides rest against the edges of the paper. You select Automatic, Normal or Photo print quality. You follow the loading instructions on the iron-on transfer packaging - Dell 966 | User Guide - Page 67
and optional paper trays. The printer automatically links the trays; when one tray is empty, paper feeds from the next linked tray. For example, if you have the same size and type of paper in Tray 1 (standard paper tray) and Tray 2 (optional tray), the printer selects print media from Tray 1 until - Dell 966 | User Guide - Page 68
and type of paper loaded in both paper trays. 6. Press the up or down Arrow button to select Auto. to scroll to Tray Linking, and then press the left or right Arrow button 7. Press the Back button to save the settings and return to the previous menu. Enabling Tray Linking to Print Received Faxes - Dell 966 | User Guide - Page 69
Quality/Speed settings Black and Color Cartridges Installed Photo and Color Cartridges Installed Normal Photo Normal Photo Photo Photo NOTE: Your printer cannot detect paper size. To choose paper size: 1. With your document open, click File® Print. The Print dialog box opens. 2. Click - Dell 966 | User Guide - Page 70
. 4. Click OK. To turn off the automatic paper type sensor for all print jobs: 1. In Windows® XP, click Start® Control Panel® Printers and Other Hardware® Printers and Faxes. In Windows 2000, click Start® Settings® Printers. In Windows Vista™: a. Click ® Control Panel. b. Click Hardware and Sound - Dell 966 | User Guide - Page 71
11.0 - 14.0 inches (279.4 - 355.6 mm) The document is loaded text side up. The paper guide rests against the edge of the paper. You allow the preprinted media to dry thoroughly before use in the ADF. You do not use media printed with metallic ink particles in the ADF. You avoid embossed designs. The - Dell 966 | User Guide - Page 72
3. Close the top cover. - Dell 966 | User Guide - Page 73
. Dell recommends Dell ink cartridges for your printer. Dell does not provide warranty coverage for problems caused by using accessories, parts, or components not supplied by Dell. Replacing Ink Cartridges 1. Turn on your printer. 2. Lift the printer unit. The ink cartridge carrier moves and stops - Dell 966 | User Guide - Page 74
shows a black cartridge and a color cartridge (used for normal printing). For photo printing, use a photo cartridge and a color cartridge. 7. Insert the new ink cartridges. Make sure the black or photo ink cartridge is secure in the left ink cartridge carrier, and the color ink cartridge is secure - Dell 966 | User Guide - Page 75
printing. The ink cartridges align when the page prints. To align the ink cartridges from the printer software: 1. Load plain paper. 2. In Windows XP, click Start® Control Panel® Printers and Other Hardware® Printers and Faxes. In Windows 2000, click Start® Settings® Printers. In Windows Vista - Dell 966 | User Guide - Page 76
to scroll to Clean Cartridges. 5. Press the Select button . The cleaning page begins printing. To clean the nozzles from the printer software: 1. Load plain paper. 2. In Windows XP, click Start® Control Panel® Printers and Other Hardware® Printers and Faxes. In Windows 2000, click Start® Settings - Dell 966 | User Guide - Page 77
the Maintenance tab. 6. Click Clean Ink Cartridges. The cleaning page begins printing. 7. If the print quality has not improved, click Clean Again. 8. Print your document again to verify the improved print quality. If you are still not satisfied with the print quality, wipe the nozzles with a clean - Dell 966 | User Guide - Page 78
Click OK or Print. Printing Photos NOTE: Dell recommends you use a color cartridge and a photo cartridge for printing photos. 1. Turn on your computer and printer, and make sure they are connected. 2. Load photo/glossy paper with the print side facing up. NOTE: Photo/glossy paper is recommended for - Dell 966 | User Guide - Page 79
paper contains a 2 mm margin on all sides. 6. On the Print Setup and Advanced tabs, make any necessary changes for your document. 7. When you finish customizing your settings, click OK. The Printing Preferences dialog box closes. 8. Click OK or Print. 9. Remove each photo after it exits the printer - Dell 966 | User Guide - Page 80
This All-In-One (AIO) printer is compliant with Bluetooth Specification 1.2. It supports Object Push Profile. Check print Microsoft documents from your Windows Mobile/Pocket PC PDA, you require additional third-party software and drivers. For more information about the required software and drivers - Dell 966 | User Guide - Page 81
. NOTE: If the security level is set to High, you need to specify a pass key for the USB Bluetooth adapter. Any external Bluetooth-enabled device needs to enter this pass key to send a print job to your printer. 9. Press the Back button to save your settings and go back to the previous menu - Dell 966 | User Guide - Page 82
Printing Photos From a PictBridge-Enabled Camera Your printer supports PictBridge-enabled cameras. 1. Insert one end of the USB cable into the camera. 2. Insert the other end of the USB cable into the PictBridge port on the front of the printer. Refer to the instructions included with your camera - Dell 966 | User Guide - Page 83
on both sides of the paper without having to manually re-orient the sheets. Make sure: You installed the optional duplex unit. You loaded letter size or A4 plain paper. You cannot duplex-print on envelopes, card stock, or photo paper. 1. Turn on your computer and printer, and make sure they are - Dell 966 | User Guide - Page 84
. 8. When you are finished customizing your settings, click OK. The Printing Preferences dialog box closes. 9. Click OK or Print. Manual Duplex Manual duplex allows you to print your document on both sides of the paper. The printer prints the odd-numbered pages of the document on the front sides of - Dell 966 | User Guide - Page 85
are finished customizing your settings, click OK. The Printing Preferences dialog box closes. 8. Click OK or Print. NOTE: Once the printer begins printing, wait until you can see the leading edge of the banner exiting the printer, and then carefully unfold the paper down to the floor in front of the - Dell 966 | User Guide - Page 86
shown on the Setting Up Your Printer poster, and then restart the computer. If the software installation screen does not appear automatically, install the software manually. 1. Insert the Drivers and Utilities CD. 2. In Windows XP, click Start® My Computer. In Windows 2000, double-click My Computer - Dell 966 | User Guide - Page 87
. Printer won't print and print jobs are stuck in the print queue. Check for multiple instances of the printer installed on your computer. 1. In Windows XP, click Start® Control Panel® Printers and Other Hardware® Printers and Faxes. In Windows 2000, click Start® Settings® Printers. In Windows Vista - Dell 966 | User Guide - Page 88
. For more information, see Loading Paper. Ensure the printer is not connected to a PictBridge-enabled camera. For more information, see Printing Photos From a PictBridge-Enabled Camera. General Problems Printing Problems Check the ink levels, and install new print cartridges if necessary. For more - Dell 966 | User Guide - Page 89
. 1. Click Start® Programs or All Programs® Dell Printers® Dell Photo AIO Printer 966. For Windows Vista: a. Click ® Programs. b. Click Dell Printers. c. Click Dell Photo AIO Printer 966. 2. Select Dell All-In-One Center. The Dell All-In-One Center opens. 3. Click See More Copy Settings, and - Dell 966 | User Guide - Page 90
Printers. For Windows Vista: 1. Click ® Programs. 2. Click Dell Printers. If the printer does not appear in the list of printers, the printer software is not installed. Install the printer software. For more information, see Removing and Reinstalling Software. Correct communication problems between - Dell 966 | User Guide - Page 91
. 1. Click Start® Programs or All Programs® Dell Printers® Dell Photo AIO Printer 966. For Windows Vista: a. Click ® Programs. b. Click Dell Printers. c. Click Dell Photo AIO Printer 966. 2. Select Dell All-In-One Center. The Dell All-In-One Center opens. 3. Click See More Scan Settings. 4. Select - Dell 966 | User Guide - Page 92
Printers® Dell Photo AIO Printer 966. For Windows Vista: a. Click ® Programs. b. Click Dell Printers. c. Click Dell Photo AIO Printer 966. 2. Select Dell All-In-One Center. The Dell All-In-One cloth dampened with water. Fax Problems Make sure you turned on both your printer and your computer, and - Dell 966 | User Guide - Page 93
it is turned on and it is correctly connected to your computer. When the printer's memory is full, print a fax activity report and resend pages that were not transmitted. When sending color pages, set the printer to scan the original documents after dialing. 1. From the main menu, press the up - Dell 966 | User Guide - Page 94
want to print photos stored on the memory card in a different file format, the photos must be transferred to your computer before printing. Ensure the printer is not connected to a PictBridge-enabled camera. For more information, see Printing Photos From a PictBridge-Enabled Camera. Paper Problems - Dell 966 | User Guide - Page 95
jam. If the paper jam is near the paper input tray: 1. Remove the paper tray. 2. Pull firmly on the paper to remove it. 3. Replace the paper tray. 4. Press the Select button . 5. Resend your print job to print any missing pages. If the paper jam is not visible: 1. Turn off the printer. 2. Lift the - Dell 966 | User Guide - Page 96
gently pull it from the printer. 4. Close the rear access door. 5. Re-install the duplex unit. 6. Press the Select button to continue printing. If the paper jam occurs near the ADF: 1. Lift the ADF cover located to the left of the ADF input tray. 2. Firmly grasp the paper, and then gently pull it - Dell 966 | User Guide - Page 97
print a borderless picture, choose a paper size that is the same size as the photo. The attached device is not a supported Bluetooth device. Please disconnect and refer to user manual. Left cartridge missing. Insert Attach a USB Bluetooth adapter into the PictBridge port. Insert a black or photo - Dell 966 | User Guide - Page 98
Black or Photo Cartridge. Right cartridge missing. Insert Color Cartridge. Left cartridge error. Replace cartridge. Right cartridge error. Replace cartridge. Check the AIO for Obstructions, then press . A printhead carrier jam exists in the printer. cartridge carrier. For more information, see - Dell 966 | User Guide - Page 99
the print quality. Use the appropriate paper. For example, use Dell™ Premium Photo Paper if you are printing photos with a photo ink cartridge. Use paper that is a heavier weight, bright white, or coated. Use Dell Premium Photo Paper if you are printing photos. NOTE: Dell Premium Photo Paper may - Dell 966 | User Guide - Page 100
that the media is properly loaded in the input tray. Do not overload the input tray. Do not remove media from the input tray while printing. Flex, fan, and straighten the paper before loading. Do not use creased, damp, or curled paper. Orient the media according to the instructions for the printer. - Dell 966 | User Guide - Page 101
USB Key Printing Photos Altering Photos Before Printing Printing Microsoft Office Files Most digital cameras use a memory card to store photos. The printer supports the following digital media: Compact Flash Type I and II Memory Stick Memory Stick PRO Memory Stick Duo (with adapter) Mini SD - Dell 966 | User Guide - Page 102
to select the speed of the slide show, and then press the Select button Printing All Photos 1. Insert the memory card or USB key. The printer automatically switches to Photo mode. 2. Press the Select button to access the Photo Card Mode menu. 3. Press the up or down Arrow button 4. Press the up or - Dell 966 | User Guide - Page 103
If your camera supports DPOF, you can specify which photos to print, and how many of each, while the memory card is still in the camera. The printer recognizes these settings when you insert the memory card into the printer. NOTE: If you specified a paper size in the DPOF selection, make sure the - Dell 966 | User Guide - Page 104
3. Press the button to access the Print Files Mode menu. 4. Press the up or down Arrow button to scroll to the file that you want to print. 5. Press the Start button . - Dell 966 | User Guide - Page 105
Overview Environmental Specifications Power Consumption and Requirements Fax Mode Capabilities Print and Scan Mode Capabilities Overview Memory Connectivity Duty cycle (average) Printer life Operating System Support Memory Specifications and Requirements Media Types and Sizes Cables 32 - Dell 966 | User Guide - Page 106
x 600 dpi Print resolution Photo/Glossy paper All other media 600 x 600 dpi 300 x 600 dpi 1200 x 1200 dpi 600 x 600 dpi 4800 x 1200 dpi 1200 x 1200 dpi Operating System Support The printer supports: Windows XP Professional x64 Windows XP Windows 2000 Windows Vista Memory Specifications - Dell 966 | User Guide - Page 107
paper Banner paper Envelopes Greeting cards, index cards, postcards, or photo cards Photo/glossy or matte paper Iron-on transfers Transparencies Custom size paper Sizes supported 162 x 229 mm 10 envelopes Photo/Post card: 4 x 6 inches transparencies The paper must fit the following dimensions: Width: - Dell 966 | User Guide - Page 108
- Dell 966 | User Guide - Page 109
currently specified copy selection (Color or Black). NOTE: If you press the Start button default. without specifying a copy selection, the copy is printed in color by Using the Computer 1. Turn on your computer and printer, and make sure they are connected. 2. Load the paper. For more information - Dell 966 | User Guide - Page 110
Programs® Dell Printers® Dell Photo AIO Printer 966. For Windows Vista: a. Click ® Programs. b. Click Dell Printers. c. Click Dell Photo AIO Printer 966. 5. Select Dell All-In-One Center. The Dell All-In-One Center opens. 6. Select the number of copies (1-99), and then specify the color setting from - Dell 966 | User Guide - Page 111
Programs® Dell Printers® Dell Photo AIO Printer 966. For Windows Vista: a. Click ® Programs. b. Click Dell Printers. c. Click Dell Photo AIO Printer 966. 5. Select Dell All-In-One Center. The Dell All-In-One Center opens. 6. Select the number of copies (1-99), and then specify the color setting from - Dell 966 | User Guide - Page 112
are finished customizing your settings, click Copy Now. Copying Photos Using the Operator Panel 1. Turn on the printer. 2. Load photo/glossy paper with the print side facing down. For more information, see Loading Paper. 3. Load your original photo. 4. Press the up or down Arrow button to scroll - Dell 966 | User Guide - Page 113
Photo AIO Printer 966. For Windows Vista: a. Click ® Programs. b. Click Dell Printers. c. Click Dell Photo AIO Printer 966. 5. Select Dell All-In-One Center. The Dell All-In-One Center opens. 6. Click Preview Now. 7. Adjust the dotted lines to fit around the portion of the image you want to print - Dell 966 | User Guide - Page 114
, follow the instructions on your LCD. Making a Duplex Copy Purchase and install an optional duplex unit to automatically perform duplex copies on your document. With an optional duplex unit, there is no need to manually re-orient the sheets. It picks the paper and allows the printer to print on the - Dell 966 | User Guide - Page 115
c. Click Dell Photo AIO Printer 966. 2. Select Dell All-In-One Center. The Dell All-In-One Center opens. 3. Select the number of copies (1-99) and color setting from the Copy drop-down menu. 4. Click See More Copy Settings to: Choose a copy quality. Select the paper size. Select the original - Dell 966 | User Guide - Page 116
and Return Policy Dell Technical Support Policy Technician-assisted technical support requires the cooperation and participation of the customer in the troubleshooting process and provides for restoration of the Operating System, application software and hardware drivers to the original default - Dell 966 | User Guide - Page 117
from parts and components that are new or equivalent to new in accordance with industry-standard practices. For information about the Dell warranty for your printer, refer to the Owner's Manual . - Dell 966 | User Guide - Page 118
. 3. Click Start® Programs or All Programs® Dell Printers® Dell Photo AIO Printer 966. For Windows Vista: a. Click ® Programs. b. Click Dell Printers. c. Click Dell Photo AIO Printer 966. 4. Select Dell All-In-One Center. The Dell All-In-One Center opens. 5. From the Send scanned image to: drop - Dell 966 | User Guide - Page 119
. 3. Click Start® Programs or All Programs® Dell Printers® Dell Photo AIO Printer 966. For Windows Vista: a. Click ® Programs. b. Click Dell Printers. c. Click Dell Photo AIO Printer 966. 4. Select Dell All-In-One Center. The Dell All-In-One Center opens. 5. From the Send scanned image to: drop-down - Dell 966 | User Guide - Page 120
document. 3. Click Start® Programs or All Programs® Dell Printers® Dell Photo AIO Printer 966. For Windows Vista: a. Click ® Programs. b. Click Dell Printers. c. Click Dell Photo AIO Printer 966. 4. Select Dell All-In-One Center. The Dell All-In-One Center opens. 5. From the Send scanned image to - Dell 966 | User Guide - Page 121
AIO Printer 966. For Windows Vista: a. Click ® Programs. b. Click Dell Printers. c. Click Dell Photo AIO Printer 966. 2. Select Dell All-In-One Center. The Dell All-In-One Center opens. 3. Click Maintain/Troubleshoot. 4. From the Maintain/Troubleshoot window, click Maintain or fix quality problems - Dell 966 | User Guide - Page 122
, ensure you have OCR software installed on your computer. 1. Turn on your computer and printer, and make sure they are connected. 2. Load your original document. 3. Click Start® Programs or All Programs® Dell Printers® Dell Photo AIO Printer 966. For Windows Vista: a. Click ® Programs. b. Click - Dell 966 | User Guide - Page 123
document. 3. Click Start® Programs or All Programs® Dell Printers® Dell Photo AIO Printer 966. For Windows Vista: a. Click ® Programs. b. Click Dell Printers. c. Click Dell Photo AIO Printer 966. 4. Select Dell All-In-One Center. The Dell All-In-One Center opens. 5. From the Send scanned image to - Dell 966 | User Guide - Page 124
Dell Photo AIO Printer 966. For Windows Vista: a. Click ® Programs. b. Click Dell Printers. c. Click Dell Photo AIO Printer 966. 4. Select Dell All-In-One Center. The Dell All-In-One Center opens. 5. From the Productivity Tools section, click Save an image on my computer. 6. Follow the instructions - Dell 966 | User Guide - Page 125
Photo AIO Printer 966. For Windows Vista: a. Click ® Programs. b. Click Dell Printers. c. Click Dell Photo AIO Printer 966. 4. Select Dell All-In-One Center. The Dell All-In-One Center opens. 5. From the Productivity Tools section, click E-mail an image or document. 6. Follow the instructions on - Dell 966 | User Guide - Page 126
3. Click Start® Programs or All Programs® Dell Printers® Dell Photo AIO Printer 966. For Windows Vista: a. Click ® Programs. b. Click Dell Printers. c. Click Dell Photo AIO Printer 966. 4. Select Dell All-In-One Center. The Dell All-In-One Center opens. 5. Click Preview Now. NOTE: If the size of the - Dell 966 | User Guide - Page 127
b. Click Dell Printers. c. Click Dell Photo AIO Printer 966. 2. Select Dell All-In-One Center. The Dell All-In-One Center opens. 3. From the Send scanned images to: drop down menu, select the program you want to use. NOTE: If the program you want to - Dell 966 | User Guide - Page 128
rights to the Dell- or third-party-copyrighted software in this printer. Since the GNU licensed software that the Dell modifications are based upon is DAMAGES (INCLUDING, BUT NOT LIMITED TO, PROCUREMENT OF SUBSTITUTE GOODS OR SERVICES; LOSS OF USE, DATA, OR PROFITS; OR BUSINESS INTERRUPTION) HOWEVER - Dell 966 | User Guide - Page 129
freedom to distribute copies of free software (and charge for this service if you wish), that you receive users may redistribute the program under these conditions, and telling the user how to view a copy of this License. (Exception: if the Program itself is interactive but does not normally print - Dell 966 | User Guide - Page 130
the terms of Sections 1 and 2 above provided that you also do one of the following: a. Accompany it with the complete corresponding machine-readable source the author/donor to decide if he or she is willing to distribute software through any other system and a licensee cannot impose that choice. This - Dell 966 | User Guide - Page 131
software which is copyrighted by the Free Software Foundation, write to the Free Software Foundation; we sometimes make exceptions for this. Our decision will be guided ALL NECESSARY SERVICING, REPAIR 1989 Lexmark International, software--to make sure the software is free for all its users. - Dell 966 | User Guide - Page 132
software (and charge for this service if you wish); that you receive source code or can get it if you want it; that you can change the software problems that might be introduced by others. Finally, software of the users' freedom, it does ensure that the user of compilation and installation of the - Dell 966 | User Guide - Page 133
modifications or work under the terms of Section 1 above, provided that you also meet all of these conditions: a. The modified work must itself be a software library. b. You must cause the files modified to carry prominent notices stating that you changed the files and the date of any change. c. You - Dell 966 | User Guide - Page 134
computer system, rather than copying library functions into the executable, and (2) will operate properly with a modified version of the library, if the user installs one, as long as the modified version is interface-compatible with the version that the work was made with. c. Accompany the work with - Dell 966 | User Guide - Page 135
to address new problems or concerns. software which is copyrighted by the Free Software Foundation, write to the Free Software Foundation; we sometimes make exceptions for this. Our decision will be guided OF ALL NECESSARY SERVICING, REPAIR OR Lexmark International, Inc. That's all there is to it!
-
 1
1 -
 2
2 -
 3
3 -
 4
4 -
 5
5 -
 6
6 -
 7
7 -
8
-
9
-
10
-
11
-
12
-
13
-
14
-
15
-
16
-
17
-
18
-
19
-
20
-
21
-
22
-
23
-
24
-
25
-
26
-
27
-
28
-
29
-
30
-
31
-
32
-
33
-
34
-
35
-
36
-
37
-
38
-
39
-
40
-
41
-
42
-
43
-
44
-
45
-
46
-
47
-
48
-
49
-
50
-
51
-
52
-
53
-
54
-
55
-
56
-
57
-
58
-
59
-
60
-
61
-
62
-
63
-
64
-
65
-
66
-
67
-
68
-
69
-
70
-
71
-
72
-
73
-
74
-
75
-
76
-
77
-
78
-
79
-
80
-
81
-
82
-
83
-
84
-
85
-
86
-
87
-
88
-
89
-
90
-
91
-
92
-
93
-
94
-
95
-
96
-
97
-
98
-
99
-
100
-
101
-
102
-
103
-
104
-
105
-
106
-
107
-
108
-
109
-
110
-
111
-
112
-
113
-
114
-
115
-
116
-
117
-
118
-
119
-
120
-
121
-
122
-
123
-
124
-
125
-
126
-
127
-
128
-
129
-
130
-
131
-
132
-
133
-
134
-
135
 |
 |
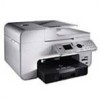
Dell™ Photo All-In-One Printer 966 User's Guide
To order ink or supplies from Dell:
1. Double-click the icon on your desktop.
2. Visit Dell's website, or order Dell printer supplies by phone.
www.dell.com/supplies
For the best service, make sure you have the Dell printer Service Tag available.
Finding Information
Faxing
About Your Printer
Understanding the Software
Understanding the Operator
Panel Menus
Installing the Dell 966 Internal
Wireless/Ethernet Adapter
Loading Paper and Originals
Maintenance
Printing
Troubleshooting
Printing From a Memory Card
or USB Key
Specifications
Copying
Appendix
Scanning
Licensing Notice
Notes, Notices, and Cautions
Information in this document is subject to change without notice.
© 2007 Dell Inc. All rights reserved.
Reproduction in any manner whatsoever without the written permission of Dell Inc. is strictly forbidden.
Trademarks used in this text:
Dell
, the
DELL
logo,
Dell Picture Studio
, and
Dell Ink Management System
are trademarks of Dell Inc.;
Microsoft
and
Windows
are registered trademarks of Microsoft Corporation in the United States and/or other countries.
Windows Server
and
Windows NT
are registered trademarks of Microsoft Corporation.
Windows Vista
is either a trademark or a registered trademark of Microsoft Corporation in
the United States and/or other countries.
Bluetooth
is a registered trademark owned by Bluetooth SIG, Inc. and is used by Dell Inc. under
license.
EMC
is a registered trademark of EMC Corporation.
Other trademarks and trade names may be used in this document to refer to either the entities claiming the marks and names or their
products. Dell Inc. disclaims any proprietary interest in trademarks and trade names other than its own.
UNITED STATES GOVERNMENT RESTRICTED RIGHTS
This software and documentation are provided with RESTRICTED RIGHTS. Use, duplication or disclosure by the Government is subject to
restrictions as set forth in subparagraph (c)(1)(ii) of the Rights in Technical Data and Computer Software clause at DFARS 252.227-7013 and
in applicable FAR provisions: Dell Inc., One Dell Way, Round Rock, Texas, 78682, USA.
Model 966
NOTE:
A
NOTE
indicates important information that helps you make better use of your printer.
NOTICE:
A
NOTICE
indicates either potential damage to hardware or loss of data and tells you how to avoid the
problem.
CAUTION:
A CAUTION indicates a potential for property damage, personal injury, or death.