Dell 966 User Guide - Page 19
Creating Fax Activity Report
 |
View all Dell 966 manuals
Add to My Manuals
Save this manual to your list of manuals |
Page 19 highlights
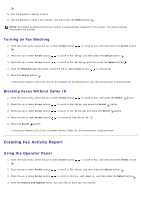
. 5. Use the keypad to specify a name. 6. Use the keypad to enter a fax number, and then press the Select button . NOTE: The lowest possible blocked fax number is automatically assigned to this contact. You cannot change the blocked fax number. Turning on Fax Blocking 1. From the main menu, press the up or down Arrow button . to scroll to Fax, and then press the Select button 2. Press the up or down Arrow button to scroll to Fax Setup, and then press the Select button . 3. Press the up or down Arrow button to scroll to Fax Blocking, and then press the Select button . 4. From the Blocked List menu item, press the left or right Arrow button to choose On. 5. Press the Select button . If the printer detects a fax from one of the numbers on the Blocked Fax List, the transmission is disconnected. Blocking Faxes Without Caller ID 1. From the main menu, press the up or down Arrow button to scroll to Fax, and press the Select button. 2. Press the up or down Arrow button to scroll to Fax Setup, and press the Select button. 3. Press the up or down Arrow button to scroll to Fax Blocking, and press the Select button. 4. Press the left or right Arrow button to choose On from Block No-ID. 5. Press the Select button. If the printer detects a fax from a machine without Caller ID, the transmission is disconnected. Creating Fax Activity Report Using the Operator Panel 1. From the main menu, press the up or down Arrow button . to scroll to Fax, and then press the Select button 2. Press the up or down Arrow button to scroll to Fax Setup, and then press the Select button . 3. Press the up or down Arrow button to scroll to History and Reports, and then press the Select button . 4. From the History and Reports menu, you can view or print your fax activity.
-
 1
1 -
2
-
3
-
4
-
5
-
6
-
7
-
8
-
9
-
10
-
11
-
12
-
13
-
 14
14 -
 15
15 -
 16
16 -
 17
17 -
 18
18 -
 19
19 -
 20
20 -
 21
21 -
 22
22 -
 23
23 -
 24
24 -
25
-
26
-
27
-
28
-
29
-
30
-
31
-
32
-
33
-
34
-
35
-
36
-
37
-
38
-
39
-
40
-
41
-
42
-
43
-
44
-
45
-
46
-
47
-
48
-
49
-
50
-
51
-
52
-
53
-
54
-
55
-
56
-
57
-
58
-
59
-
60
-
61
-
62
-
63
-
64
-
65
-
66
-
67
-
68
-
69
-
70
-
71
-
72
-
73
-
74
-
75
-
76
-
77
-
78
-
79
-
80
-
81
-
82
-
83
-
84
-
85
-
86
-
87
-
88
-
89
-
90
-
91
-
92
-
93
-
94
-
95
-
96
-
97
-
98
-
99
-
100
-
101
-
102
-
103
-
104
-
105
-
106
-
107
-
108
-
109
-
110
-
111
-
112
-
113
-
114
-
115
-
116
-
117
-
118
-
119
-
120
-
121
-
122
-
123
-
124
-
125
-
126
-
127
-
128
-
129
-
130
-
131
-
132
-
133
-
134
-
135
 |
 |