Dell 966 User Guide - Page 34
Photo More Options Menu, Photo Edit Mode Menu
 |
View all Dell 966 manuals
Add to My Manuals
Save this manual to your list of manuals |
Page 34 highlights
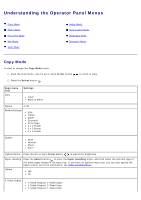
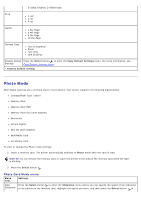
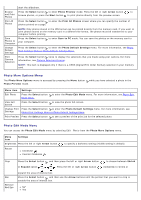
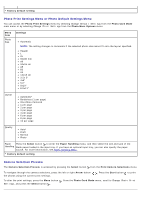
start the slideshow. Browse and Print Photos Print All Photos Press the Select button to enter Photo Preview mode. Press the left or right Arrow button to browse photos, or press the Start button to print photos directly from the preview screen. Press the Select button to enter the Print All Photos screen where you can specify the number of photos printed on a page. NOTE: Only photos stored in the JPG format can be printed directly from the memory card. If you want to print photos stored on the memory card in a different file format, the photos must be transferred to your computer before printing. Save Photos to Computer Press the Select button your computer. to enter Save to PC mode. You can save the photos on the memory card to Change Default Settings Print Camera Selection Press the Select button to enter the Photo Default Settings menu. For more information, see Photo Print Settings Menu or Photo Default Settings Menu. Press the Select button twice to display the selections that you made using your camera. For more information, see Camera Selection Preview. NOTE: This item is displayed only if there is a DPOF (Digital Print Order Format) selection in your memory card. Photo More Options Menu The Photo More Options menu is accessed by pressing the Menu button Photo Preview mode. while you have selected a photo in the Menu item Settings Edit Photo Press the Select button Mode Menu. to enter the Photo Edit Mode menu. For more information, see Photo Edit View Full Screen Press the Select button to view the photo full-screen. Change Print Press the Select button to enter the Photo Default Settings menu. For more information, see Settings Photo Print Settings Menu or Photo Default Settings Menu. Print Preview Press the Select button to see a preview of the print job for the selected photo. Photo Edit Mode Menu You can access the Photo Edit Mode menu by selecting Edit Photo from the Photo More Options menu. Menu item Settings Brightness Press the left or right Arrow button Rotate Clockwise * Counter Clockwise to specify a darkness setting (middle setting is default). Crop Press the Select button , and then press the left or right Arrow button or Expand option . Press the left or right Arrow button to choose between Shrink repeatedly to shrink or Pan Remove Red Eye expand the area of interest box. Press the Select button , and then use the Arrow buttons until the portion that you want to crop is outside the area of interest box. No* Yes
-
 1
1 -
2
-
3
-
4
-
5
-
6
-
7
-
8
-
9
-
10
-
11
-
12
-
13
-
14
-
15
-
16
-
17
-
18
-
19
-
20
-
21
-
22
-
23
-
24
-
25
-
26
-
27
-
28
-
 29
29 -
 30
30 -
 31
31 -
 32
32 -
 33
33 -
 34
34 -
 35
35 -
 36
36 -
 37
37 -
 38
38 -
 39
39 -
40
-
41
-
42
-
43
-
44
-
45
-
46
-
47
-
48
-
49
-
50
-
51
-
52
-
53
-
54
-
55
-
56
-
57
-
58
-
59
-
60
-
61
-
62
-
63
-
64
-
65
-
66
-
67
-
68
-
69
-
70
-
71
-
72
-
73
-
74
-
75
-
76
-
77
-
78
-
79
-
80
-
81
-
82
-
83
-
84
-
85
-
86
-
87
-
88
-
89
-
90
-
91
-
92
-
93
-
94
-
95
-
96
-
97
-
98
-
99
-
100
-
101
-
102
-
103
-
104
-
105
-
106
-
107
-
108
-
109
-
110
-
111
-
112
-
113
-
114
-
115
-
116
-
117
-
118
-
119
-
120
-
121
-
122
-
123
-
124
-
125
-
126
-
127
-
128
-
129
-
130
-
131
-
132
-
133
-
134
-
135
 |
 |
