Dell Force10 S25-01-GE-24P Installing the S25P System - Page 23
Installing the S25P System, Four-Post Rack-mounting with Cage Nuts
 |
View all Dell Force10 S25-01-GE-24P manuals
Add to My Manuals
Save this manual to your list of manuals |
Page 23 highlights
Step 4 Task Position the cage nuts over the holes on each bracket flange and each rack post. Figure 12 Four-Post Rack-mounting with Cage Nuts fn00147d_s25P Stack ID AC1 XFP25 XFP26 AACla2rm 27 P28 S25-01-GE-24P 5 Align the rack filler panel to the rear bracket and rack posts. Secure by inserting two screws into the hole in the filler panel through to the holes in the rack post. Figure 13 Four-Post Rack-mounting with Cage Nuts fn00147e_s25P Stack ID AC1 XFP25 XFP26 AACla2rm 27 P28 S25-01-GE-24P Installing the S25P System 23
-
 1
1 -
2
-
3
-
4
-
5
-
6
-
7
-
8
-
9
-
10
-
11
-
12
-
13
-
14
-
15
-
16
-
17
-
 18
18 -
 19
19 -
 20
20 -
 21
21 -
 22
22 -
 23
23 -
 24
24 -
 25
25 -
 26
26 -
 27
27 -
 28
28 -
29
-
30
-
31
-
32
-
33
-
34
-
35
-
36
-
37
-
38
-
39
-
40
-
41
-
42
-
43
-
44
-
45
-
46
-
47
-
48
 |
 |

Installing the S25P System
23
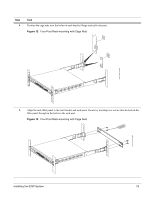
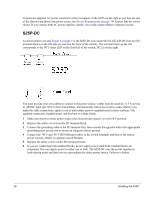
4
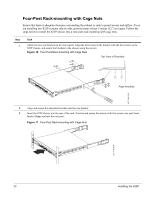
Position the cage nuts over the holes on each bracket flange and each rack post.
Figure 12
Four-Post Rack-mounting with Cage Nuts
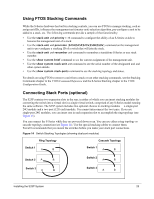
5
Align the rack filler panel to the rear bracket and rack posts. Secure by inserting two screws into the hole in the
filler panel through to the holes in the rack post.
Figure 13
Four-Post Rack-mounting with Cage Nuts
Step
Task
fn00147d_s25P
fn00147e_s25P