Dell Force10 S25-01-GE-24P Installing the S25P System - Page 32
Installing XFPs, FTOS Configuration Guide, S50V and S50N Quick Reference
 |
View all Dell Force10 S25-01-GE-24P manuals
Add to My Manuals
Save this manual to your list of manuals |
Page 32 highlights
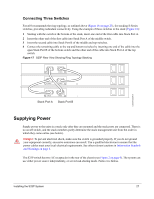
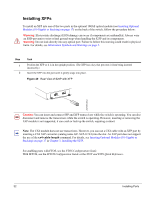
Installing XFPs To install an XFP into one of the two ports in the optional 10GbE optical module (see Inserting Optional Modules (10-Gigabit or Stacking) on page 17) on the back of the switch, follow the procedure below: Warning: Electrostatic discharge (ESD) damage can occur if components are mishandled. Always wear an ESD-preventive wrist or heel ground strap when handling the S25P and its components. Warning: Do not look directly into any optical port. Failure to follow this warning could result in physical harm. For details, see Information Symbols and Warnings on page 5. Step 1 2 Task Position the XFP so it is in the upright position. (The XFP has a key that prevents it from being inserted incorrectly.) Insert the XFP into the port until it gently snaps into place. Figure 20 Rear View of S25P with XFP fn00160s25P Caution: You can insert and connect SFP and XFP transceivers while the switch is operating. You can also disconnect and remove the transceivers while the switch is operating. However, inserting or removing the XFP module is not supported; it can crash or lock up the switch, requiring a reboot. Note: The CX4 module does not use transceivers. However, you can use a CX4 cable with an XFP port by inserting a CX4 XFP converter (catalog name GP- XFP-1CX4) into the slot. An XFP port does not support the use of the cx4-cable-length command. For details, see Inserting Optional Modules (10-Gigabit or Stacking) on page 17 in Chapter 3, Installing the S25P. For enabling ports with FTOS, see the FTOS Configuration Guide. With SFTOS, see the SFTOS Configuration Guide or the S50V and S50N Quick Reference. 32 Installing Ports
-
 1
1 -
2
-
3
-
4
-
5
-
6
-
7
-
8
-
9
-
10
-
11
-
12
-
13
-
14
-
15
-
16
-
17
-
18
-
19
-
20
-
21
-
22
-
23
-
24
-
25
-
26
-
 27
27 -
 28
28 -
 29
29 -
 30
30 -
 31
31 -
 32
32 -
 33
33 -
 34
34 -
 35
35 -
 36
36 -
 37
37 -
38
-
39
-
40
-
41
-
42
-
43
-
44
-
45
-
46
-
47
-
48
 |
 |
