Dell Inspiron 1720 View - Page 147
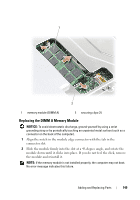
Memory
 |
View all Dell Inspiron 1720 manuals
Add to My Manuals
Save this manual to your list of manuals |
Page 147 highlights
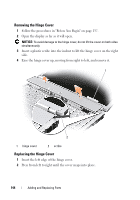
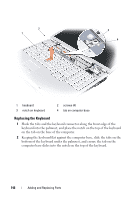
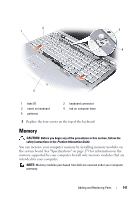
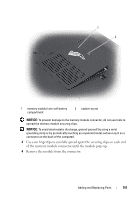
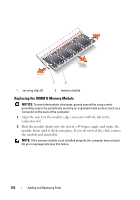
2 1 3 4 5 1 tabs (7) 3 notch on keyboard 5 palmrest 2 keyboard connector 4 tab on computer base 3 Replace the four screws on the top of the keyboard. Memory CAUTION: Before you begin any of the procedures in this section, follow the safety instructions in the Product Information Guide. You can increase your computer memory by installing memory modules on the system board. See "Specifications" on page 179 for information on the memory supported by your computer. Install only memory modules that are intended for your computer. NOTE: Memory modules purchased from Dell are covered under your computer warranty. Adding and Replacing Parts 147
-
 1
1 -
2
-
3
-
4
-
5
-
6
-
7
-
8
-
9
-
10
-
11
-
12
-
13
-
14
-
15
-
16
-
17
-
18
-
19
-
20
-
21
-
22
-
23
-
24
-
25
-
26
-
27
-
28
-
29
-
30
-
31
-
32
-
33
-
34
-
35
-
36
-
37
-
38
-
39
-
40
-
41
-
42
-
43
-
44
-
45
-
46
-
47
-
48
-
49
-
50
-
51
-
52
-
53
-
54
-
55
-
56
-
57
-
58
-
59
-
60
-
61
-
62
-
63
-
64
-
65
-
66
-
67
-
68
-
69
-
70
-
71
-
72
-
73
-
74
-
75
-
76
-
77
-
78
-
79
-
80
-
81
-
82
-
83
-
84
-
85
-
86
-
87
-
88
-
89
-
90
-
91
-
92
-
93
-
94
-
95
-
96
-
97
-
98
-
99
-
100
-
101
-
102
-
103
-
104
-
105
-
106
-
107
-
108
-
109
-
110
-
111
-
112
-
113
-
114
-
115
-
116
-
117
-
118
-
119
-
120
-
121
-
122
-
123
-
124
-
125
-
126
-
127
-
128
-
129
-
130
-
131
-
132
-
133
-
134
-
135
-
136
-
137
-
138
-
139
-
140
-
141
-
 142
142 -
 143
143 -
 144
144 -
 145
145 -
 146
146 -
 147
147 -
 148
148 -
 149
149 -
 150
150 -
 151
151 -
 152
152 -
153
-
154
-
155
-
156
-
157
-
158
-
159
-
160
-
161
-
162
-
163
-
164
-
165
-
166
-
167
-
168
-
169
-
170
-
171
-
172
-
173
-
174
-
175
-
176
-
177
-
178
-
179
-
180
-
181
-
182
-
183
-
184
-
185
-
186
-
187
-
188
-
189
-
190
-
191
-
192
-
193
-
194
-
195
-
196
-
197
-
198
-
199
-
200
-
201
-
202
-
203
-
204
-
205
-
206
-
207
-
208
-
209
-
210
-
211
-
212
-
213
-
214
-
215
-
216
-
217
-
218
-
219
-
220
 |
 |

Adding and Replacing Parts
147
3
Replace the four screws on the top of the keyboard.
Memory
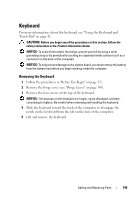
CAUTION:
Before you begin any of the procedures in this section, follow the
safety instructions in the
Product Information Guide
.
You can increase your computer memory by installing memory modules on
the system board. See "Specifications" on page 179 for information on the
memory supported by your computer. Install only memory modules that are
intended for your computer.
NOTE:
Memory modules purchased from Dell are covered under your computer
warranty.
1
tabs (7)
2
keyboard connector
3
notch on keyboard
4
tab on computer base
5
palmrest
2
1
5
4
3