Dell XPS One 24 Service Manual - Page 29
tab in the connector slot., Replace the two screws that secures the graphics card.
 |
View all Dell XPS One 24 manuals
Add to My Manuals
Save this manual to your list of manuals |
Page 29 highlights
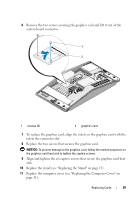
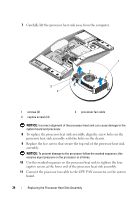
6 Remove the two screws securing the graphics card and lift it out of the system board connector. 1 2 1 screws (2) 2 graphics card 7 To replace the graphics card, align the notch on the graphics card with the tab in the connector slot. 8 Replace the two screws that secures the graphics card. NOTICE: To prevent damage to the graphics card, follow the marked sequence on the graphics card heat sink to tighten the captive screws. 9 Align and tighten the six captive screws that secure the graphics card heat sink. 10 Replace the stand (see "Replacing the Stand" on page 13). 11 Replace the computer cover (see "Replacing the Computer Cover" on page 11). Replacing Cards 29
-
 1
1 -
2
-
3
-
4
-
5
-
6
-
7
-
8
-
9
-
10
-
11
-
12
-
13
-
14
-
15
-
16
-
17
-
18
-
19
-
20
-
21
-
22
-
23
-
 24
24 -
 25
25 -
 26
26 -
 27
27 -
 28
28 -
 29
29 -
 30
30 -
 31
31 -
 32
32 -
 33
33 -
 34
34 -
35
-
36
-
37
-
38
-
39
-
40
-
41
-
42
-
43
-
44
-
45
-
46
-
47
-
48
-
49
-
50
 |
 |

Replacing Cards
29
6
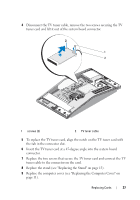
Remove the two screws securing the graphics card and lift it out of the
system board connector.
7
To replace the graphics card, align the notch on the graphics card with the
tab in the connector slot.
8
Replace the two screws that secures the graphics card.
NOTICE:
To prevent damage to the graphics card, follow the marked sequence on
the graphics card heat sink to tighten the captive screws.
9
Align and tighten the six captive screws that secure the graphics card heat
sink.
10
Replace the stand (see "Replacing the Stand" on page 13).
11
Replace the computer cover (see "Replacing the Computer Cover" on
page 11).
1
screws (2)
2
graphics card
1
2