Denon AVR 1707 Owners Manual - English - Page 5

Getting Started - remote

Page 5 highlights

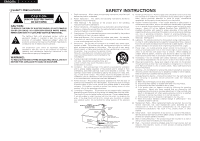
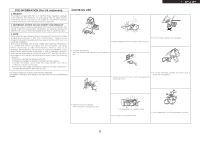
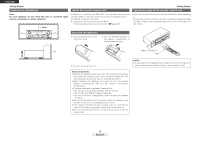
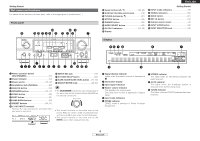
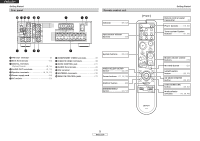
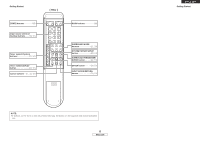
ENGLISH Advanced Setup - Part 1 System setup items and default values 38, 39 Navigating through the System Setup items 40 About the front display 40 Input Setup Setting the Digital In Assignment 41 Setting the iPod Assignment 41 Setting the Component In Assignment 41 Setting the Video Convert 42 Setting the Audio Delay 42 Setting the EXT. IN Subwoofer Level 42 Setting the Auto Preset Memory 43 Option Setup Setting the Power Amplifier Assignment 43 Setting the Volume Control 44 Setting the 2ch Direct/Stereo Custom 44 Setting the Auto Surround Mode 45 Advanced Setup - Part 2 Speaker Setup Setting the Speaker Configuration 45, 46 Setting the Subwoofer Mode Setup 46 Setting the Distance 46, 47 Setting the Crossover Frequency 47 Setting the Test Tone 47 Operating the remote control unit Operating DENON audio components 48 Setting the preset memory function 48 Operating a component stored in the preset memory ····49 ~ 51 Setting the punch through function 52 Getting Started Accessories Before using Check that the following parts are attached in addition to the main unit: q Operating instructions 1 w Warranty (for North America model only 1 e Service station list 1 r Remote control unit (RC-1048 1 t R6P/AA batteries 2 y AM loop antenna 1 u FM indoor antenna 1 i Setup microphone (DM-S205) (Approx. 23-5/8 ft / 6 m) ..........1 r t y u i Pay attention to the following before using this unit: • Moving the unit. To prevent short-circuits or damaged wires in the connection cables, always unplug the power supply cord and disconnect the connection cables between all other audio components when moving the unit. • Cautions on using mobile phones. Using a mobile phone near this unit may result in noise. If so, move the mobile phone away from this unit when it is in use. • Before turning the power operation button on. Check once again that all connections are correct and that there are not problems with the connection cables. Always set the power operation button to the standby position before connecting and disconnecting connection cables. • Store these instructions in a safe place. After reading, store this instructions along with the warranty card in a safe place. • Whenever the power operation button is in the STANDBY state, the unit is still connected to AC line voltage. Please be sure to turn off the power operation button or unplug the cord when you leave home for, say, a vacation. • Note that the illustrations in these instructions may differ from the actual unit for explanation purposes. Additional Information 53, 54 Troubleshooting 55, 56 Specifications 56 List of preset codes End of this manual 2 ENGLISH

  • 1
  • 2
  • 3
  • 4
  • 5
  • 6
  • 7
  • 8
  • 9
  • 10
  • 11
  • 12
  • 13
  • 14
  • 15
  • 16
  • 17
  • 18
  • 19
  • 20
  • 21
  • 22
  • 23
  • 24
  • 25
  • 26
  • 27
  • 28
  • 29
  • 30
  • 31
  • 32
  • 33
  • 34
  • 35
  • 36
  • 37
  • 38
  • 39
  • 40
  • 41
  • 42
  • 43
  • 44
  • 45
  • 46
  • 47
  • 48
  • 49
  • 50
  • 51
  • 52
  • 53
  • 54
  • 55
  • 56
  • 57
  • 58
  • 59
  • 60
  • 61
  • 62
  • 63
  • 64

ENGLISH
2
ENGLISH
Speaker Setup
Setting the Speaker Configuration·········································45, 46
Setting the Subwoofer Mode Setup············································46
Setting the Distance ······························································46, 47
Setting the Crossover Frequency ················································47
Setting the Test Tone···································································47
Troubleshooting
······································································
55, 56
Additional Information
···························································
53, 54
Specifications
················································································
56
List of preset codes
············································End of this manual
Operating DENON audio components
·······································48
Setting the preset memory function
··········································48
Operating a component stored in the preset memory
····49 ~ 51
Setting the punch through function
···········································52
Advanced Setup – Part 2
Operating the remote control unit
Accessories
Check that the following parts are attached in addition to the main
unit:
q
Operating instructions
..............................................................
1
w
Warranty (for North America model only)
.....................................
1
e
Service station list
....................................................................
1
r
Remote control unit (RC-1048)
.................................................
1
t
R6P/AA batteries
......................................................................
2
y
AM loop antenna
......................................................................
1
u
FM indoor antenna
...................................................................
1
i
Setup microphone (DM-S205) (Approx. 23-5/8 ft / 6 m)
..........
1
t
y
i
r
u
Getting Started
Before using
Pay attention to the following before using this unit:
• Moving the unit.
To prevent short-circuits or damaged wires in the connection cables,
always unplug the power supply cord and disconnect the connection
cables between all other audio components when moving the unit.
• Cautions on using mobile phones.
Using a mobile phone near this unit may result in noise. If so, move
the mobile phone away from this unit when it is in use.
• Before turning the power operation button on.
Check once again that all connections are correct and that there are
not problems with the connection cables. Always set the power
operation button to the standby position before connecting and
disconnecting connection cables.
• Store these instructions in a safe place.
After reading, store this instructions along with the warranty card in
a safe place.
Whenever the power operation button is in the STANDBY state,
the unit is still connected to AC line voltage.
Please be sure to turn off the power operation button or unplug
the cord when you leave home for, say, a vacation.
• Note that the illustrations in these instructions may differ from
the actual unit for explanation purposes.
System setup items and default values
·······························38, 39
Navigating through the System Setup items
···························40
About the front display
································································40
Input Setup
Setting the Digital In Assignment ················································41
Setting the iPod Assignment ······················································41
Setting the Component In Assignment ·······································41
Setting the Video Convert····························································42
Setting the Audio Delay ·······························································42
Setting the EXT. IN Subwoofer Level ·········································42
Setting the Auto Preset Memory·················································43
Option Setup
Setting the Power Amplifier Assignment ····································43
Setting the Volume Control··························································44
Setting the 2ch Direct/Stereo Custom·········································44
Setting the Auto Surround Mode·················································45
Advanced Setup – Part 1