Denon DN-T625 Operating Instructions - Page 14
PLAYBACK, 11 RECORDING, Music search system - reviews
 |
UPC - 081757505208
View all Denon DN-T625 manuals
Add to My Manuals
Save this manual to your list of manuals |
Page 14 highlights
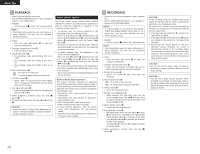
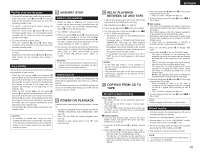
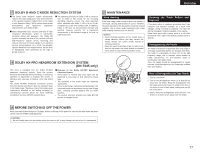
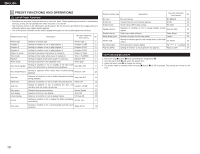
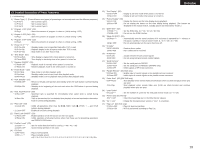
ENGLISH 10 PLAYBACK • Switch on your amplifier or receiver. • Set the TAPE MONITOR switch on your amplifier or receiver to the TAPE position. 1. POWER • Push the switch q to turn "ON" (¢) the power. NOTE : • The display lights when the deck mechanism is being initialized. The deck will not operated during initialization. 2. EJECT • Press the eject (5) button @7 to open the cassette compartment. 3. Cassette compartment cover @8 • Load the cassette tape. 4. DOLBY NR switch @2 • For recordings made without Dolby NR, set to "OFF". • For recordings made with Dolby B NR, set to "B". • For recordings made with Dolby C NR, set to "C". 5. REV. MODE switch @0 : To listen to one side only : To listen to repeat playback of both side 6. OUTPUT switch !9 • Select "SEP." to output only the deck signals, "MIX" to output the mixed deck and CD signals from the MIX outputs. 7. Play (0 or 1) button @9 • Push the play button (The direction of playback is indicated (0 or 1)). ✽ When playback is finished, press the stop (2) button @9. ✽ To restart the tape, press the play (0 or 1) button @9. CAUTION : • If different types of Dolby Noise Reduction are used for record and playback, playback response will be adversely effected. Music search system The music search system detects blank sections (lasting for at least 4 seconds) between selections in order to locate the beginning of selections in the forward or reverse direction. 1. To advance from the current selection to the beginning of the next selection (CUE) : Press the play (1) button @9 simultaneously with the fast forward (7) button @9. Press the play (0) button @9 simultaneously with the rewind (6) button @9. The deck will skip the rest of the current selection and automatically resume play from the beginning of the next selection. 2. To repeat playback from the beginning of the current selection (REVIEW) : Press the play (1) button @9 simultaneously with the rewind (6) button @9. Press the play (0) button @9 simultaneously with the fast forward (7) button @9. The deck will rewind the tape to the beginning of the current selection and automatically resume play from that point. This is very convenient for repeating playback of the current selection. Notes on Music Search Operation : The search functions operates by detecting comparatively long, blank sections approximately 4 to 5 seconds long, in between recorded selections. Therefore, the system may not operate normally in the following cases : • Recordings with discontinuous speech or conversation. • Recordings with long periods of pianissimo (softly played music). • Blank sections with a high level of noise. • Blank sections shorter than 4 seconds. • If noise-emitting appliances, such as electric razors, drills, refrigerators, etc., are operated nearby. • REVIEW close to the beginning of the program or CUE close to the ending. 11 RECORDING • Switch on the source component (tuner, amplifier, etc.). • Set the TAPE MONITOR switch on your amplifier or receiver to the SOURCE position. NOTE : • It is not possible to use both the BALANCED INPUT and UNBALANCED INPUT jacks at the same time. Use the input selected with the INPUT SELECT switch. 1. POWER • Push the switch q to turn "ON" (¢) the power. NOTE : • The display lights when the deck mechanism is being initialized. The deck will not operated during initialization. 2. EJECT • Press the eject (5) button @7 to open the cassette compartment. 3. Cassette compartment cover @8 • Make sure the erasure prevention tab has not been removed from the cassette shell half. 4. DOLBY NR switch @2 • Select the Dolby NR type that suits the recording. 5. REV. MODE switch @0 : To record on only one side : To continuously record on both sides 6. INPUT switch @1 • Select the recording source. 7. Rec/Rec mute (4) button @9 • When pressed, the tape deck goes into the record standby mode. The "4, 3" will light. Initial setting of recording levels should be made in the record standby mode. 8. INPUT LEVEL control @6 • Used to set the recording level. 9. Play (0 or 1) button @9 • Recording starts when the play (0 or 1) button @9 for the direction indicated by the lighting tape travel indicator (0 or 1) is pressed. If the other play (0 or 1) button @9 is pressed, the direction of tape travel changes. The play (0 or 1) and the "4" indicator will light during recording. ✽ When recording is finished, press the stop (2) button @9. CAUTION : In the recording mode, the variable speed mode cannot be selected, and the mode is automatically switched to the fixed speed mode. Be careful not to erase important recordings by mistake. Mis-erasing can be avoided by following the two steps below : 1. If the play (0 or 1) while the "4" will light, the tape will be recorded. 2. If the play (0 or 1) and rec/rec mute (4) button are pressed at the same time, the tape will be recorded. 3. Performing the record pause or the stop operation during recording will create a discontinuous portion in the recording signal. The previously recorded signal may remain after erasure at this connecting portion. Also, a very small amount of the end portion of the previous song may be erased. CAUTION : • Do not turn off the power while the deck is operating or being initialized. Doing so could cause damage. CAUTION : • This set has a quick reverse function. When recording on an already recorded tape, some of the old recording at the beginning of the reverse side of the tape is not erased, so erase it before starting to record. 14
-
 1
1 -
2
-
3
-
4
-
5
-
6
-
7
-
8
-
 9
9 -
 10
10 -
 11
11 -
 12
12 -
 13
13 -
 14
14 -
 15
15 -
 16
16 -
 17
17 -
 18
18 -
 19
19 -
20
-
21
-
22
-
23
-
24
-
25
-
26
-
27
-
28
-
29
-
30
-
31
-
32
-
33
-
34
-
35
-
36
-
37
-
38
 |
 |