Denon DN-T625 Operating Instructions - Page 16
EXPANDED FUNCTION, Cascade playback, Cascade recording, External synchronized recording - cd player
 |
UPC - 081757505208
View all Denon DN-T625 manuals
Add to My Manuals
Save this manual to your list of manuals |
Page 16 highlights
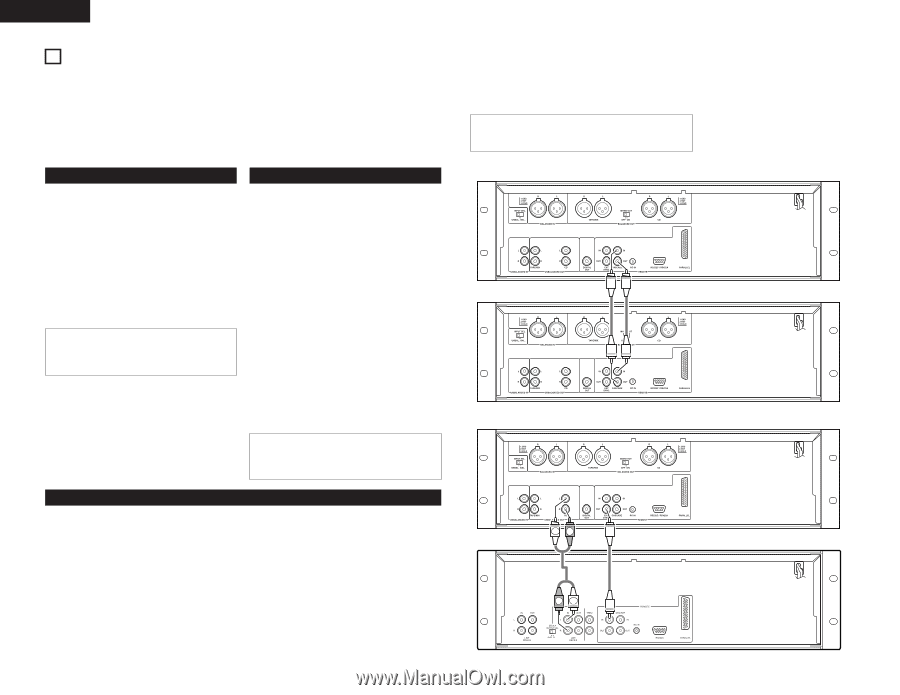
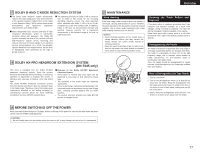
ENGLISH 16 EXPANDED FUNCTION Multiple units of the DN-T645/625 or other DENON products (DN-780R etc.) can be used together for longer play and recording time, simultaneous recording and other functions. 2 CASCADE (MULTIPULE CONTINUOUS) OPERATION • Refer to figure 1 to connect the equipment. • Use a single RCA cable to connect the units' CASCADE OUT jacks with the units' CASCADE IN jacks. • When the first and last units are connected as shown in figure 1, recording and playback are performed endlessly. Note that in the recording mode, previous recordings are overwritten. • If the first and last units are not connected, operation stops at the last unit. Cascade playback 1. Load the discs and the tapes you want to play in all the units. Make sure the Dolby NR and play mode are properly set. 2. Use the RELAY MODE switch !3 to set the relay mode of all units to "CASCADE". 3. Press the play/pause (1 3) button t on unit 1. Playback starts. • Playback on CD ends, Deck starts playing. • Playback on Deck ends, playback starts on unit 2's CD. 4. Playback stops when the stop button on the unit currently playing is pressed. NOTE : • The front and rear sides of the tape are played continuously, regardless of the position of the REV. MODE switch. Cascade recording 1. Load cassette tapes on which nothing is recording into decks of all the units and set the Dolby NR modes. Adjust the recording level for Decks. 2. Use the RELAY MODE switch !3 to set the relay mode of all units to "CASCADE". 3. Press the rec/rec mute (4) button @9 on Deck of all the units. ✽ Check that all Decks are set to the recording pause mode. ✽ Also set the direction of tape travel at this time. 4. Press the Deck play (0 or 1) button @9 on unit 1. Recording starts. • Once recording on Deck ends, recording starts on Deck of the next unit. • Deck is set to the recording pause mode on unit on which recording has ended. ✽ Cascade recording stops if Deck of any of the units is set to anything other than the recording pause mode. 5. Recording stops when the stop (2) button @9 on the deck currently recording is pressed. After doing this, press the stop (2) buttons @9 on all the decks. NOTE : • The front and rear sides of the tape are recorded continuously, regardless of the position of the REV. MODE switch. 3. Adjust the twin recording level of DN-780Rs. (Master/Slave switch set to OFF.) 4. Press the CD SYNC. button #5 of DN-T645/625 to display "Normal Copy". And press the select knob !2 to set the CD SYNC. mode. And press the Twin recording button of DN-780R. 5. Press the play/pause (1 3) button t of DN-T645/625. Recording starts all decks. 6. Press the stop (2) button on one of the units. The all unit is also set to the stop mode. NOTES : • Use tapes of the same times (lengths) as far as possible. • Note that the auto reverse timing is not synchronized. Figure 1 unit 1 DN-T645 unit 2 DN-T645 Figure 2 DN-T645 External synchronized recording The synchronized recording can be use when the DN-T645/625 is used in combination with DENON other product (DN-780R etc.). When the CD player's play/pause button and the deck's play button are pressed, a synchronized signal for starting is output from the EXT. SYNC. jack. When the stop buttons on the CD player and the deck are pressed a synchronized signal for stopping is output. • Refer to figure 2 to connect the equipment. • Use a single RCA cable to connect the units' EXT. SYNC. OUT jacks with the units' EXT. SYNC. IN jacks. ✽ Set the infrared remote sensors of all the units to "OFF" when using this function. Also set the same infrared remote control codes for all the units. (Refer to "PRESET FUNCTIONS AND OPERATIONS" (See page 18).) Failure to make these settings could result in malfunction. 1. Load the CD into DN-T645/625. Load unrecorded cassette tapes into all decks. 2. Set the reverse mode and Dolby NR of all decks. 16 LR RL DN-780R
-
 1
1 -
2
-
3
-
4
-
5
-
6
-
7
-
8
-
9
-
10
-
 11
11 -
 12
12 -
 13
13 -
 14
14 -
 15
15 -
 16
16 -
 17
17 -
 18
18 -
 19
19 -
 20
20 -
 21
21 -
22
-
23
-
24
-
25
-
26
-
27
-
28
-
29
-
30
-
31
-
32
-
33
-
34
-
35
-
36
-
37
-
38
 |
 |