Epson 2080 User Manual - Page 51
Using the Front Push Tractor (optional), Installing the tractor in the front push position
 |
View all Epson 2080 manuals
Add to My Manuals
Save this manual to your list of manuals |
Page 51 highlights
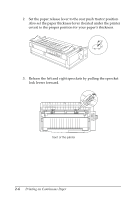
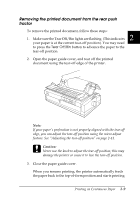
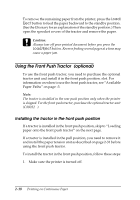
To remove the remaining paper from the printer, press the Load/ Eject button to feed the paper backward to the standby position. (See the Glossary for an explanation of the standby position.) Then open the sprocket covers of the tractor and remove the paper. c Caution: Always tear off your printed document before you press the Load/Eject button. Reverse feeding several pages at a time may cause a paper jam. Using the Front Push Tractor (optional) To use the front push tractor, you need to purchase the optional tractor unit and install it in the front push position. slot. For information on when to use the front push tractor, see "Available Paper Paths" on page -3. Note: The tractor is installed in the rear push position only when the printer is shipped. For the front push tractor, purchase the optional tractor unit (C80032T). Installing the tractor in the front push position If a tractor is installed in the front push position, skip to "Loading paper onto the front push tractor" on the next page. If a tractor is installed in the pull position, you need to remove it and install the paper tension unit as described on page 2-31 before using the front push tractor. To install the tractor in the front push position, follow these steps: 1. Make sure the printer is turned off. 2-10 Printing on Continuous Paper
-
 1
1 -
2
-
3
-
4
-
5
-
6
-
7
-
8
-
9
-
10
-
11
-
12
-
13
-
14
-
15
-
16
-
17
-
18
-
19
-
20
-
21
-
22
-
23
-
24
-
25
-
26
-
27
-
28
-
29
-
30
-
31
-
32
-
33
-
34
-
35
-
36
-
37
-
38
-
39
-
40
-
41
-
42
-
43
-
44
-
45
-
 46
46 -
 47
47 -
 48
48 -
 49
49 -
 50
50 -
 51
51 -
 52
52 -
 53
53 -
 54
54 -
 55
55 -
 56
56 -
57
-
58
-
59
-
60
-
61
-
62
-
63
-
64
-
65
-
66
-
67
-
68
-
69
-
70
-
71
-
72
-
73
-
74
-
75
-
76
-
77
-
78
-
79
-
80
-
81
-
82
-
83
-
84
-
85
-
86
-
87
-
88
-
89
-
90
-
91
-
92
-
93
-
94
-
95
-
96
-
97
-
98
-
99
-
100
-
101
-
102
-
103
-
104
-
105
-
106
-
107
-
108
-
109
-
110
-
111
-
112
-
113
-
114
-
115
-
116
-
117
-
118
-
119
-
120
-
121
-
122
-
123
-
124
-
125
-
126
-
127
-
128
-
129
-
130
-
131
-
132
-
133
-
134
-
135
-
136
-
137
-
138
-
139
-
140
-
141
-
142
-
143
-
144
-
145
-
146
-
147
-
148
-
149
-
150
-
151
-
152
-
153
-
154
-
155
-
156
-
157
-
158
-
159
-
160
-
161
-
162
-
163
-
164
-
165
-
166
-
167
-
168
-
169
-
170
-
171
-
172
-
173
-
174
-
175
-
176
-
177
-
178
-
179
-
180
-
181
-
182
-
183
-
184
-
185
-
186
-
187
-
188
-
189
-
190
-
191
-
192
-
193
-
194
-
195
-
196
-
197
-
198
-
199
-
200
-
201
-
202
-
203
-
204
-
205
-
206
-
207
-
208
-
209
-
210
-
211
-
212
-
213
-
214
-
215
-
216
-
217
-
218
-
219
-
220
-
221
-
222
-
223
-
224
-
225
-
226
-
227
-
228
 |
 |
