Epson 2080 User Manual - Page 59
Using the Tractor in the Pull Position (optional), and heavy continuous paper
 |
View all Epson 2080 manuals
Add to My Manuals
Save this manual to your list of manuals |
Page 59 highlights
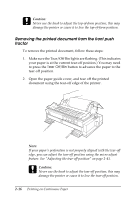
4. Press the tractor's lock tabs, tilt the tractor up, and lift it out of the printer. 5. Replace the front paper guide by sliding it along the printer's mounting slots until it locks in place. Then close the front paper guide. Using the Tractor in the Pull Position (optional) Using the tractor in the pull position is ideal for printing on thick and heavy continuous paper, such as multipart forms or continuous paper with labels. However, you cannot use the tearoff feature with the pull tractor. 2-18 Printing on Continuous Paper
-
 1
1 -
2
-
3
-
4
-
5
-
6
-
7
-
8
-
9
-
10
-
11
-
12
-
13
-
14
-
15
-
16
-
17
-
18
-
19
-
20
-
21
-
22
-
23
-
24
-
25
-
26
-
27
-
28
-
29
-
30
-
31
-
32
-
33
-
34
-
35
-
36
-
37
-
38
-
39
-
40
-
41
-
42
-
43
-
44
-
45
-
46
-
47
-
48
-
49
-
50
-
51
-
52
-
53
-
 54
54 -
 55
55 -
 56
56 -
 57
57 -
 58
58 -
 59
59 -
 60
60 -
 61
61 -
 62
62 -
 63
63 -
 64
64 -
65
-
66
-
67
-
68
-
69
-
70
-
71
-
72
-
73
-
74
-
75
-
76
-
77
-
78
-
79
-
80
-
81
-
82
-
83
-
84
-
85
-
86
-
87
-
88
-
89
-
90
-
91
-
92
-
93
-
94
-
95
-
96
-
97
-
98
-
99
-
100
-
101
-
102
-
103
-
104
-
105
-
106
-
107
-
108
-
109
-
110
-
111
-
112
-
113
-
114
-
115
-
116
-
117
-
118
-
119
-
120
-
121
-
122
-
123
-
124
-
125
-
126
-
127
-
128
-
129
-
130
-
131
-
132
-
133
-
134
-
135
-
136
-
137
-
138
-
139
-
140
-
141
-
142
-
143
-
144
-
145
-
146
-
147
-
148
-
149
-
150
-
151
-
152
-
153
-
154
-
155
-
156
-
157
-
158
-
159
-
160
-
161
-
162
-
163
-
164
-
165
-
166
-
167
-
168
-
169
-
170
-
171
-
172
-
173
-
174
-
175
-
176
-
177
-
178
-
179
-
180
-
181
-
182
-
183
-
184
-
185
-
186
-
187
-
188
-
189
-
190
-
191
-
192
-
193
-
194
-
195
-
196
-
197
-
198
-
199
-
200
-
201
-
202
-
203
-
204
-
205
-
206
-
207
-
208
-
209
-
210
-
211
-
212
-
213
-
214
-
215
-
216
-
217
-
218
-
219
-
220
-
221
-
222
-
223
-
224
-
225
-
226
-
227
-
228
 |
 |

2-18
Printing on Continuous Paper
4.
Press the tractor’s lock tabs, tilt the tractor up, and lift it out
of the printer.
5.
Replace the front paper guide by sliding it along the printer’s
mounting slots until it locks in place. Then close the front
paper guide.
Using the Tractor in the Pull Position
(optional)
Using the tractor in the pull position is ideal for printing on thick
and heavy continuous paper, such as multipart forms or
continuous paper with labels. However, you cannot use the tear-
off feature with the pull tractor.