Epson DS-30000 Users Guide - Page 87
Double Feed Stop Timing, Power Separation Mode
 |
View all Epson DS-30000 manuals
Add to My Manuals
Save this manual to your list of manuals |
Page 87 highlights
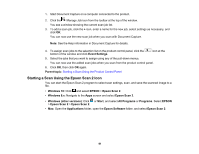
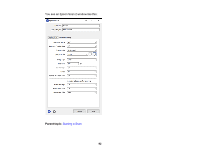
7. Select from the following options: • To change the saved file type, select File Type and select a file type. • To change the color type of the scanned image, select Image Type and select an option. • To change the resolution, select Resolution and select an option from either Low (200 dpi), Medium (300 dpi), or High (600 dpi). • To change the size of the scanned original, select Original Size and select an option. • To scan both sides of the original, select Source and select 2-Sided. • To change the number of copies to print when a printer is selected as the destination, select Copies and enter a number. 8. If you want to change the scanner settings for the current job, select Scanner Settings on the control panel. Note: If an administrator has locked the settings, you may need to enter the administrator password to change certain scanner settings. 9. Select from the following options: • To increase the force used to separate originals in Delicate Mode, enable Power Separation Mode (DS-32000). Caution: Do not use Power Separation Mode with thin originals, or you may damage them. • To slow down the scanning speed, set the Slow setting to On. • To stop scanning immediately when a double feed is detected, set the Double Feed Stop Timing setting to Immediate. When set to After Eject, the double feed is scanned and ejected before scanning ends. • To skip double feed detection when scanning originals such as envelopes or plastic cards, set the DFDS Function setting to On. • To stop scanning immediately when a skewed original or feeding error is detected, enable the Paper Protection setting. When set to higher levels, the setting reduces the amount of skew required to trigger a stop. Select higher settings when scanning thin papers. • To detect dirt on the scanner glass, enable the Detect Glass Dirt setting. • To use the ultrasonic sensor to detect double feed errors, enable the Ultrasonic Double Feed Detection setting. This setting may not work with envelopes, plastic cards, or originals with labels or stickers. 87
-
 1
1 -
2
-
3
-
4
-
5
-
6
-
7
-
8
-
9
-
10
-
11
-
12
-
13
-
14
-
15
-
16
-
17
-
18
-
19
-
20
-
21
-
22
-
23
-
24
-
25
-
26
-
27
-
28
-
29
-
30
-
31
-
32
-
33
-
34
-
35
-
36
-
37
-
38
-
39
-
40
-
41
-
42
-
43
-
44
-
45
-
46
-
47
-
48
-
49
-
50
-
51
-
52
-
53
-
54
-
55
-
56
-
57
-
58
-
59
-
60
-
61
-
62
-
63
-
64
-
65
-
66
-
67
-
68
-
69
-
70
-
71
-
72
-
73
-
74
-
75
-
76
-
77
-
78
-
79
-
80
-
81
-
 82
82 -
 83
83 -
 84
84 -
 85
85 -
 86
86 -
 87
87 -
 88
88 -
 89
89 -
 90
90 -
 91
91 -
 92
92 -
93
-
94
-
95
-
96
-
97
-
98
-
99
-
100
-
101
-
102
-
103
-
104
-
105
-
106
-
107
-
108
-
109
-
110
-
111
-
112
-
113
-
114
-
115
-
116
-
117
-
118
-
119
-
120
-
121
-
122
-
123
-
124
-
125
-
126
-
127
-
128
-
129
-
130
-
131
-
132
-
133
-
134
-
135
-
136
-
137
-
138
-
139
-
140
-
141
-
142
-
143
-
144
-
145
-
146
-
147
-
148
-
149
-
150
-
151
-
152
-
153
-
154
-
155
-
156
-
157
-
158
-
159
-
160
-
161
-
162
-
163
-
164
-
165
-
166
-
167
-
168
-
169
 |
 |
