Epson LQ-1500 User Manual - Page 28
Interface connection to computer, while the, is ON. You, reinitialize
 |
View all Epson LQ-1500 manuals
Add to My Manuals
Save this manual to your list of manuals |
Page 28 highlights
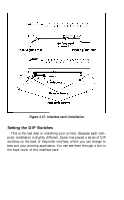
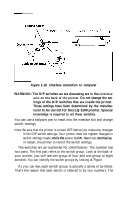
Figure 1-18. Interface connection to computer WARNING: The DIP switches we are discussing are in the interface unit on the back of the printer. Do not change the settings of the DIP switches that are inside the printer. These settings have been determined by the manufacturer to be correct for this LQ-1500 printer. Special knowledge is required to set these switches. You can use a ballpoint pen to reach into the interface slot and change switch settings. Note: Be sure that the printer is turned OFF before you make any changes in the DIP switch settings. Your printer does not register changes in switch settings made while the power is ON. You must reinitialize, or restart, the printer to record the switch settings. The switches are all numbered for identification. The number has two parts. The first part refers to the switch group. Look at the back of your printer; you will see one group of four and one group of eight switches. You can identify the switch groups by looking at Figure 1-19. As you can see, each switch group is actually a series of switches. That's the reason that each switch is referred to by two numbers. The 20
-
 1
1 -
2
-
3
-
4
-
5
-
6
-
7
-
8
-
9
-
10
-
11
-
12
-
13
-
14
-
15
-
16
-
17
-
18
-
19
-
20
-
21
-
22
-
 23
23 -
 24
24 -
 25
25 -
 26
26 -
 27
27 -
 28
28 -
 29
29 -
 30
30 -
 31
31 -
 32
32 -
 33
33 -
34
-
35
-
36
-
37
-
38
-
39
-
40
-
41
-
42
-
43
-
44
-
45
-
46
-
47
-
48
-
49
-
50
-
51
-
52
-
53
-
54
-
55
-
56
-
57
-
58
-
59
-
60
-
61
-
62
-
63
-
64
-
65
-
66
-
67
-
68
-
69
-
70
-
71
-
72
-
73
-
74
-
75
-
76
-
77
-
78
-
79
-
80
-
81
-
82
-
83
-
84
-
85
-
86
-
87
-
88
-
89
-
90
-
91
-
92
-
93
-
94
-
95
-
96
-
97
-
98
-
99
-
100
-
101
-
102
-
103
-
104
-
105
-
106
-
107
-
108
-
109
-
110
-
111
 |
 |
