Epson LQ-1500 User Manual - Page 32
Installing the Power Cord, Switch, grounded
 |
View all Epson LQ-1500 manuals
Add to My Manuals
Save this manual to your list of manuals |
Page 32 highlights
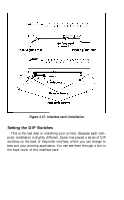
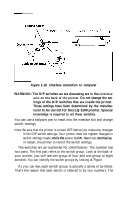
have commands for setting top and bottom margins and they work best if the skip-over-perforation feature is turned off. Switch 2-6--There are occasions when the printer bell (which is actually a buzzer) can be used to signal the operator. For example, you may want to switch paper in the middle of a long document. You can use the bell to signal when it is time to make the change, To make use of this feature, leave switch 2-6 down in the down position. For a rough draft, it may not be necessary to switch paper, so by turning switch 2-6 up, you won't be bothered by unnecessary noise. Generally, switch 2-6 is left in the down position. Switch 2-7--This switch also selects a feature that you may want to use one way for rough drafts and another way for the final printout. You can select either letter quality printing or draft printing. The LQ-1500 prints much faster in draft mode, but the quality isn't as good. You can also change between draft and letter quality printing by using commands sent from your computer. Switch 2-8--This switch is used to control the select signal. Most computers require that the select signal be fixed (switch is in the up position). If your computer requires that the select signal not be fixed, then set the switch in the down position. If you have a parallel interface card, your installation is now complete! Go on to Chapter 2, where you'll learn how to operate the LQ-1500. If, on the other hand, you have a serial or IEEE 488 interface card, you have a few more switches to set in order to ensure that your computer and LQ-1500 are communicating properly. Consult your interface user manual for instructions on the proper setting of these switches. Installing the Power Cord If you have been following along so far you should have one piece left: the power cord. Plug one end into the LQ-1500--the connection is on the rear of the printer near the right side (as you face the rear). Plug the other end into a standard (120 VAC, 60 Hz) grounded electrical outlet (do not use an adapter plug). 24
-
 1
1 -
2
-
3
-
4
-
5
-
6
-
7
-
8
-
9
-
10
-
11
-
12
-
13
-
14
-
15
-
16
-
17
-
18
-
19
-
20
-
21
-
22
-
23
-
24
-
25
-
26
-
 27
27 -
 28
28 -
 29
29 -
 30
30 -
 31
31 -
 32
32 -
 33
33 -
 34
34 -
 35
35 -
 36
36 -
 37
37 -
38
-
39
-
40
-
41
-
42
-
43
-
44
-
45
-
46
-
47
-
48
-
49
-
50
-
51
-
52
-
53
-
54
-
55
-
56
-
57
-
58
-
59
-
60
-
61
-
62
-
63
-
64
-
65
-
66
-
67
-
68
-
69
-
70
-
71
-
72
-
73
-
74
-
75
-
76
-
77
-
78
-
79
-
80
-
81
-
82
-
83
-
84
-
85
-
86
-
87
-
88
-
89
-
90
-
91
-
92
-
93
-
94
-
95
-
96
-
97
-
98
-
99
-
100
-
101
-
102
-
103
-
104
-
105
-
106
-
107
-
108
-
109
-
110
-
111
 |
 |