Epson LQ-1500 User Manual - Page 46
Paper inserted,
 |
View all Epson LQ-1500 manuals
Add to My Manuals
Save this manual to your list of manuals |
Page 46 highlights
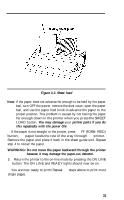
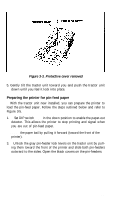
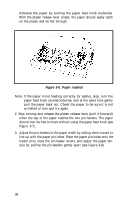
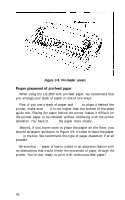
Advance the paper by turning the paper feed knob clockwise. With the platen release lever closed, the paper should easily catch on the platen and be fed through. Figure 3-6. Paper inserted Note: If the paper is not feeding correctly (or easily), stop, turn the paper feed knob counterclockwise, and at the same time gently pull the paper back out. Check the paper to be sure it is not wrinkled or torn and try again. 2. Stop turning and release the platen release lever (pull it forward) when the top of the paper reaches the two pin-feeders. The paper should now be free to move without using the paper feed knob (see Figure 3-7). 3. Adjust the pin-feeders to the paper width by sliding them inward to line up with the paper pin-holes. Place the paper pin-holes onto the tractor pins, close the pin-feeder covers, and adjust the paper tension by pulling the pin-feeders gently apart (see Figure 3-8). 38
-
 1
1 -
2
-
3
-
4
-
5
-
6
-
7
-
8
-
9
-
10
-
11
-
12
-
13
-
14
-
15
-
16
-
17
-
18
-
19
-
20
-
21
-
22
-
23
-
24
-
25
-
26
-
27
-
28
-
29
-
30
-
31
-
32
-
33
-
34
-
35
-
36
-
37
-
38
-
39
-
40
-
 41
41 -
 42
42 -
 43
43 -
 44
44 -
 45
45 -
 46
46 -
 47
47 -
 48
48 -
 49
49 -
 50
50 -
 51
51 -
52
-
53
-
54
-
55
-
56
-
57
-
58
-
59
-
60
-
61
-
62
-
63
-
64
-
65
-
66
-
67
-
68
-
69
-
70
-
71
-
72
-
73
-
74
-
75
-
76
-
77
-
78
-
79
-
80
-
81
-
82
-
83
-
84
-
85
-
86
-
87
-
88
-
89
-
90
-
91
-
92
-
93
-
94
-
95
-
96
-
97
-
98
-
99
-
100
-
101
-
102
-
103
-
104
-
105
-
106
-
107
-
108
-
109
-
110
-
111
 |
 |
