Epson LQ-1500 User Manual - Page 42
Removing Single-sheet Paper, Loading Pin-feed Paper, Installing the Tractor Unit
 |
View all Epson LQ-1500 manuals
Add to My Manuals
Save this manual to your list of manuals |
Page 42 highlights
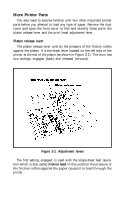
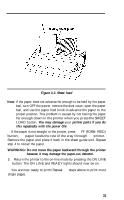
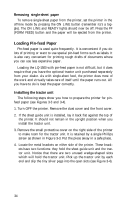
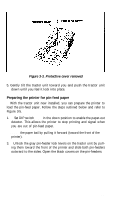
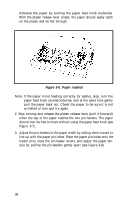
Removing single-sheet paper To remove single-sheet paper from the printer, set the printer in the off-line mode by pressing the ON LINE button (remember its's a toggle). The ON LINE and READY lights should now be off. Press the FF (FORM FEED) button and the paper will be ejected from the printer. Loading Pin-feed Paper Pin-feed paper is used quite frequently. It is convenient if you do lots of printing or want to use special pin-feed forms such as labels. It is also very convenient for printing rough drafts of documents where you can use less expensive paper. Loading the LQ-1500 with pin-feed paper is not difficult, but it does require that you have the optional tractor unit purchased separately from your dealer. As with single-sheet feed, the printer does most of the work and virtually takes care of itself until the paper runs out. All you have to do is load the paper correctly. Installing the tractor unit The following steps show you how to prepare the printer for pinfeed paper (see Figures 3-3 and 3-4). 1. Turn OFF the printer. Remove the dust cover and the front cover. 2. If the sheet guide unit is installed, lay it back flat against the top of the printer. It should not remain in the upright position when you install the tractor unit. 3. Remove the small protective cover on the right side of the printer to make room for the tractor unit. It is retained by a single Phillips screw as shown in Figure 3-3. Put the piece away in a safe place. 4. Locate the metal brackets on either side of the printer. These brackets have two functions: they hold the sheet guide unit and the tractor unit. Notice that there are two unused wedge-shaped slots which will hold the tractor unit. Pick up the tractor unit by each end and slip the tiny silver pegs into the open slots (see Figure 3-4). 34
-
 1
1 -
2
-
3
-
4
-
5
-
6
-
7
-
8
-
9
-
10
-
11
-
12
-
13
-
14
-
15
-
16
-
17
-
18
-
19
-
20
-
21
-
22
-
23
-
24
-
25
-
26
-
27
-
28
-
29
-
30
-
31
-
32
-
33
-
34
-
35
-
36
-
 37
37 -
 38
38 -
 39
39 -
 40
40 -
 41
41 -
 42
42 -
 43
43 -
 44
44 -
 45
45 -
 46
46 -
 47
47 -
48
-
49
-
50
-
51
-
52
-
53
-
54
-
55
-
56
-
57
-
58
-
59
-
60
-
61
-
62
-
63
-
64
-
65
-
66
-
67
-
68
-
69
-
70
-
71
-
72
-
73
-
74
-
75
-
76
-
77
-
78
-
79
-
80
-
81
-
82
-
83
-
84
-
85
-
86
-
87
-
88
-
89
-
90
-
91
-
92
-
93
-
94
-
95
-
96
-
97
-
98
-
99
-
100
-
101
-
102
-
103
-
104
-
105
-
106
-
107
-
108
-
109
-
110
-
111
 |
 |