Epson PowerLite Pro Z8455WUNL Operation Guide - EasyMP Network Projection - Page 16
Disable interrupt connection, Use multi-display
 |
View all Epson PowerLite Pro Z8455WUNL manuals
Add to My Manuals
Save this manual to your list of manuals |
Page 16 highlights
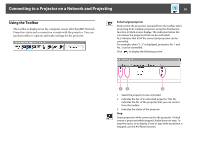
Connecting to a Projector on a Network and Projecting 16 3 Status The following six icons indicate the status of the detected projectors. Standby Select for connecting. Busy Select for connecting. When you click Connect, the computer currently connected is disconnected and your computer is connected. Busy (Disable Cannot be selected. Disable interrupt interrupt connection is set on connection) another computer which is already connected. Currently in use by another application The projector's Configuration Menu is open. You can select it after closing the Configuration menu and running the search again. Searching Displayed while running Manual search or Profile. Not found. Displayed when a projector cannot be found as a result of Manual search or Profile. In Quick Connection Mode, you can only select multiple projectors with the same SSID. 4 Projector name The projector's name is displayed. 5 Disable interrupt connection Check the box to prevent an interrupt connection by other computers while connected to the selected projector. 6 Use multi-display Check the box to use the Multi-screen display function. When this is selected, Display layout and Display properties are displayed at the bottom of the screen.s p.24 7 Troubleshooting If there is a problem and you cannot make a connection, press this button to open the EasyMP Network Projection Troubleshooting screen. 8 Connect Connect to the projector you selected from the search results list. When a connection is made with a projector, a toolbar is displayed. 9 Set options You can set general setting options such as the processing method when starting EasyMP Network Projection. For details, see Set options s p.38 10 Save in the profile Saves the results of a network projector search as a Profile.s p.33 11 Clear list Deletes all search results. 12 IP address (Advanced Connection Mode only) The projector's IP address is displayed. 13 Display (Select the number displayed (when Use multi-display is selected). s p.30 14 Profile You can search for a projector on the network using a Profile saved using Save in the profile. s p.33 15 SSID (Quick Connection Mode only) The projector's SSID is displayed. 16 Signal intensity This is displayed when the connection is made in Quick Connection Mode. As the Signal intensity increases, so does the number of lit indicators.
-
 1
1 -
2
-
3
-
4
-
5
-
6
-
7
-
8
-
9
-
10
-
 11
11 -
 12
12 -
 13
13 -
 14
14 -
 15
15 -
 16
16 -
 17
17 -
 18
18 -
 19
19 -
 20
20 -
 21
21 -
22
-
23
-
24
-
25
-
26
-
27
-
28
-
29
-
30
-
31
-
32
-
33
-
34
-
35
-
36
-
37
-
38
-
39
-
40
-
41
-
42
-
43
-
44
-
45
-
46
-
47
-
48
-
49
-
50
-
51
-
52
-
53
 |
 |
