Epson PowerLite Pro Z8455WUNL Operation Guide - EasyMP Network Projection - Page 18
Using the Toolbar, Projection starts and a connection is made with the projector. You can
 |
View all Epson PowerLite Pro Z8455WUNL manuals
Add to My Manuals
Save this manual to your list of manuals |
Page 18 highlights
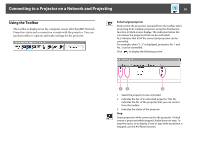
Connecting to a Projector on a Network and Projecting 18 Using the Toolbar The toolbar is displayed on the computer screen after EasyMP Network Projection starts and a connection is made with the projector. You can use this toolbar to operate and make settings for the projector. Select target projector Click to limit the projectors operated from the toolbar when projecting from multiple projectors using the distribution function or Multi-screen display. The indication below the icon shows the projectors that can be controlled. ALL indicates that all of the connected projectors can be controlled. For example, when "1, 3" is displayed, projectors No. 1 and No. 3 can be controlled. Click to display the following screen. 1 Select the projector to be controlled. 2 Indicates the No. of an allocated projector. This No. indicates the No. of the projector that you can control from the toolbar. 3 Indicates the status of the projector. Stop Stops projection while connected to the projector. A black screen is projected while stopped. Audio does not stop. To stop the audio, or to display a User's Logo while projection is stopped, use the A/V Mute function.
-
 1
1 -
2
-
3
-
4
-
5
-
6
-
7
-
8
-
9
-
10
-
11
-
12
-
 13
13 -
 14
14 -
 15
15 -
 16
16 -
 17
17 -
 18
18 -
 19
19 -
 20
20 -
 21
21 -
 22
22 -
 23
23 -
24
-
25
-
26
-
27
-
28
-
29
-
30
-
31
-
32
-
33
-
34
-
35
-
36
-
37
-
38
-
39
-
40
-
41
-
42
-
43
-
44
-
45
-
46
-
47
-
48
-
49
-
50
-
51
-
52
-
53
 |
 |
