Foxconn A7GM-S English Manual. - Page 87
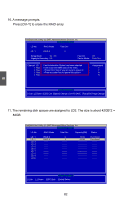
As we want to introduce how to create two logical drives by using the same two hard
 |
View all Foxconn A7GM-S manuals
Add to My Manuals
Save this manual to your list of manuals |
Page 87 highlights
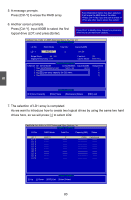
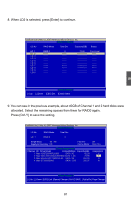
5 5. A message prompts. Press [Ctrl-Y] to erase the RAID array. 6. Another screen prompts. Press [Ctrl-Y]. Input 80GB to select the first logical drive (LD1) and press [Enter]. Fast Initialization Option has been selected It will erase the MBR data of the disks, Press Ctrl-Y to Modify Array Capacity or press any other key to use maximum capacity... FastBuild (tm) Utility (c) 2007 Advanced Micro Devices, Inc. [ Define LD Menu ] LD No RAID Mode Total Drv Capacity(GB) LD 1 RARIDAI0D 0 2 164.56 Stripe Block: 64 KB Gigabyte Boundary: OFF Fast Init: ON Cache Mode: WriteThru [ Drives Assignment ] Channel :ID Drive Model Compatibilities Capacity(GB) Assignment 1 :Mas HDS728090PLA380 SATA 3G 82.34 Y 2 :Mas WDC WD1200JD-98HBB0 SATA 1.5G 3 :Mas HiEtanctheir HarDraTy72c5a0p2a5ciVtyLA(in3 GBS)AhTeAre3:G 120.03 Y 250.05 N 4 :Mas ST3320620AS SATA 1.5G 320.07 N [0-9] Input Capacity [ Keys Available ] [Enter] Save [Backspace] Delete [ESC] exit 7. The selection of LD1 array is completed. As we want to introduce how to create two logical drives by using the same two hard drives here, so we will press [↓] to select LD2. FastBuild (tm) Utility (c) 2007 Advanced Micro Devices, Inc. [ Define LD Menu ] LD No RAID Mode Total Drv Capacity(GB) Status LD 1 LD 2 LD 3 LD 4 LD 5 LD 6 LD 7 LD 8 LD 9 LD10 RAID 0 2 16739.99 FunFctuionncatiol nal [ Keys Available ] [↑] Up [↓] Down [ESC] Exit [Enter] Select 80
-
 1
1 -
2
-
3
-
4
-
5
-
6
-
7
-
8
-
9
-
10
-
11
-
12
-
13
-
14
-
15
-
16
-
17
-
18
-
19
-
20
-
21
-
22
-
23
-
24
-
25
-
26
-
27
-
28
-
29
-
30
-
31
-
32
-
33
-
34
-
35
-
36
-
37
-
38
-
39
-
40
-
41
-
42
-
43
-
44
-
45
-
46
-
47
-
48
-
49
-
50
-
51
-
52
-
53
-
54
-
55
-
56
-
57
-
58
-
59
-
60
-
61
-
62
-
63
-
64
-
65
-
66
-
67
-
68
-
69
-
70
-
71
-
72
-
73
-
74
-
75
-
76
-
77
-
78
-
79
-
80
-
81
-
 82
82 -
 83
83 -
 84
84 -
 85
85 -
 86
86 -
 87
87 -
 88
88 -
 89
89 -
 90
90 -
 91
91 -
 92
92 -
93
-
94
-
95
-
96
-
97
-
98
-
99
-
100
-
101
-
102
-
103
-
104
-
105
-
106
-
107
 |
 |