Gateway EC14 Service Guide - Page 57
Removing the Hard Disk Drive Module, See Removing the Battery Pack - disk cable
 |
View all Gateway EC14 manuals
Add to My Manuals
Save this manual to your list of manuals |
Page 57 highlights
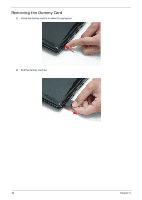
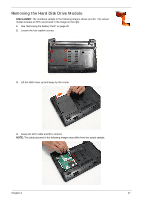
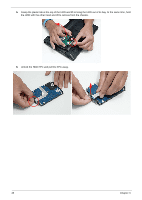
Removing the Hard Disk Drive Module DISCLAIMER: The notebook sample in the following images shows an FFC. The actual model includes an FPC as pictured in the image on the right. 1. See "Removing the Battery Pack" on page 45. 2. Loosen the four captive screws. 3. Lift the HDD cover up and away by the corner. 4. Grasp the FPC cable and lift to remove. NOTE: The cable pictured in the following images may differ from the actual sample. Chapter 3 47
-
 1
1 -
2
-
3
-
4
-
5
-
6
-
7
-
8
-
9
-
10
-
11
-
12
-
13
-
14
-
15
-
16
-
17
-
18
-
19
-
20
-
21
-
22
-
23
-
24
-
25
-
26
-
27
-
28
-
29
-
30
-
31
-
32
-
33
-
34
-
35
-
36
-
37
-
38
-
39
-
40
-
41
-
42
-
43
-
44
-
45
-
46
-
47
-
48
-
49
-
50
-
51
-
 52
52 -
 53
53 -
 54
54 -
 55
55 -
 56
56 -
 57
57 -
 58
58 -
 59
59 -
 60
60 -
 61
61 -
 62
62 -
63
-
64
-
65
-
66
-
67
-
68
-
69
-
70
-
71
-
72
-
73
-
74
-
75
-
76
-
77
-
78
-
79
-
80
-
81
-
82
-
83
-
84
-
85
-
86
-
87
-
88
-
89
-
90
-
91
-
92
-
93
-
94
-
95
-
96
-
97
-
98
-
99
-
100
-
101
-
102
-
103
-
104
-
105
-
106
-
107
-
108
-
109
-
110
-
111
-
112
-
113
-
114
-
115
-
116
-
117
-
118
-
119
-
120
-
121
-
122
-
123
-
124
-
125
-
126
-
127
-
128
-
129
-
130
-
131
-
132
-
133
-
134
-
135
-
136
-
137
-
138
-
139
-
140
-
141
-
142
-
143
-
144
-
145
-
146
-
147
-
148
-
149
-
150
-
151
-
152
-
153
-
154
-
155
-
156
-
157
-
158
-
159
-
160
-
161
-
162
-
163
-
164
-
165
-
166
-
167
-
168
-
169
-
170
-
171
-
172
-
173
-
174
 |
 |

Chapter 3
47
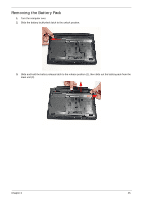
Removing the Hard Disk Drive Module
DISCLAIMER:
The notebook sample in the following images shows an FFC. The actual
model includes an FPC as pictured in the image on the right.
1.
See “Removing the Battery Pack” on page 45.
2.
Loosen the four captive screws.
3.
Lift the HDD cover up and away by the corner.
4.
Grasp the FPC cable and lift to remove.
NOTE:
The cable pictured in the following images may differ from the actual sample.