Gateway EC14 Service Guide - Page 98
Replacing the LCD Panel, LCD Panel Assembly
 |
View all Gateway EC14 manuals
Add to My Manuals
Save this manual to your list of manuals |
Page 98 highlights
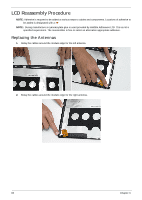
Replacing the LCD Panel 1. Place the LCD panel into LCD module as shown top edge first, making sure the cable is not trapped behind the panel. 2. Replace the four screws while ensuring the cables pass through the hinges correctly. Screw List Step LCD Panel Assembly Screw 2x3 Quantity 4 Screw Type 88 Chapter 3
-
 1
1 -
2
-
3
-
4
-
5
-
6
-
7
-
8
-
9
-
10
-
11
-
12
-
13
-
14
-
15
-
16
-
17
-
18
-
19
-
20
-
21
-
22
-
23
-
24
-
25
-
26
-
27
-
28
-
29
-
30
-
31
-
32
-
33
-
34
-
35
-
36
-
37
-
38
-
39
-
40
-
41
-
42
-
43
-
44
-
45
-
46
-
47
-
48
-
49
-
50
-
51
-
52
-
53
-
54
-
55
-
56
-
57
-
58
-
59
-
60
-
61
-
62
-
63
-
64
-
65
-
66
-
67
-
68
-
69
-
70
-
71
-
72
-
73
-
74
-
75
-
76
-
77
-
78
-
79
-
80
-
81
-
82
-
83
-
84
-
85
-
86
-
87
-
88
-
89
-
90
-
91
-
92
-
 93
93 -
 94
94 -
 95
95 -
 96
96 -
 97
97 -
 98
98 -
 99
99 -
 100
100 -
 101
101 -
 102
102 -
 103
103 -
104
-
105
-
106
-
107
-
108
-
109
-
110
-
111
-
112
-
113
-
114
-
115
-
116
-
117
-
118
-
119
-
120
-
121
-
122
-
123
-
124
-
125
-
126
-
127
-
128
-
129
-
130
-
131
-
132
-
133
-
134
-
135
-
136
-
137
-
138
-
139
-
140
-
141
-
142
-
143
-
144
-
145
-
146
-
147
-
148
-
149
-
150
-
151
-
152
-
153
-
154
-
155
-
156
-
157
-
158
-
159
-
160
-
161
-
162
-
163
-
164
-
165
-
166
-
167
-
168
-
169
-
170
-
171
-
172
-
173
-
174
 |
 |

88
Chapter 3
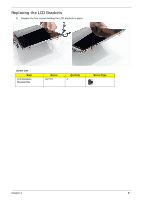
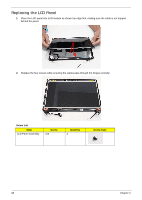
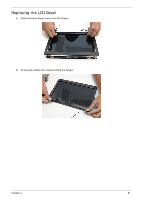
Replacing the LCD Panel
1.
Place the LCD panel into LCD module as shown top edge first, making sure the cable is not trapped
behind the panel.
2.
Replace the four screws while ensuring the cables pass through the hinges correctly.
Screw List
Step
Screw
Quantity
Screw Type
LCD Panel Assembly
2x3
4